A home golf simulator can cost as little as $1,300 for a very basic DIY setup, while fully integrated professional systems can climb to $75,000 to $150,000+. For most homeowners who want a serious, enjoyable setup without stepping into luxury-showroom territory, the strongest value usually lands in the $15,000 to $35,000 range.
If you're reading this in the middle of a long winter and pricing out ways to practice without leaving the house, you're asking the right question. But "how much does a golf simulator cost" isn't really one number. It's a decision about performance, room design, finish quality, and whether the space becomes a one-purpose practice bay or a polished part of your home.
That difference matters. A simulator assembled from decent parts can work well enough for casual use. A professionally designed room can feel like it belonged in the house from day one, with the lighting, networking, audio, control, and visuals all handled properly. Those are very different projects, even if both technically let you hit balls indoors.
A homeowner buys a launch monitor, mat, and net online, then calls when the garage still does not feel usable. The ball data may be fine. The room usually is not.
That gap is what drives real simulator cost. Hardware gets you to first swing. A finished home installation also has to solve ceiling height, hitting depth, screen setback, projector placement, lighting, power, network reliability, cable paths, acoustics, and how the room looks when no one is hitting balls.
Industry pricing reflects that wide range. Basic recreational setups can start very low, while professionally built rooms can run well past six figures, and analysts in the U.S. golf simulator market report also point to the midrange as a common value zone for serious DIY buyers. The mistake is treating that hardware range as the full project budget.
Practical rule: Budget for the experience you want to live with, not just the parts you need to turn the software on.
I tell clients to price the room and the system together. If the goal is a polished space you can use three nights a week without dragging out equipment, rebooting devices, or fighting bad lighting, the total cost changes quickly. Finish carpentry, paint, flooring transitions, ventilation, and control all affect whether the simulator feels permanent or improvised.
The room has to work as part of the house. One tap should bring up the projector, set the lights, route the audio, and start the right source. Broader home technology experience becomes valuable in this context, especially when the same room also needs to handle movies, sports, or gaming. The reason this is important is that multi-use rooms survive budget scrutiny better than single-purpose rooms.
Two projects can share similar launch data and end up with very different total costs. One is a collection of parts. The other is a finished feature that gets used.
A homeowner buys a few simulator components online, clears space in the garage, and expects a quick win. A month later, the mat is creeping across the floor, the projector image is off-center, cords are visible, and the room still does not feel like part of the house. The budget was real. The finished result was not.
That is why simulator pricing needs to be framed by outcome, not just by parts. The same swing data can live in a temporary practice setup or in a finished room that starts cleanly, looks right, and gets used often. Those are different projects with different costs.
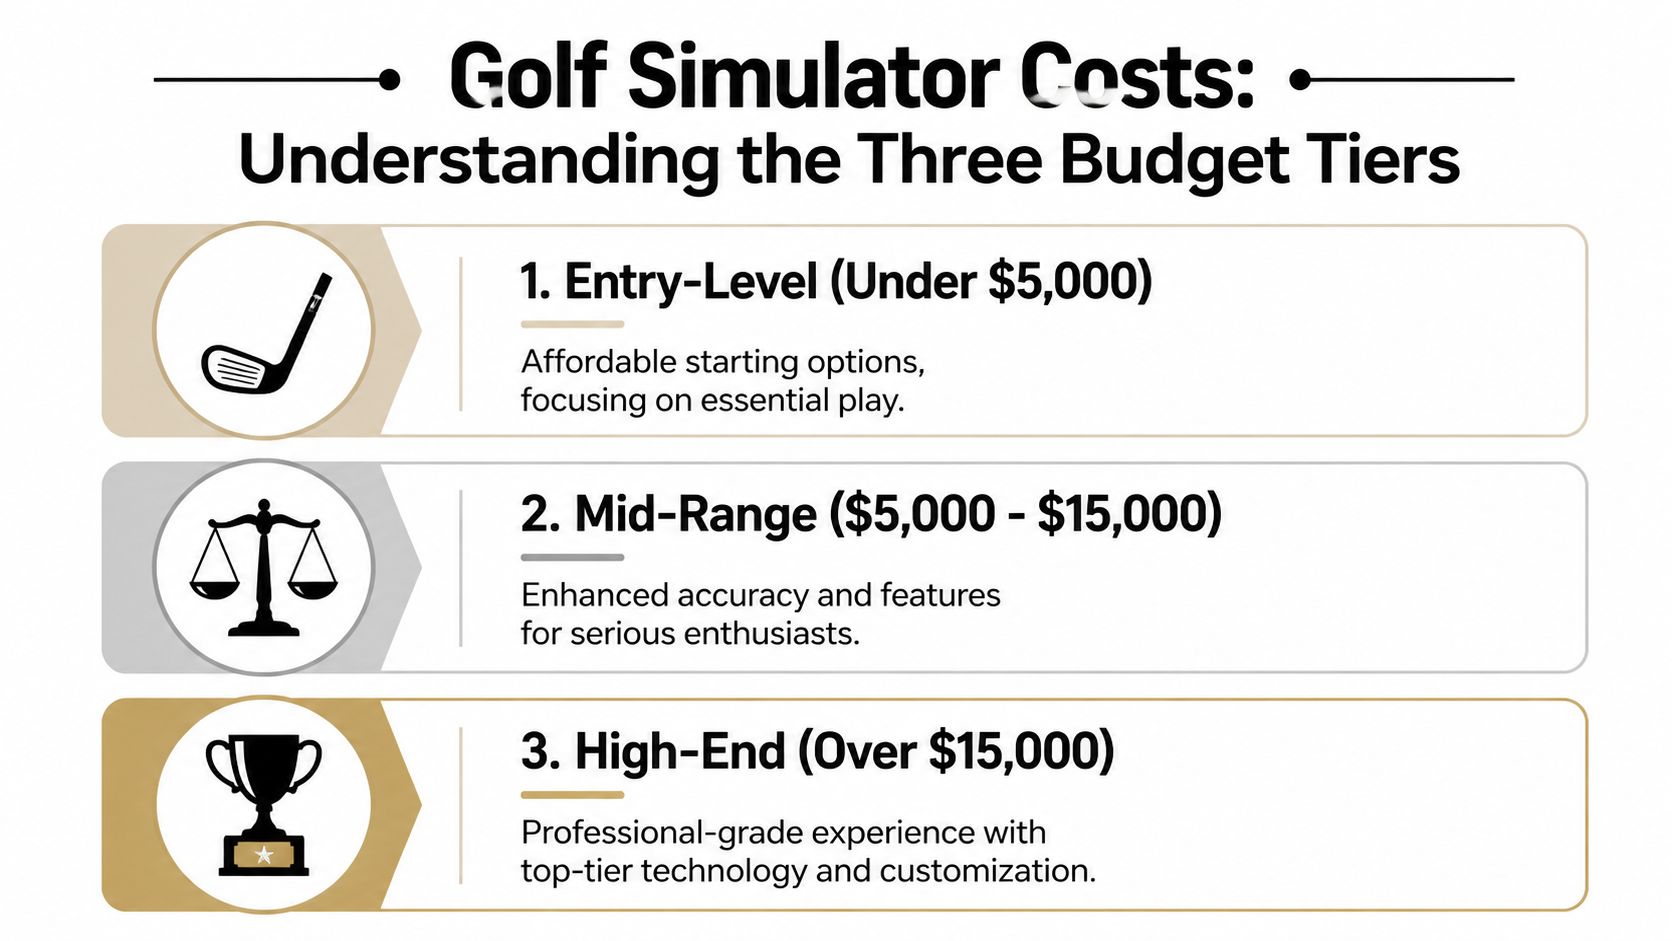
This tier is built for practice first. It usually includes an entry launch monitor, a hitting mat, and a net or basic impact surface. It can work well for short sessions, especially in a garage or flexible space where portability matters more than finish.
What you get:
What you give up:
This budget makes sense for golfers who want reps, not a permanent room feature. It can also pair well with outdoor practice. Homeowners comparing an indoor setup with exterior practice work often look at Prescott backyard putting green prices to decide where their money will get used more often.
This is the range I point to first for clients who want the simulator to stay in service for years. It covers the jump from “equipment in a room” to “a room designed around the equipment.”
A solid project here usually includes better tracking, a proper enclosure, a safer and quieter impact screen, and projection that fills the hitting area correctly. If you want a clearer sense of what projector planning involves, this golf simulator projector setup guide is a useful starting point. Once projection, cable management, lighting control, and clean mounting are part of the plan, the total project cost rises for good reasons.
Typical advantages in this tier:
This is also where professional design starts paying for itself. A midrange simulator can underperform if the ceiling lights wash out the image, the projector is mounted in the wrong position, or the hitting zone is placed without enough clearance for both right- and left-handed players. Good planning avoids those expensive corrections.
At this level, the conversation shifts from simulator shopping to room building. Buyers in this range usually care about three things at the same time. Shot accuracy, appearance, and easy operation.
Projects here often include premium overhead or photometric tracking, custom enclosures, dedicated projection, acoustic treatment, lighting scenes, upgraded flooring, stronger networking, and integrated audio and control. The simulator becomes one part of a finished entertainment space, not a stand-alone purchase.
What the added budget usually buys:
This tier is where total cost of ownership matters most. A premium launch monitor in a poorly planned room is still a compromised experience. A properly integrated room gets used more, needs fewer workarounds, and holds up better over time. That is the difference between buying expensive gear and building a feature that belongs in the home.
A golf simulator rarely goes over budget because of one bad purchase. The overrun usually comes from how the parts interact once they are in a real room. A launch monitor may be accurate on paper, but if the mat height, screen position, projector placement, and lighting are mismatched, the system feels compromised from day one.
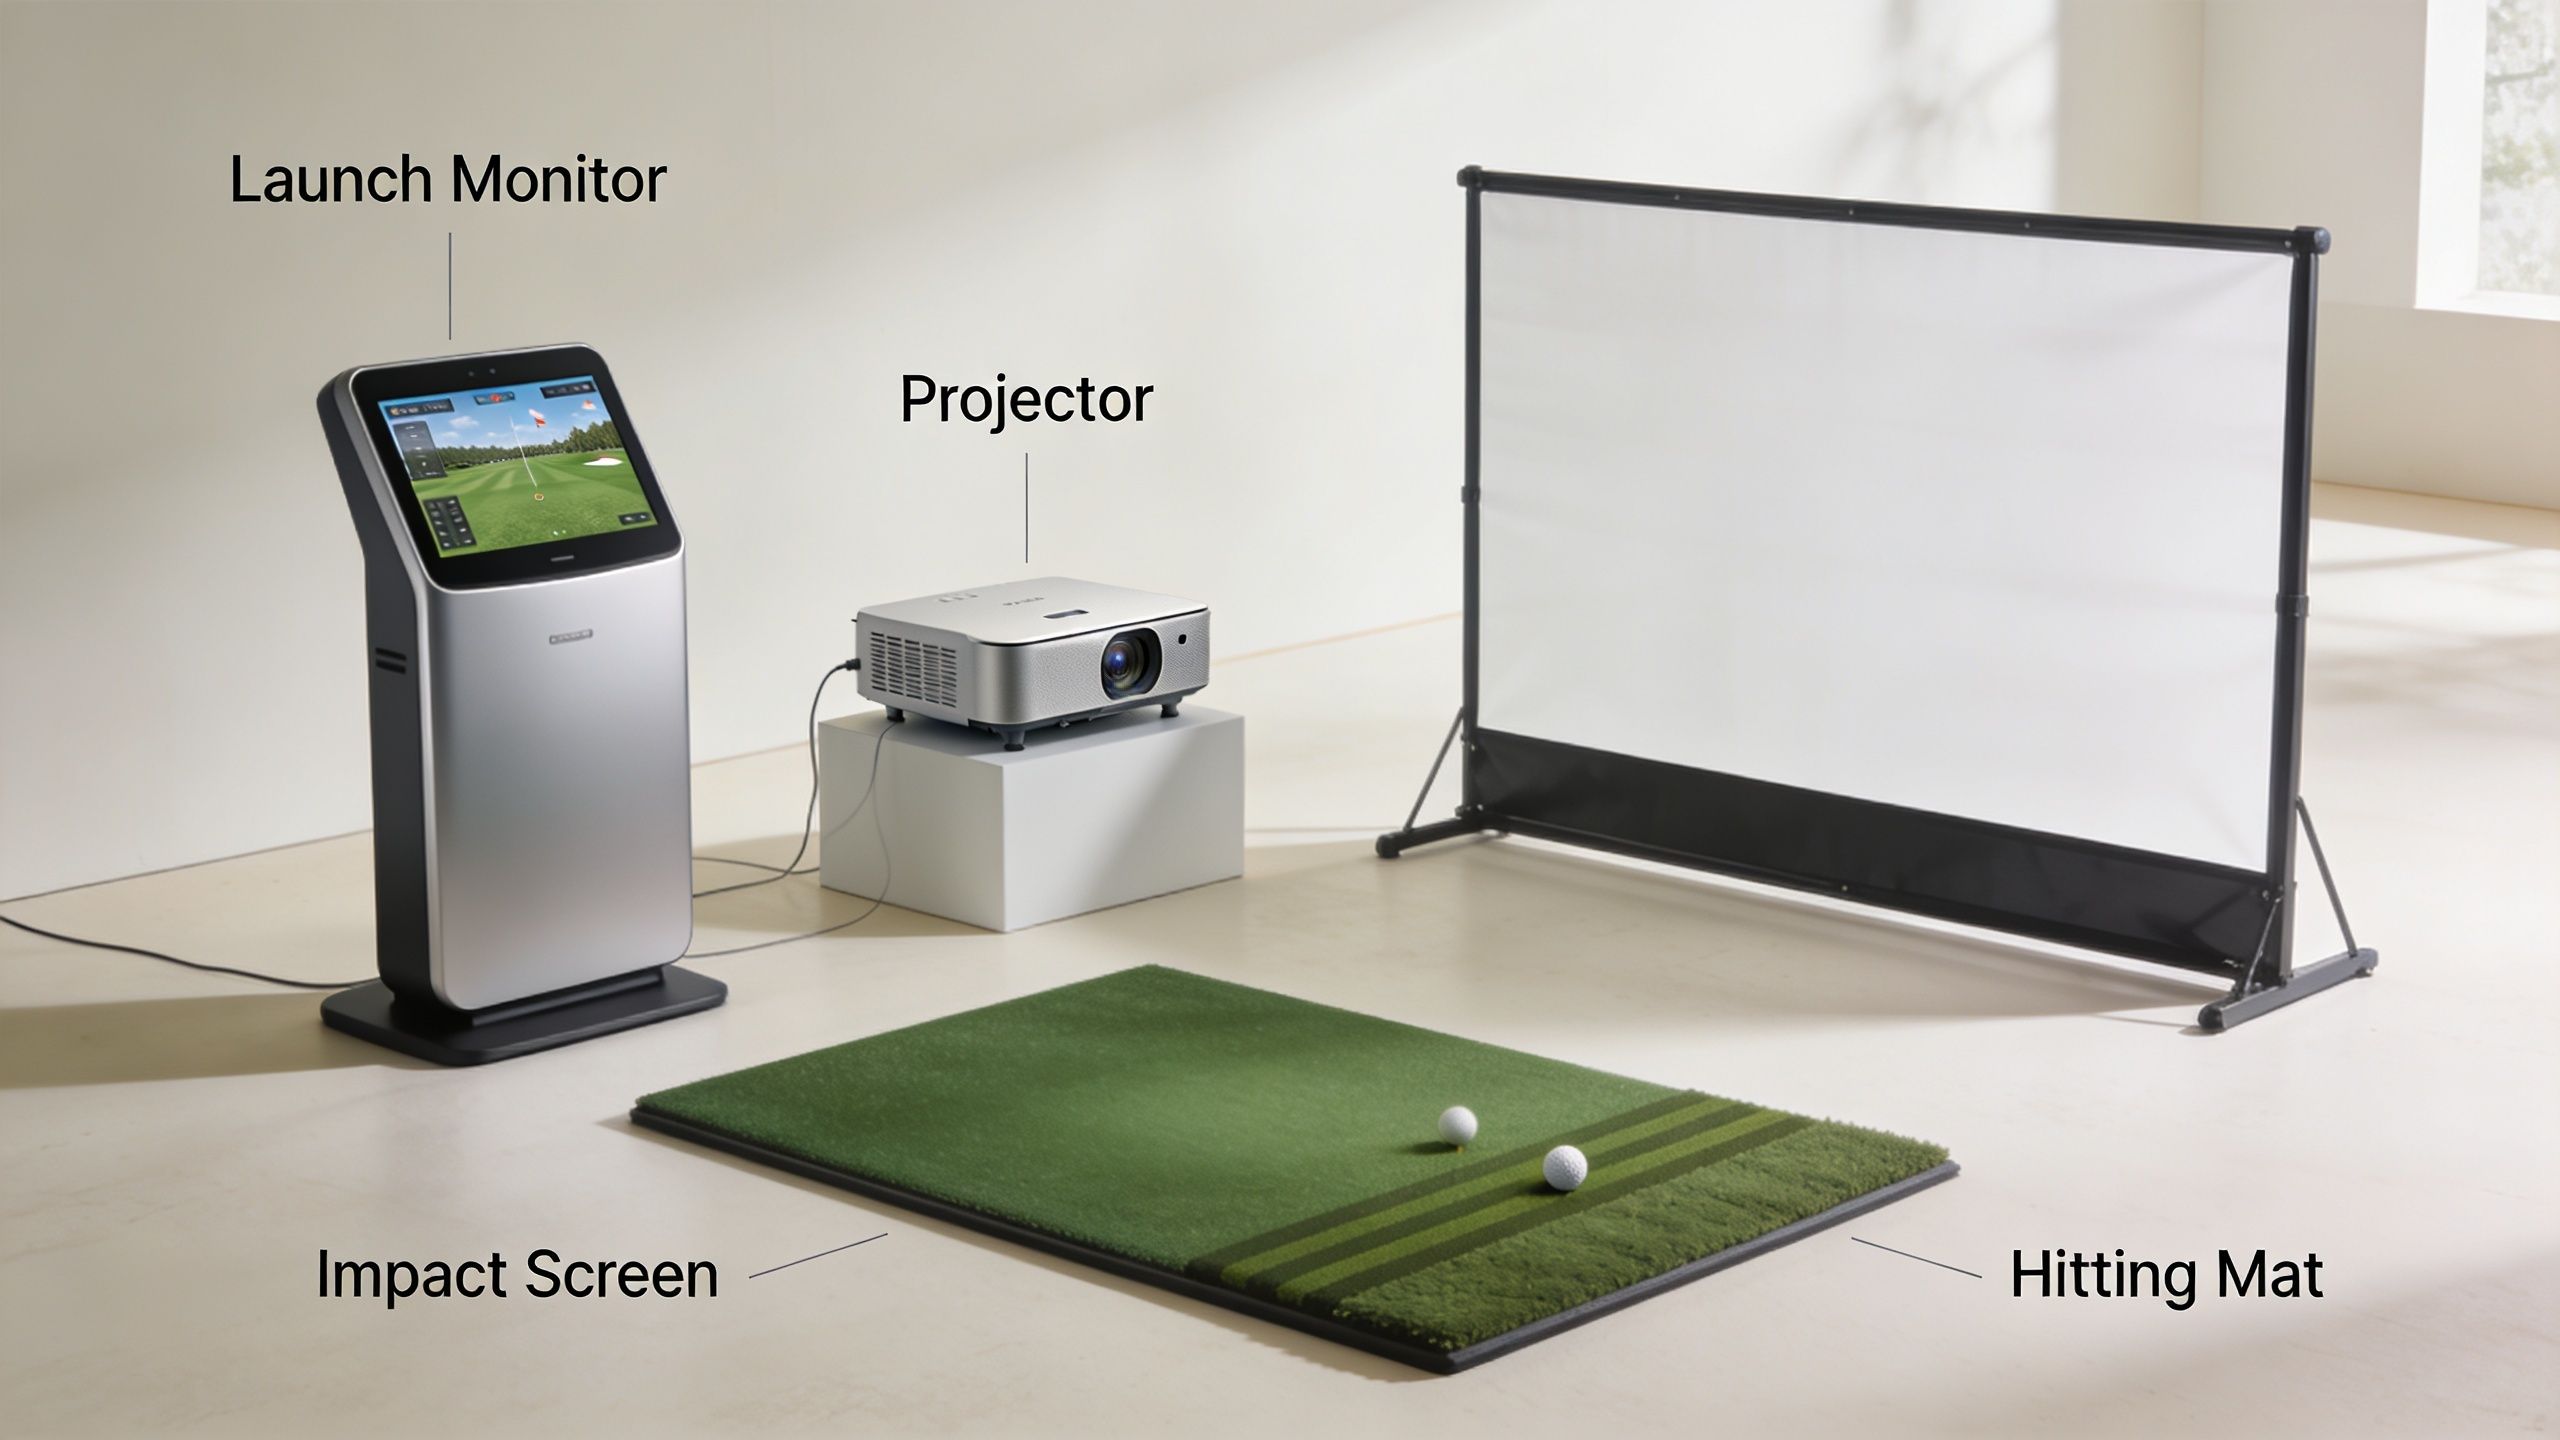
The launch monitor drives the entire experience. It is also the component that sets the budget fastest.
According to MyGolfSpy's golf simulator guide, launch monitors often account for 30% to 50% of total system cost. The same guide places units like Mevo+ around $2,000 to $3,000, while premium systems such as Foresight GCQuad can run $10,000 to $25,000+.
That gap is more than branding. Lower-cost radar units can be a good fit for casual practice or mixed indoor and outdoor use, but they usually ask for more space and can be less forgiving indoors. Camera-based and photometric systems cost more, yet they often fit tighter rooms better and inspire more confidence in the numbers. For a client who wants the simulator to feel reliable every time, paying more here often prevents frustration later.
A simple way to evaluate the options:
| Component choice | What you gain | What you give up |
|---|---|---|
| Budget radar | Lower entry cost, portability | More sensitivity to room depth and setup |
| Mid-tier camera systems | Better indoor consistency, stronger ball data | Higher hardware cost |
| Premium photometric | Top-tier data and analysis | Highest cost, tighter installation standards |
Clients often treat the screen package as a commodity. It isn't. This part determines noise, bounce-back, ball containment, room appearance, and how confident people feel swinging indoors.
A basic screen can be relatively affordable, but a good enclosure system costs more than fabric and pipes. Frame strength, side protection, screen tension, finish trim, and padding all affect the result. Cheap builds tend to look temporary. They also wear faster and create more nuisance issues, especially in multipurpose rooms where appearance matters as much as function.
The mat deserves the same scrutiny. A hitting surface that feels too hard, too grabby, or uneven will shorten practice sessions fast. If the room also includes a putting area or adjacent practice turf, compare those finish expectations with broader synthetic turf projects such as Prescott backyard putting green prices. It is a different category, but the comparison helps explain why better turf systems and cleaner finish work raise the final project cost.
Projection problems are among the most common issues I see in retrofit simulator rooms. The hardware may be decent, but the image is dim, the screen is not filled correctly, or the projector throws shadows into the hitting area.
Projector pricing varies widely, and the right choice depends less on sticker price than on room geometry. Throw distance, ceiling height, screen size, ambient light, and mount location all have to line up. A projector that works in one room can be the wrong fit in another room with the same screen size.
For that reason, projector selection should be tied to layout from the start. This golf simulator projector setup guide is a useful reference because most image complaints trace back to planning and mounting errors, not to the projector itself.
A quick walkthrough helps make that point clear:
Software affects the experience more than many buyers expect. It determines course access, graphics quality, practice modes, online play, and how polished the system feels in daily use.
The computer matters just as much. Some platforms will run on modest hardware. Others need a gaming PC with enough graphics power to keep the image smooth and load times reasonable. If the software lags, crashes, or takes too many steps to launch, people use the room less often. That is one reason professionally integrated systems tend to perform better over time. The components are chosen to work together, not just to check boxes on a shopping list.
Buy the launch monitor for the golfer. Buy the screen, projection, and control experience for everyone who will spend time in the room.
The biggest budgeting mistake isn't choosing the wrong launch monitor. It's assuming the invoice stops after hardware shows up.
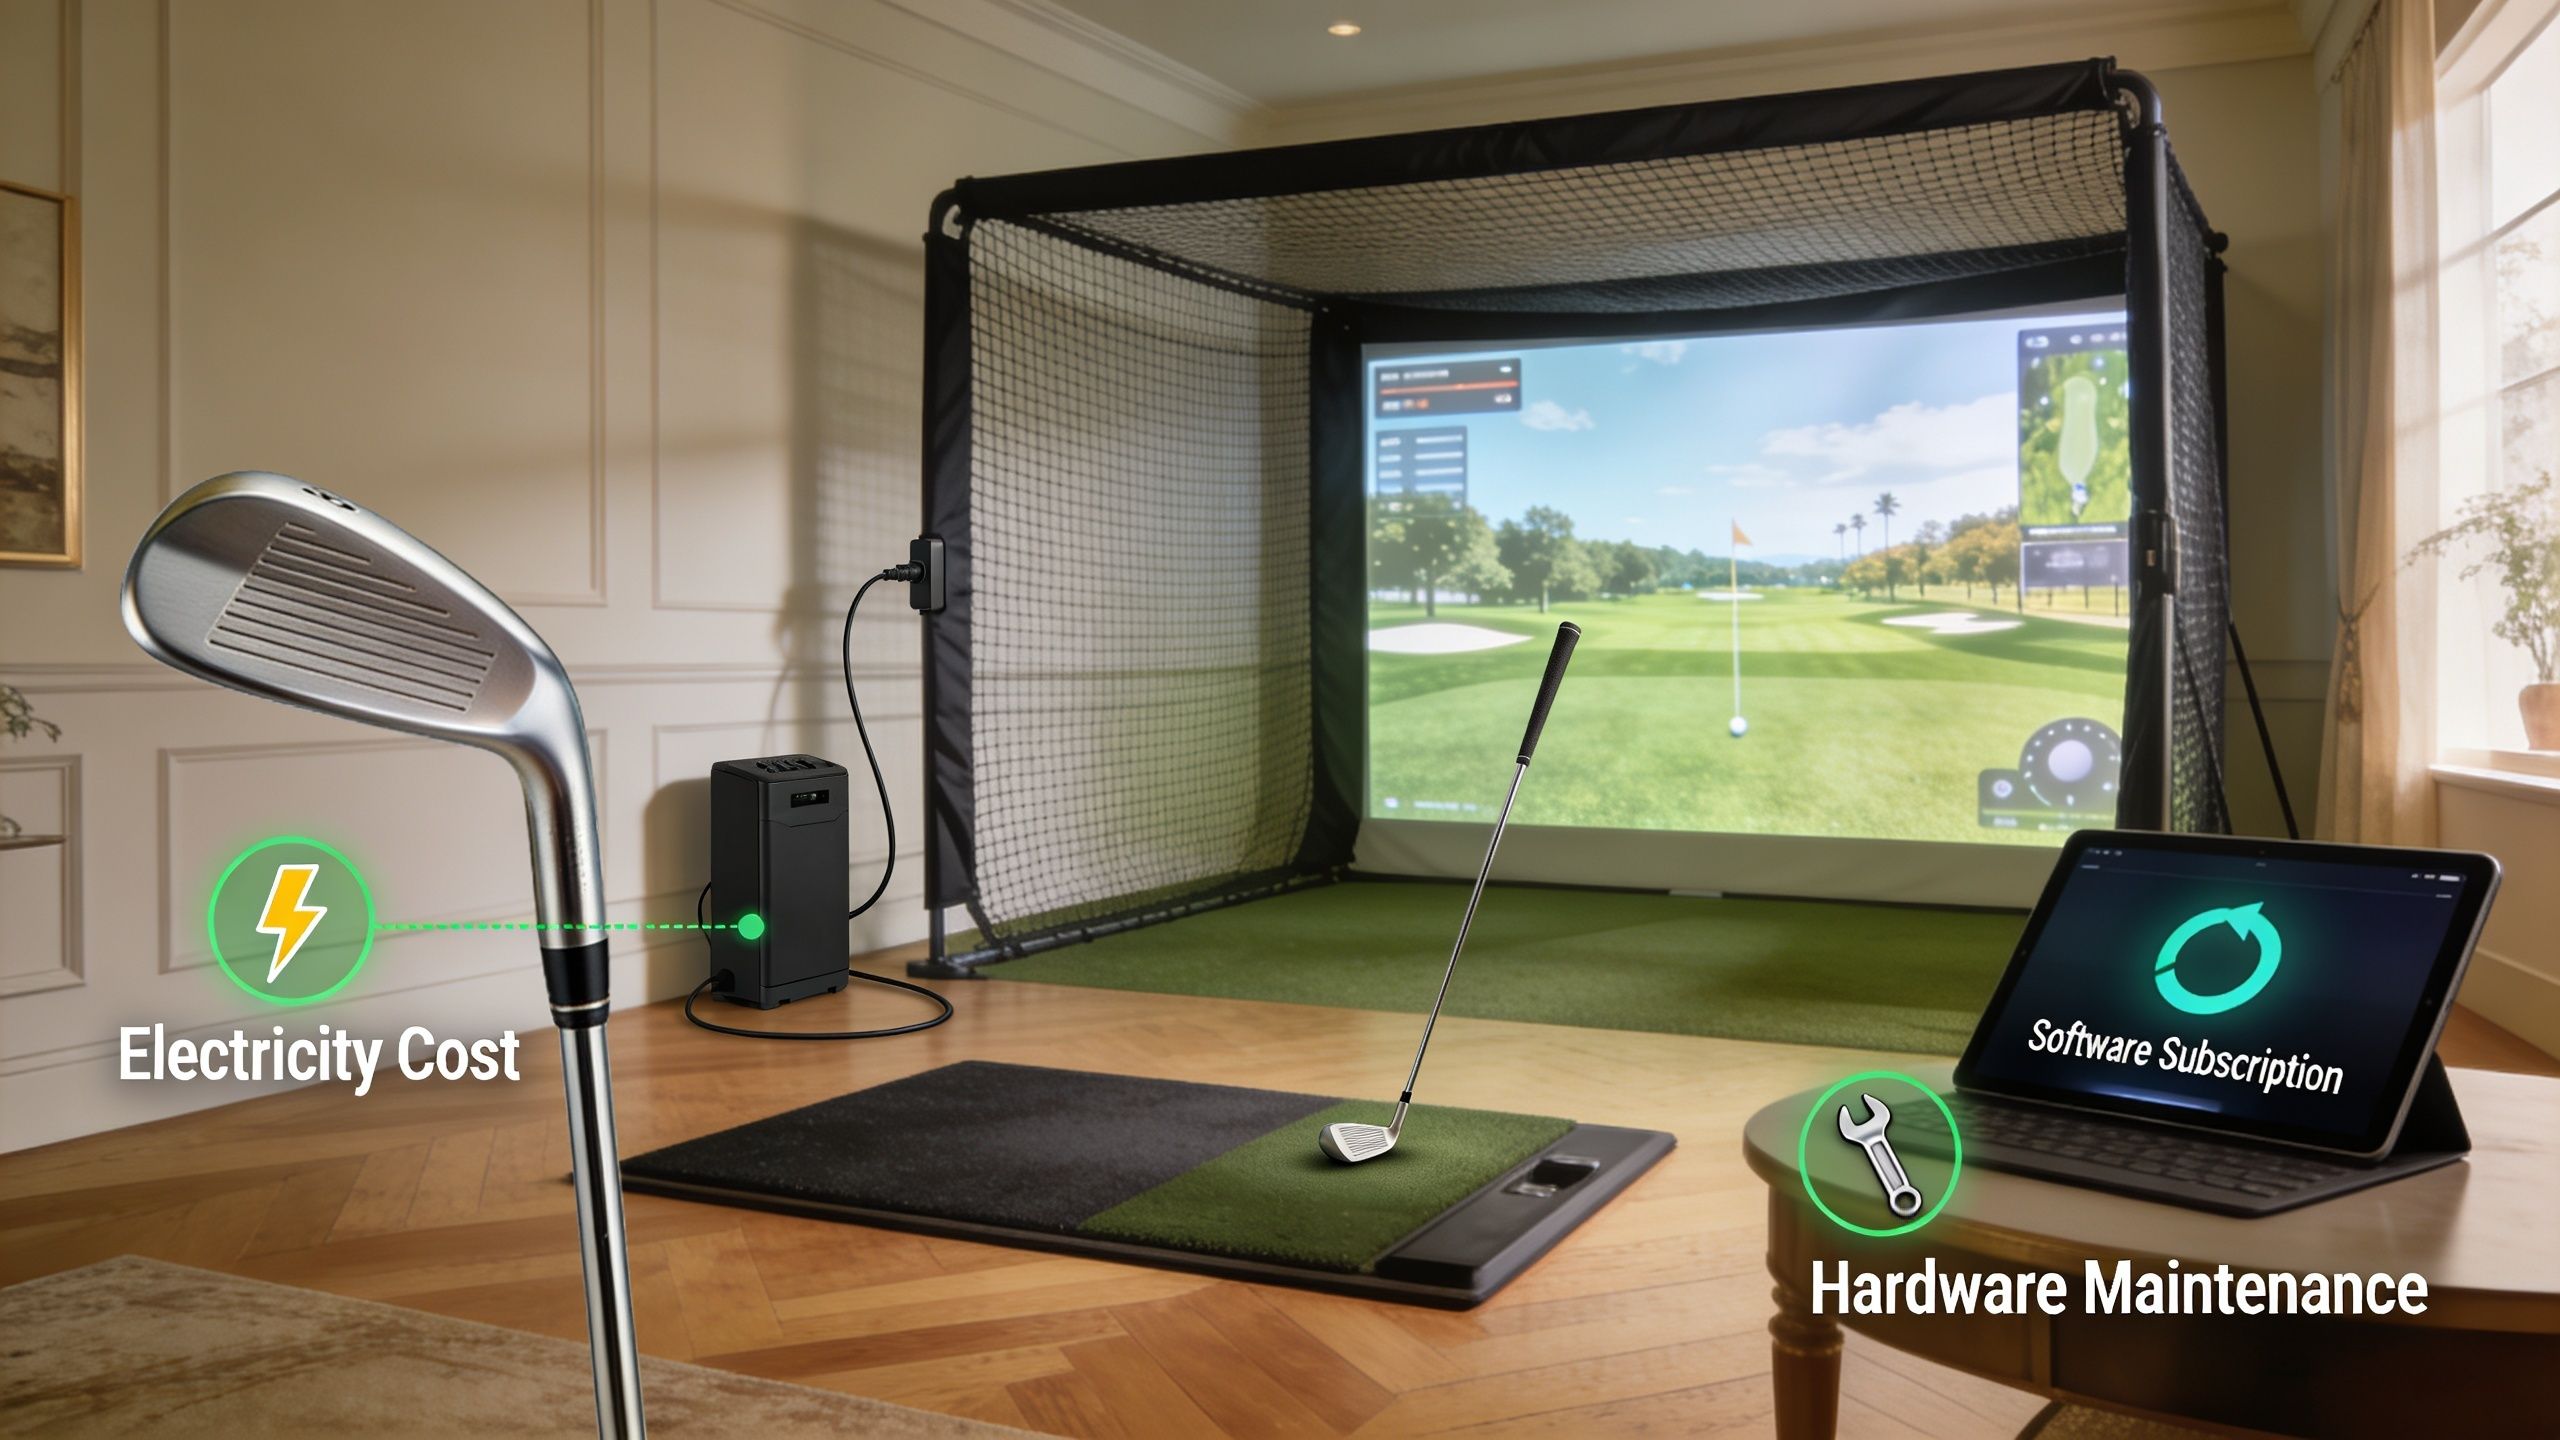
Most buying guides obsess over the initial package and barely mention what it costs to keep the room running. Verified ownership data shows software subscriptions commonly land at $300 to $600 per year, and maintenance plus operating expenses can add 10% to 20% annually to total cost of ownership, as outlined in this ownership cost discussion.
That ongoing budget can include:
None of that means a simulator is a bad investment. It means you should price it like a room system, not like a one-time sporting goods purchase.
The hidden costs usually come from the room, not the simulator.
A few examples:
For many homeowners, these room-related costs become easier to understand when they compare them to broader media-room planning. A breakdown of home theater system installation cost gives useful context because the same wiring, power, control, and finish issues often show up in golf simulator projects too.
Hidden cost doesn't mean unnecessary cost. It usually means necessary work that nobody mentioned in the ad.
The cleanest projects are almost always the ones where somebody identified those issues before equipment was ordered.
A lot of simulator rooms start with one goal. Hit balls at home. Six months later, the owners who are happiest with the investment are usually the ones who built a room the family wants to use even when nobody is practicing.
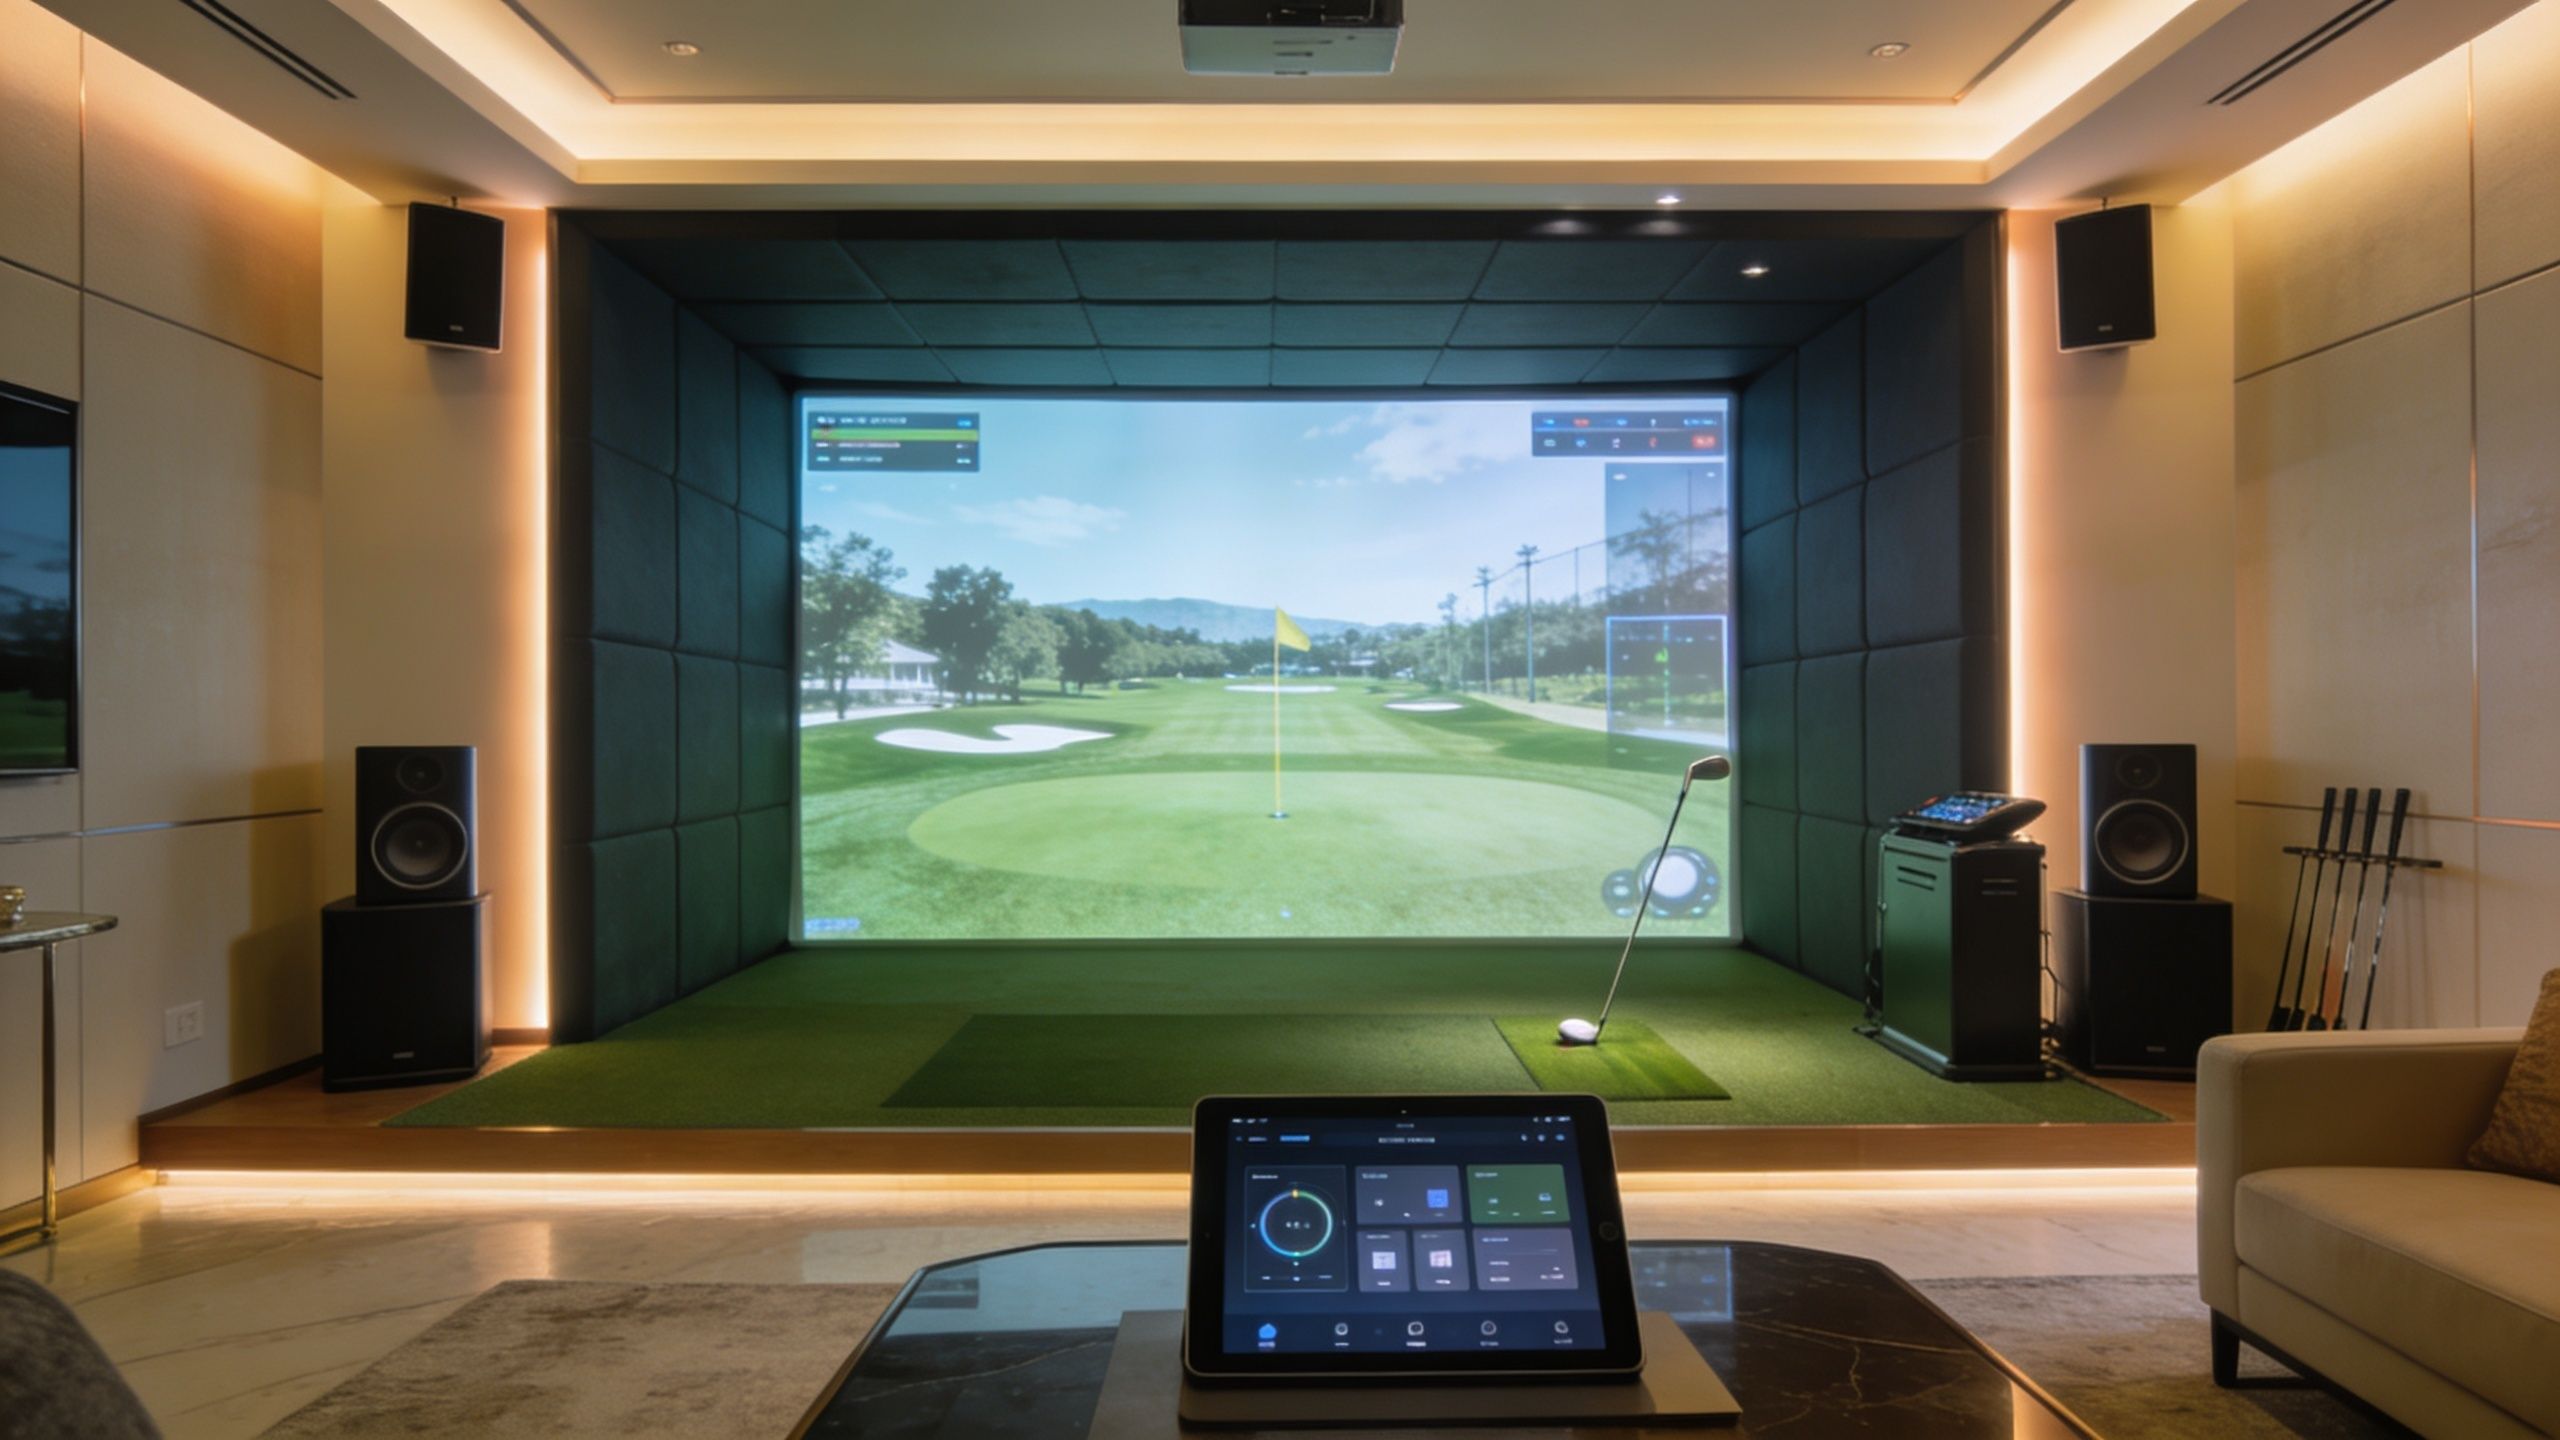
That is the primary integration argument. A simulator that doubles as a media room, sports room, or casual hangout delivers better long-term value than a single-purpose setup that sits dark between practice sessions.
The difference between a collection of parts and a room people enjoy using usually comes down to control, lighting, and how cleanly everything works together.
A well-integrated system can start the projector, select the simulator input, set the right light level, and route audio with one command. Josh.ai voice control can handle that without a pile of remotes on the side table. Lutron lighting matters for a more practical reason. The wrong fixtures or the wrong dimming zones can wash out the image, interfere with the room’s mood, or make the space awkward to use outside simulator sessions. Sonos or a dedicated AV audio system gives the room a second life for music, sports, and streaming.
Good integration usually includes:
This is also the point where room planning affects cost more than homeowners expect. Screen size, projector placement, speaker locations, sightlines, and swing clearance all compete for the same square footage. If the room dimensions are marginal, every inch matters. Before equipment gets locked in, it helps to review practical golf simulator space requirements so the room works for both golf and everyday use.
When we design these rooms properly, the impact screen is not sitting idle between rounds. It becomes the big screen for Saturday sports, family movies, console gaming, or a Kaleidescape movie server. The network matters too. A properly designed Ubiquiti setup keeps simulator software, streaming, and control traffic stable, which is a bigger deal than it sounds once the room starts doing more than one job.
Multi-use rooms also hold up better during budget decisions. A golf-only room can feel hard to justify. A golf simulator that also functions as part of the home’s entertainment system is easier to support because more people in the house will use it.
The best results usually come from coordinating trades early. Electricians, low-voltage installers, finish carpenters, and AV professionals all affect the outcome, and poor sequencing gets expensive fast. If you are managing parts of the project yourself, it helps to understand how to hire contractors before the room turns into a patchwork of separate installs.
Professional integration improves more than convenience. It protects the look of the room, reduces daily friction, and helps the simulator feel like a permanent part of the home instead of a temporary setup assembled around a hitting mat.
DIY has a place. If you're handy, your expectations are modest, and the room is forgiving, it can be the right answer.
But golf simulators punish small mistakes. A projector mounted a bit off-center, lighting in the wrong place, poor ceiling clearance, unreliable networking, and incorrect sensor positioning can turn a promising parts list into a room nobody enjoys using.
DIY usually fits buyers who are comfortable with trial and error.
It tends to work best when:
If you're hiring out even part of the work, it helps to know how to hire contractors well. That becomes important fast when a simulator room touches electrical, finish carpentry, networking, and low-voltage work.
Verified pricing shows professional installation can add $2,000 to $10,000 for wiring, calibration, room optimization, and smart home linkage, according to this golf simulator installation cost overview. That's not just an "install fee." It's the cost of reducing expensive mistakes.
What professionals usually solve better than DIY:
A dedicated planning guide for golf simulator space requirements is worth reviewing before anybody buys equipment, because many bad purchases start with a space that was never suitable for the chosen hardware.
Professional installation is the better path when the simulator needs to feel built-in, dependable, and worthy of the room it's going into.
The right budget comes from three decisions. How accurate you want the golf experience to be. How finished you want the room to look. How much you want the simulator to function as part of the home instead of as a standalone gadget.
For some homeowners, that answer is a modest setup focused on swing work. For others, it's a fully integrated room with projection, lighting control, premium audio, and automation. Both can be valid. The expensive mistake is mixing a low-friction expectation with a bare-bones build.
A smarter starting point is to define the room before you define the gear:
If you're still narrowing down equipment, a guide to the best golf simulator for home can help frame the trade-offs before you request quotes.
The homeowners who end up happiest with these projects usually don't start by shopping for the cheapest launch monitor. They start by deciding what they want the room to feel like on a cold January evening when they walk in, hit one button, and everything just works.
If you want a golf simulator that feels like part of your home instead of a pile of expensive parts, Home AV Pros can help you design it correctly from the start. They serve southern Wisconsin and nearby northern Illinois with custom AV, smart home automation, home theater, new home build integration, restaurants, whole-home audio, outdoor lighting and sound, permanent lighting, networking, and golf simulator solutions built around clean installation and reliable everyday use.

Copyright © 2026. Home AV pros. All rights reserved.