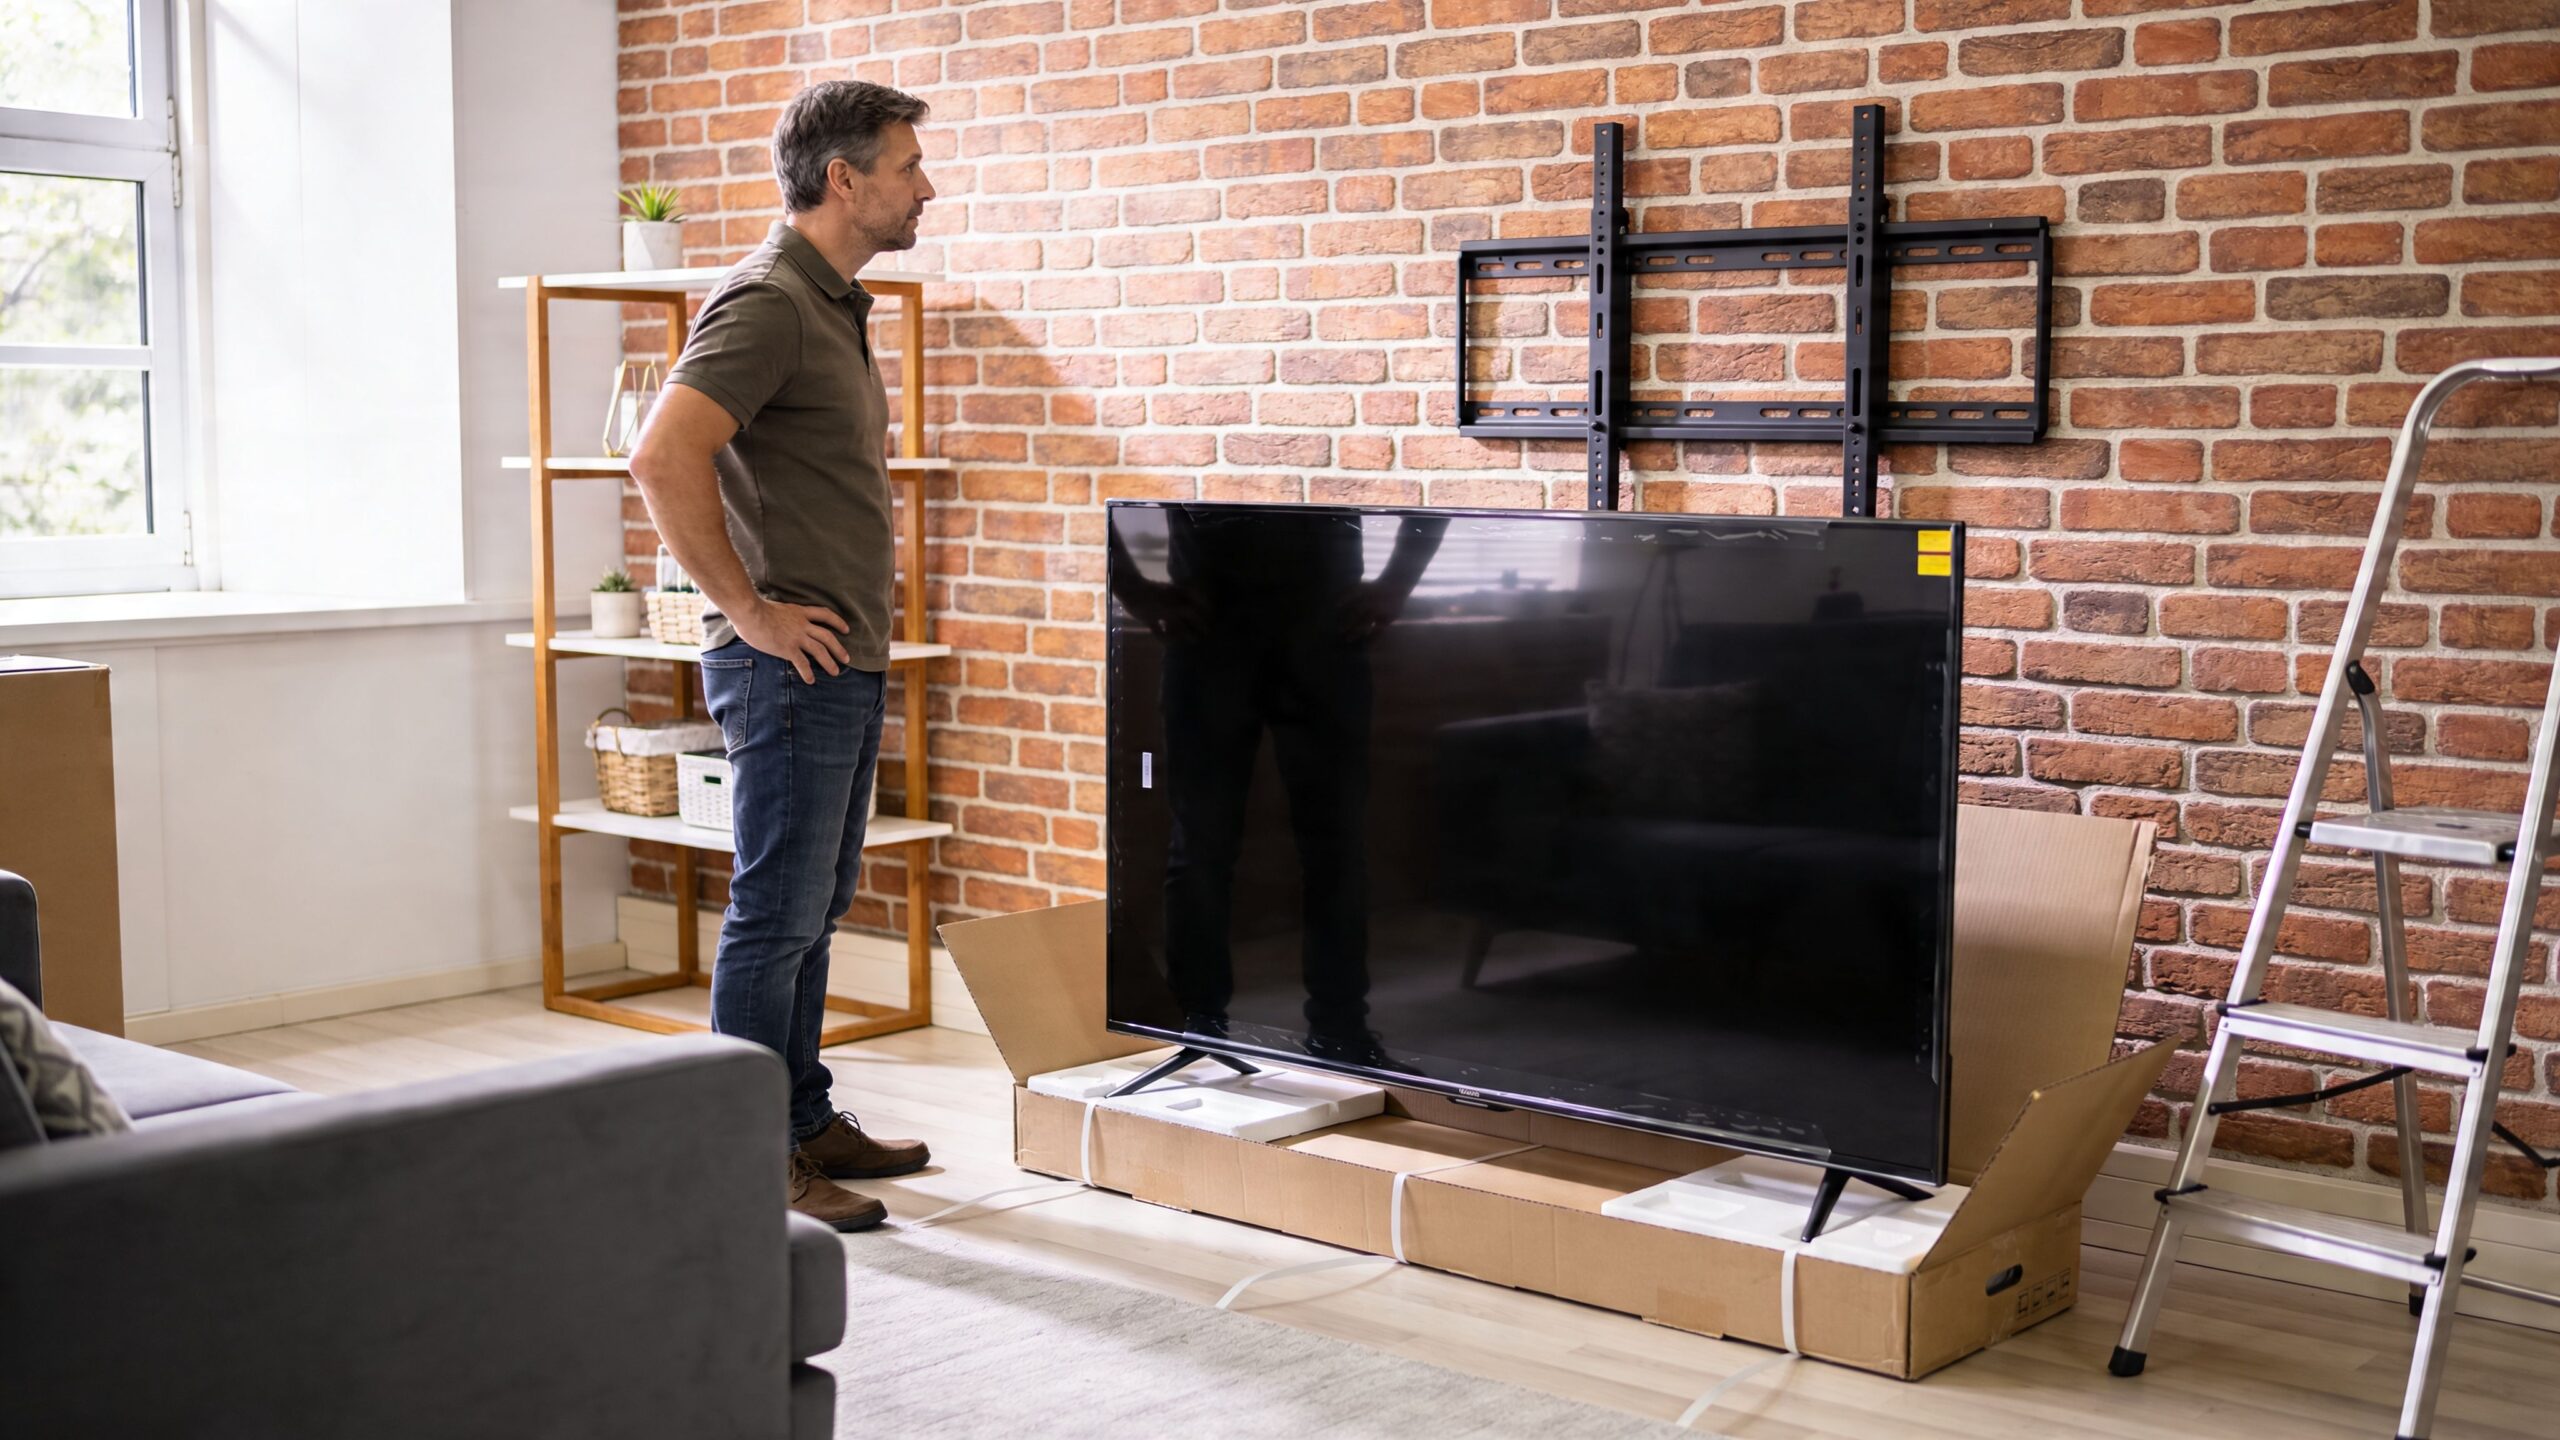
A new TV shows up, the box is finally open, and the room starts to come together in your head. You can already see the finished look. The screen floating cleanly on that brick wall, no bulky stand, no sagging furniture, no mess underneath.
Then the reality hits. Brick looks solid, but it’s not forgiving. One bad hole, one wrong anchor, or one mount that applies too much strain on the wall, and the project goes from sleek to expensive fast. I’ve seen homeowners get the screen on the wall, step back, and only then realize the TV is slightly out of level, the cables are exposed, or the mount is anchored where the masonry never should have been drilled.
The best tv mount for brick wall installs isn’t just about the bracket in the box. It’s about the wall condition, the anchor choice, the VESA match, the viewing height, and the finish details that make the setup look intentional instead of improvised.
A brick wall often becomes the visual anchor of a room. It might be a painted fireplace surround, an exposed loft wall, or a warm traditional feature in a family room. That’s why TV mounting on brick carries more pressure than a basic drywall install. You’re not just hanging equipment. You’re working on one of the room’s defining surfaces.
The homeowners I talk to usually want the same outcome. They want the TV secure, centered, low-profile, and visually calm. They don’t want a mount that sticks too far out unless the room needs it, and they definitely don’t want cracked brick, loosened mortar, or cables hanging down the face of the wall.
That’s why the right approach starts with respect for the material. Brick can hold a TV very well when it’s properly anchored. It can also punish rushed work.
Practical rule: On masonry, the cleanest-looking install is usually the one that was planned like a system, not treated like a quick hardware project.
A good result balances three things at once:
If you’re trying to choose the best tv mount for brick wall use, start by thinking bigger than the bracket itself. The mount is only one part of a successful installation.
A TV mount fails on brick long before the bracket gives out. The failure usually starts in the wall itself. I’ve seen installs loosen because the brick was weathered, the face was too thin, or the fastener was set into material that looked solid from six feet away and crumbled under a drill.
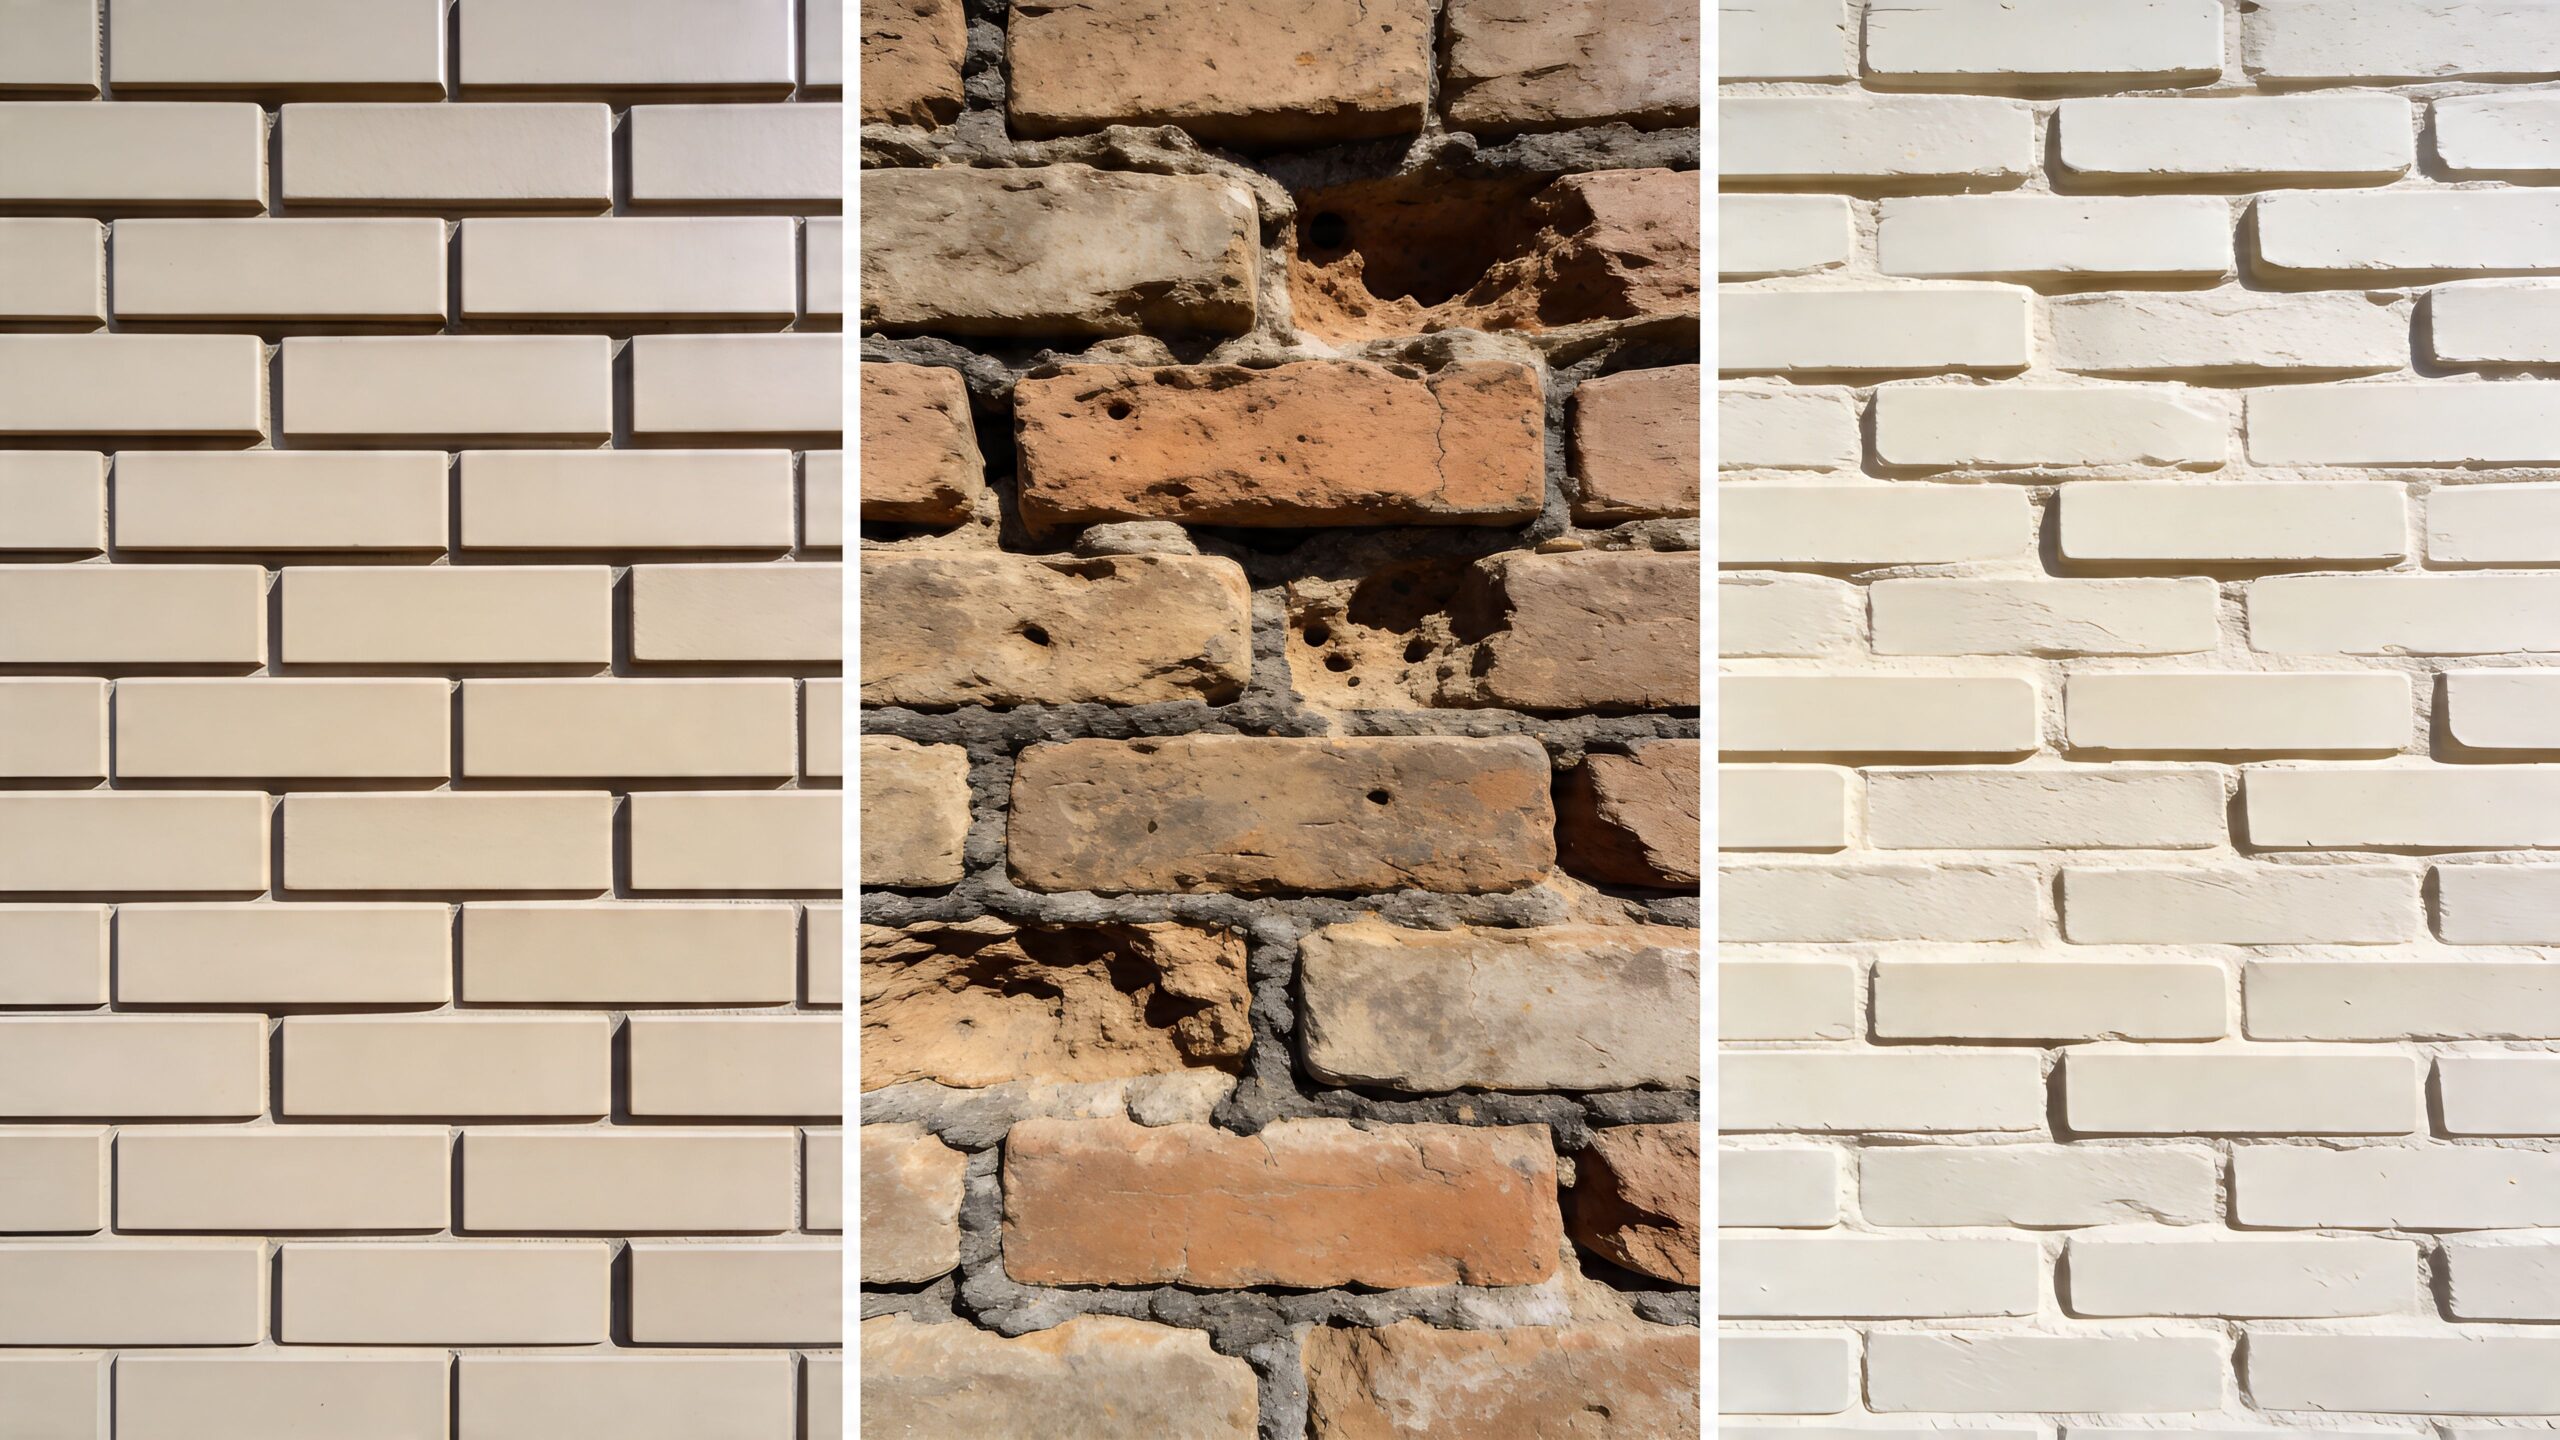
A true solid brick wall gives you the best chance at a clean, durable install. The brick has enough depth to accept proper masonry fasteners, and the load transfers into a stable surface if the material is still in good shape.
A brick veneer wall needs more caution. From the room, it can look identical to structural brick, but the outer layer may be decorative facing over framing or another substrate. That changes the anchor plan completely. A mount that feels fine on day one can work loose if the fasteners only bite into the veneer.
CMU or concrete block adds another variable. Some block walls are solid. Many are hollow. That affects hole placement, anchor choice, and how much confidence you should have in a full-motion arm. If you need help comparing mount styles before you buy, this guide on how to choose a TV wall mount for your room and wall type is a good companion to the wall assessment.
Start with the condition of the material, not the appearance of the wall.
Look closely at the brick face for flaking, cracks, chipping, or a dusty surface. Those are common signs of deterioration, especially on older fireplace surrounds and exterior-facing walls. Painted brick deserves extra skepticism because paint can hide patchwork, hairline damage, and uneven repairs.
Then inspect the mortar joints. Mortar tells you a lot about age and stability, even though it should not be your mounting point. If the joints are sandy, recessed, or breaking apart under light scraping, the surrounding brick may not hold as well as it looks.
Tap the wall in several spots and listen for changes. A hollow sound can point to veneer, voids, or areas that were furred out during a remodel. That matters if the goal is a low-profile install with clean cable management and a finished look that suits a modern media wall instead of a bracket bolted onto a decorative surface.
Practical rule: Mount into sound brick face, not mortar. If the brick condition is questionable, stop and verify the structure before you drill.
Some walls need a different approach before the first hole is marked.
| Wall condition | What it suggests | Installation implication |
|---|---|---|
| Dense, intact brick face | Stable substrate | Standard masonry mounting may work well |
| Crumbly edges or surface dusting | Deterioration | Shift location or reassess the install |
| Thin brick appearance | Veneer or facing material | Confirm backing before choosing anchors |
| Uneven surface or proud brick | Poor plate contact | Use spacers carefully and check for flat bearing |
Historic brick often falls into its own category. It can be beautiful and still be a bad candidate for a routine TV mount. Fireplace walls add their own complications, including heat exposure, irregular surfaces, and placement that looks dramatic but puts the screen too high for comfortable viewing.
The mount brand matters less than the substrate. A well-made bracket cannot fix weak brick, shallow embedment, or poor hole placement.
Good brick gives you options. Bad brick narrows them fast. That is why the wall inspection is part of the system, right alongside the mount, the anchors, the TV weight, and the finish details that keep the installation looking intentional once the screen, soundbar, power, and control devices are all in place.
A TV that sits flat and quiet on brick can look built into the room. The wrong mount turns that same wall into a stress test for the anchors, the brick face, and every cable you planned to hide.
For a quick visual overview, this video is useful before you commit to a mount style.
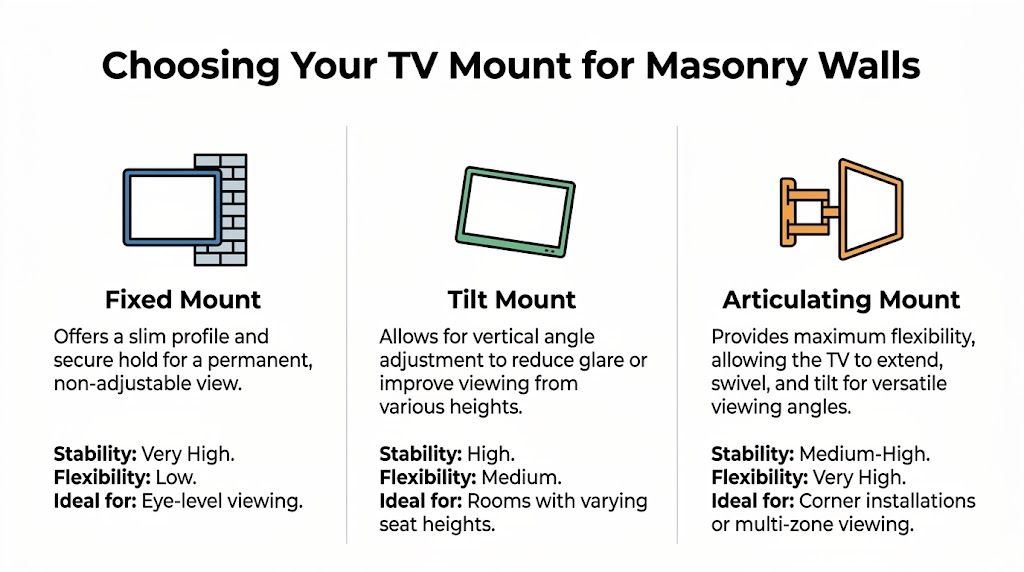
Fixed mounts are the cleanest match for masonry in many rooms. They keep the screen close to the wall, hold the load in a steady position, and avoid the extra force that comes from arms, pivots, and frequent adjustment.
That matters on brick because movement changes the load pattern. A fixed bracket asks the least from the anchor points and usually gives the best-looking result once the TV, soundbar, and wire management are finished. If the goal is a modern, intentional install that does not project far into the room, fixed is usually the first option to check.
I treat fixed mounts as the default choice for sound brick and straightforward seating.
Tilt mounts solve a specific placement problem. The TV sits higher than ideal, but the room still needs decent viewing comfort.
That is common above casework, on bedroom walls, or over a fireplace where placement options are limited. A small downward angle can reduce neck strain and cut reflections from windows or ceiling lights. You give up some of the flush look, but not much, and the mount still stays relatively close to the wall compared with a full-motion design.
Use a tilt mount when the height is driving the decision, not because extra movement sounds useful on paper.
Articulating mounts earn their keep in corner installs, open-plan rooms, and spaces with multiple seating zones. They also create the highest pull on the fasteners because the TV moves away from the wall.
That extension changes everything. The farther the screen comes off the brick, the more force the top anchors and the mounting surface have to resist. On a strong wall with the right anchor layout, that can be done well. On old brick, patched areas, or surfaces that are not flat, I get cautious fast because a full-motion arm has very little tolerance for weak spots or sloppy drilling.
Articulating mounts also affect the finished look. The arm needs clearance, the plate is usually larger, and cable routing has to be planned so nothing binds or shows when the TV swings out.
| Mount Type | Pros | Cons | Best For |
|---|---|---|---|
| Fixed | Slim profile, least stress on masonry, clean finished look | No viewing adjustment | Eye-level viewing on a solid brick wall |
| Tilt | Reduces glare, helps with higher placement, modest added depth | Less flush than fixed, limited range of motion | Bedrooms, fireplace installs, TVs mounted above eye level |
| Articulating | Swivels and extends for complex sightlines | Highest force on anchors, larger profile, more demanding cable planning | Corners, multi-use rooms, off-axis seating |
Choose the mount based on how the room will be used. If the seating is centered and the brick wall is a visual focal point, fixed usually gives the best mix of stability and appearance. If height is the problem, tilt is the sensible correction. If sightlines change across the room, an articulating mount may be justified, but the wall and anchor plan need to be right before the bracket ever comes out of the box.
For a broader breakdown of styles, profiles, and room-fit trade-offs, see this guide on how to choose a TV wall mount.
A mount can be perfectly designed and still fail if the fasteners are wrong. On brick, the small hardware matters as much as the bracket itself.
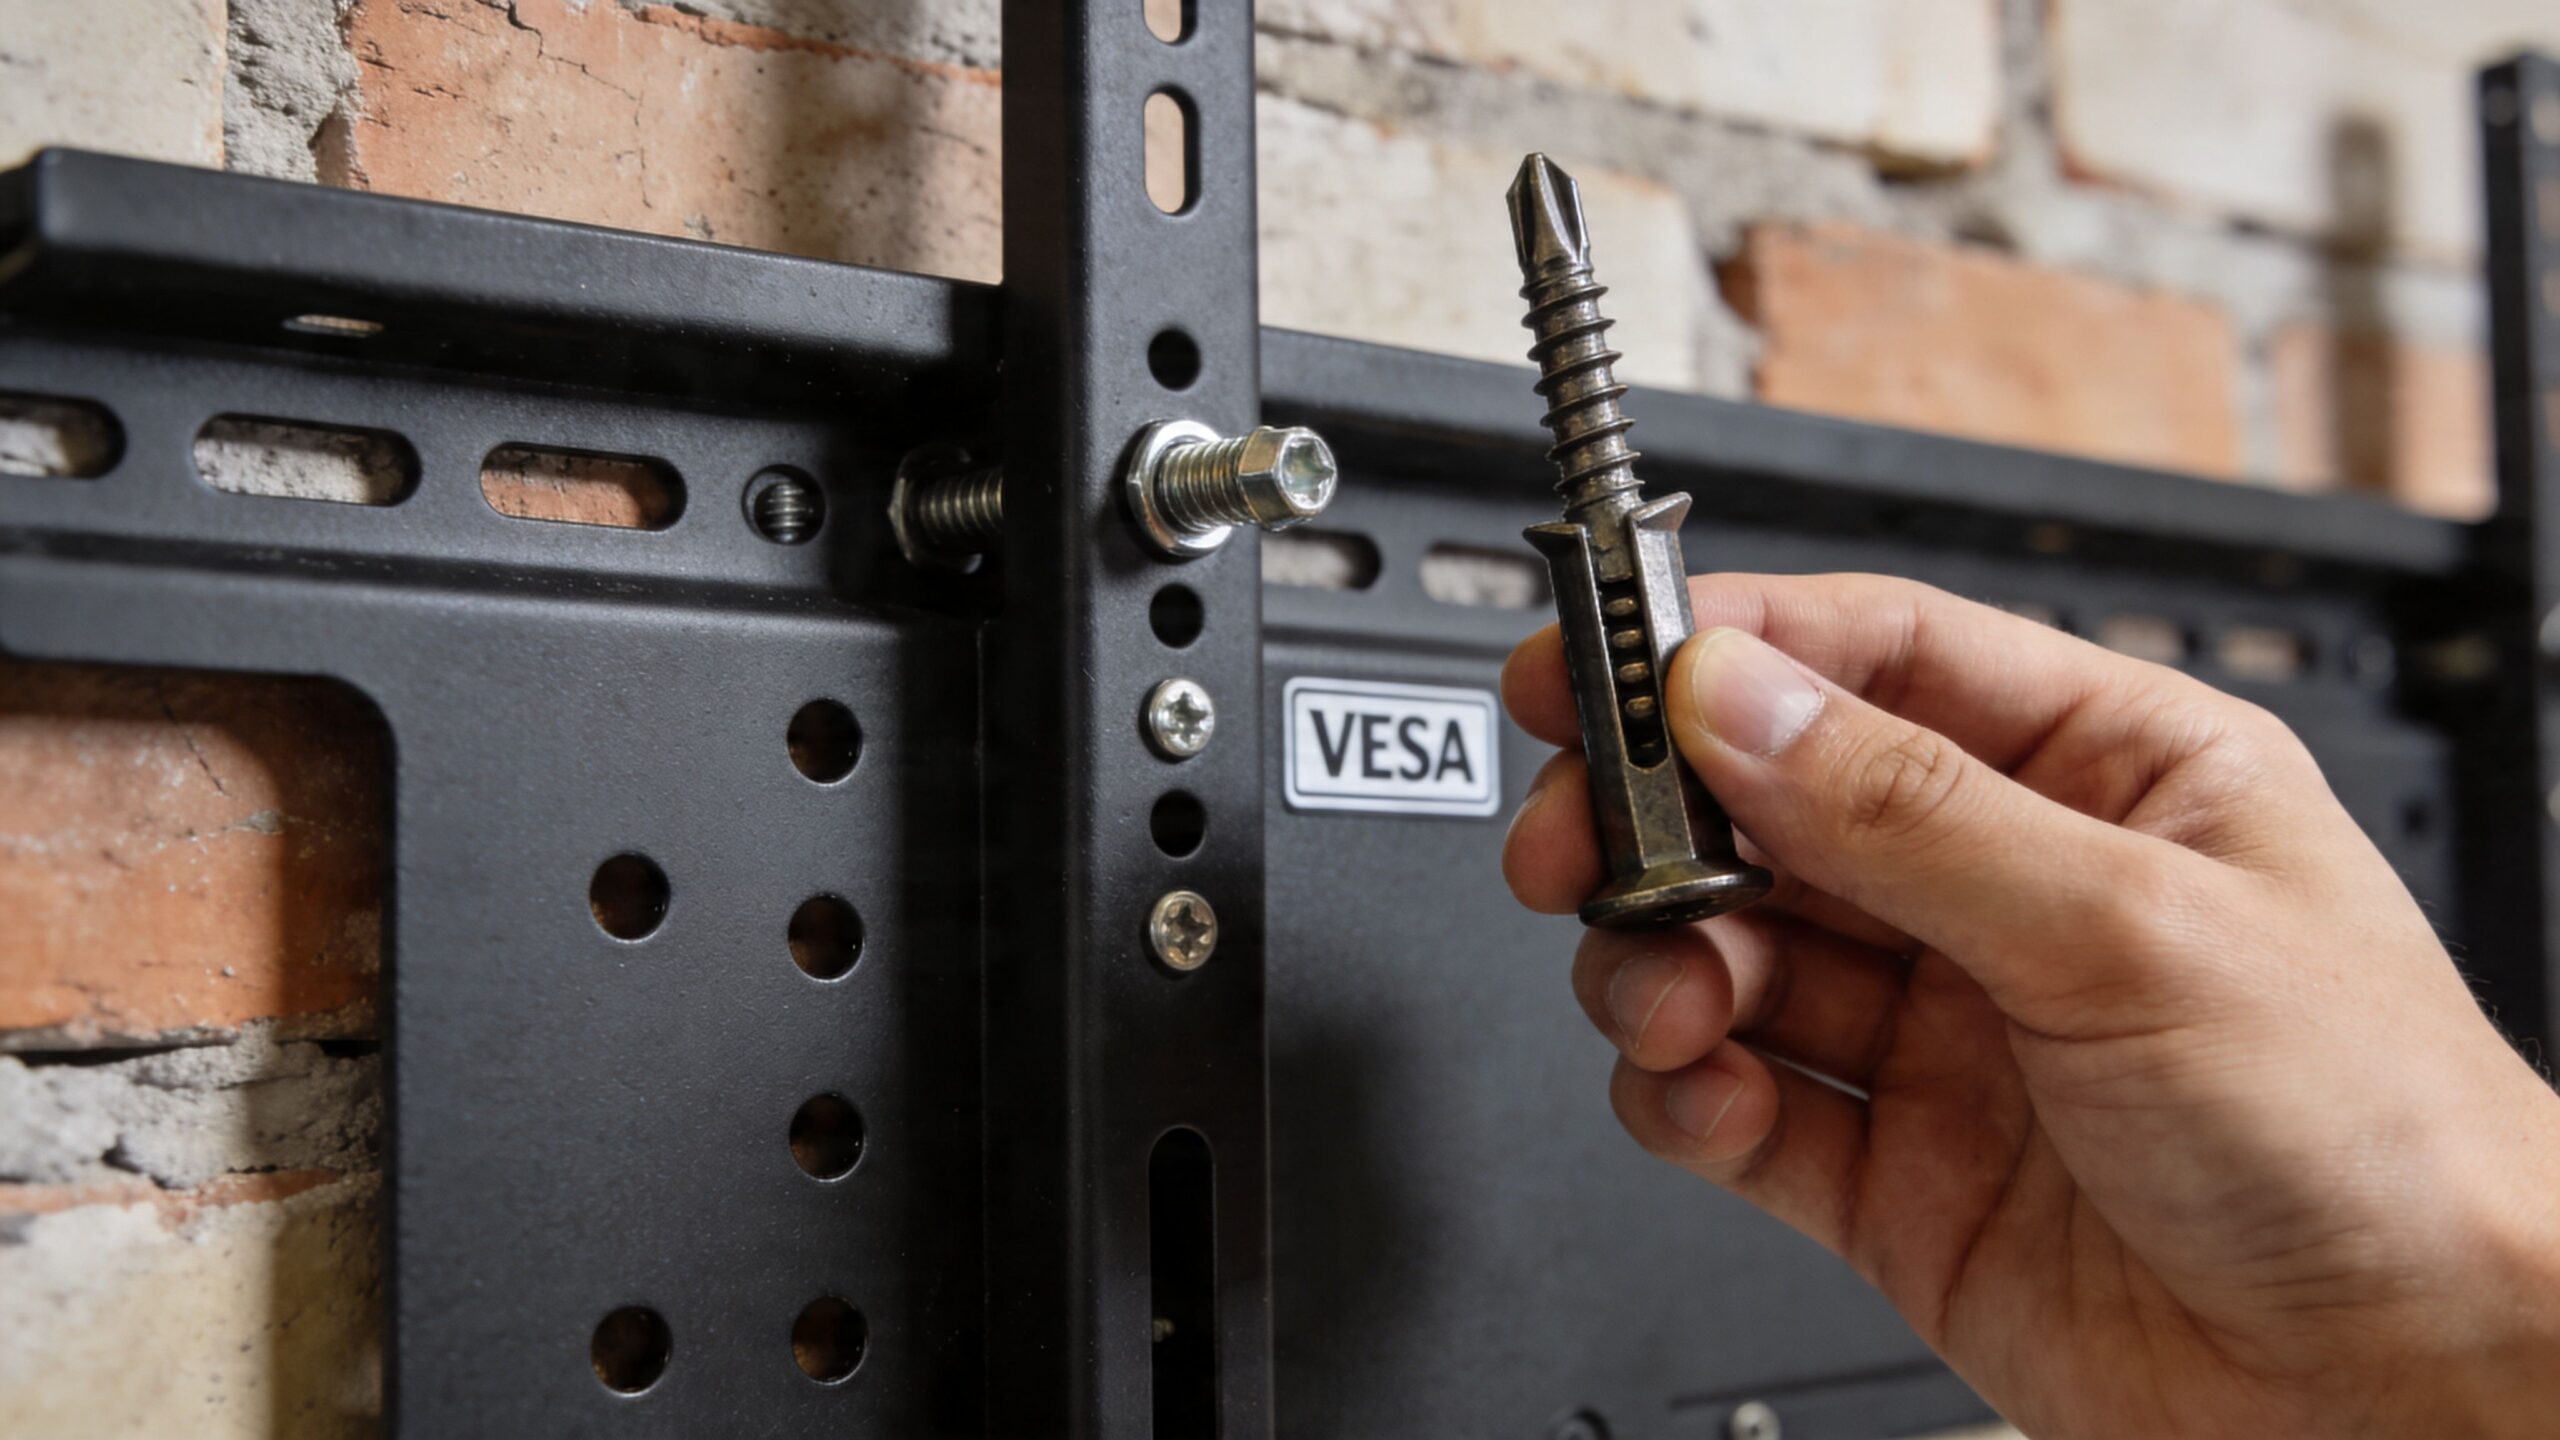
Most TV mounts come with assorted screws, spacers, and wall hardware. That doesn’t mean all of it belongs on brick. Many kits are assembled to cover common drywall or wood-stud installs, not masonry.
For brick walls, installers commonly reach for concrete screws such as Tapcons, or another anchor system rated for masonry. The right choice depends on the wall material, hole quality, mount plate design, and load behavior.
What doesn’t work well is guessing.
VESA is the mounting hole pattern on the back of the TV. If the pattern on the television and the mount don’t line up, the install stops right there.
You’ll usually see VESA written as a measurement like 400x400mm. That describes the horizontal and vertical spacing between the mounting holes. It sounds technical, but it’s simple once you check the back of the display or the TV specs.
A proper match has three parts:
If even one of those is off, the install becomes sloppy or unsafe.
Anchor choice isn’t just “strong enough” versus “not strong enough.” It’s about the type of load. A fixed mount close to the wall behaves differently than a TV on an arm that extends into the room.
That’s why pros tend to overbuild brick installs. Not because the TV is necessarily massive, but because masonry gives you one chance to do the holes right.
Field note: A clean anchor hole, proper embedment, and correct fastener choice usually matter more than buying the fanciest mount on the shelf.
A reliable brick mounting setup usually includes:
| Problem | What happens | Better approach |
|---|---|---|
| VESA pattern too small or too large | TV won’t mount correctly | Confirm TV and mount pattern before purchase |
| TV screw length incorrect | Poor thread engagement or damage to TV | Use the manufacturer-correct screws and spacers |
| Wall hardware from the box used blindly | Weak hold in masonry | Buy hardware specifically for brick |
| Anchor layout forced into bad brick | Unstable plate or cosmetic damage | Reposition or change mount strategy |
The best tv mount for brick wall installations is never just a mount model. It’s the combination of correct VESA fit, proper masonry anchor choice, and a layout that works with the actual brick pattern.
The difference between a secure install and a stressful one usually comes down to process. Pros don’t start with the drill. They start with layout, verification, and a plan for what the room should look like when everything is finished.
Choose the viewing height before you choose the bolt locations. The room decides this more than the wall does. Sofa height, viewing distance, glare from windows, and whether the TV is above a fireplace all matter.
A cardboard template or painter’s tape outline helps. It’s a simple move, but it lets you judge scale, centerline, and sightline before you make permanent holes in masonry.
Once the location is settled, hold the wall plate in position and level it carefully. On brick, small errors are obvious because the grout lines and courses create strong visual references. A slightly crooked TV looks even more crooked against masonry.
Mark hole positions based on the actual mount plate, not rough measurement alone. Then stop and check the marks against the brick layout. If a mark lands near an edge, on damaged material, or where the surface is uneven, adjust before drilling.
Technique matters. Use a hammer drill with a carbide-tipped masonry bit sized to the anchor system. Start steady. Let the tool work instead of forcing it.
Hole depth needs to be consistent, and the holes need to be clean. Brick dust left inside the hole can interfere with anchor engagement. That’s why installers clear out debris before setting hardware.
A clean workflow usually looks like this:
For a broader walkthrough of general wall-mounting mechanics, this article on how to mount a TV on wall is useful background.
Even when the screen isn’t especially heavy, the shape makes it awkward. One person can support weight while the other guides the mounting arms onto the wall plate and confirms the lock or safety tabs engage properly.
Don’t rush this part. Before the TV is released, check:
A brick TV wall can look polished or unfinished depending on cable management. Because masonry isn’t as easy to open as framed drywall, the path for power, HDMI, network, and audio needs to be considered early.
There are a few common approaches:
| Cable approach | Look | Best use |
|---|---|---|
| Surface raceway painted to match wall | Clean and practical | Fast upgrades without major wall work |
| Concealment through adjacent wall or cabinet path | Very clean | Remodels or nearby equipment locations |
| External media console directly below TV | Simple and serviceable | Traditional living rooms |
The install isn’t complete when the TV is hanging. It’s complete when the screen is level, the cables are controlled, and the wall still looks like the room’s focal point.
That’s the part many DIY installs miss. Mounting on brick is less about brute force and more about disciplined sequence.
A wall-mounted TV often becomes the visual center of a room, but in a well-designed home it also becomes part of a larger system. The mount is the physical foundation. What happens around it is where the experience changes.
A modern living room shouldn’t feel like a collection of unrelated black boxes. The screen, audio, lighting, control, and network should work together and disappear into the background when they’re not in use.
That’s where smart home integration matters. A clean brick TV installation pairs naturally with voice control from Josh.ai, lighting scenes from Lutron, whole-room audio from Sonos, and premium movie playback from Kaleidescape. Add Ubiquiti networking behind the scenes and the system becomes more reliable, not just more impressive.
The most satisfying systems reduce steps. Instead of juggling remotes and apps, a simple command can lower lights, wake the display, start the right source, and route sound to the room.
A “Movie Night” scene might do things like:
If you’re still deciding where the screen should land in relation to your seating, the TV Distance Calculator is a useful planning tool for room layout and comfort.
Brick walls don’t forgive sloppy wire management. The hardware can be perfect and the room can still feel unfinished if power cords and HDMI lines are visible.
That’s why cable concealment should be part of the design conversation from the beginning. This guide on how to hide TV wires and cables is helpful if you’re weighing raceways, adjacent-wall routing, or cabinet-based equipment placement.
For many homeowners, the living room setup is only the start. The same control layer that handles the TV can also reach into outdoor audio, outdoor lighting, and exterior accents. Systems built around brands like Oelo for lighting and reliable network infrastructure make the house feel more unified.
This is also where broader integration work comes into view. Home-focused projects often expand into custom home theater, new home builds, whole-home audio, outdoor lighting and sound, and even specialized spaces where entertainment and automation are planned together from day one. Commercial work exists too, including restaurants, but the strongest value is usually in the home, where aesthetics and daily usability matter room by room.
Some brick TV installs are straightforward. Others look simple until you start checking the wall, the hardware, and the cable path. That’s usually where the DIY line becomes clear.
If the brick is old, painted over many times, patched, or shedding material, I’d be careful. If you want an articulating arm on a large screen, I’d be careful. If the room needs hidden wiring, smart control, distributed audio, or a polished theater-style result, I’d be careful.
The biggest red flags are usually these:
A good installer doesn’t just attach a bracket. They evaluate the substrate, choose the right hardware, place the TV at a height that makes sense, and leave the room looking intentional. That precision matters more on brick than on forgiving interior walls.
It also helps to know how to evaluate the person doing the work. If you’re hiring for any home project, this guide on how to choose a contractor is a practical resource for screening experience, communication, and fit.
If budget is part of your decision, this page on average cost of TV mounting can help frame what professional installation typically includes.
A TV install often leads to larger upgrades. Once the screen is on the wall, homeowners start asking about better sound, lighting scenes, stronger Wi-Fi, security cameras, automated shades, or a dedicated media room. That’s where a qualified integrator is worth more than a handyman with a drill.
For homeowners in southern Wisconsin and nearby northern Illinois, that can also mean one team handling more than a single room. The same expertise often extends to new home builds, custom home theaters, home audio, outdoor sound and lighting, and selected commercial spaces such as restaurants. But for most families, value is at home, where the system has to look clean, work every day, and feel easy to use.
Yes, if the brick underneath is sound. Painted brick changes the finish concerns more than the structural ones. Use painter’s tape for marking when possible, drill carefully to reduce chipping, and expect small touch-up work if the paint flakes around the hole.
Drilling into mortar joints is the mistake that causes the most trouble. Mortar is weaker than the face of the brick, and it doesn’t hold TV mount loads the same way. If the holes are wrong, the rest of the install never really recovers.
Not always, but it’s the safest default for many brick walls. If your seating is at normal height and you don’t need swivel or extension, fixed usually gives the best combination of stability, low profile, and clean appearance.
Yes, but the method depends on the room. Some setups use paintable surface raceways. Others route wiring through an adjacent wall, cabinet, or equipment location nearby. The cleanest result usually comes from planning the cable path before the mount goes up.
Sometimes, but not automatically. The questions are heat, viewing height, and wall condition. Many fireplace locations put the TV too high for comfortable long-term viewing, and some surfaces are harder to mount cleanly than they first appear.
Yes. Masonry work calls for a hammer drill and carbide-tipped masonry bits, plus hardware rated for brick. Standard wall anchors and wood-focused tools are not the right setup for this material.
If you want the job done cleanly, safely, and with the rest of your home in mind, Home AV Pros can help. They handle professional TV mounting, custom home theater, smart home automation with platforms like Josh.ai and Lutron, whole-home audio, networking, new home builds, outdoor lighting and sound, and more across southern Wisconsin and nearby northern Illinois. If your brick wall install needs more than guesswork, they’re the team to call.

Copyright © 2026. Home AV pros. All rights reserved.