A new TV usually arrives with a lot of excitement and one deceptively simple question. Where should it go?
Most homeowners start by looking at screen size and wall space. Installers look at the room differently. We look at sightlines, glare, wall structure, speaker placement, cable paths, and what else that screen needs to work with later. A TV mount isn’t just a bracket. It’s the foundation for how the room will feel every day.
That matters even more in homes that are being built out into a larger lifestyle system. The TV may end up sharing the wall with a Sonos soundbar, tying into Josh.ai voice control, sitting inside a Lutron lighting and shade scene, or becoming the visual centerpiece of a custom theater. In that kind of setup, a bad mount choice shows up fast. You see the gap off the wall, the crooked line over the cabinet, the exposed wires, or the screen that can’t angle where the seating is.
Choosing well at the start saves rework later. It also protects the look of the room, which is usually what homeowners care about most once the TV is no longer in the box and the installation becomes part of the house.
The most common mistake happens before a single hole is drilled. Someone buys a great TV, grabs a mount that says it fits that screen size, and assumes the rest will sort itself out.
Sometimes it does. Often it doesn’t.
A clean installation depends on more than whether the TV physically hangs on the wall. The mount affects how close the screen sits, whether you can reduce glare, whether the TV clears a soundbar, and whether the whole setup feels intentional instead of improvised. A sleek living room with hidden wiring and balanced spacing feels different from a room where the TV sticks out too far and every cord is visible from the sofa.
Practical rule: The best mount is the one that fits the room, not just the TV.
That’s especially true when the television is part of a bigger home system. In a dedicated media room, a fixed mount may create the lowest-profile look and the most picture-frame feel. In a family room that opens toward the kitchen, a full-motion arm may be the difference between a TV that works for one seat and a TV that works for the whole space.
The mount also shapes what comes next. If you plan to add whole-home audio, architectural speakers, a Kaleidescape movie player, automated shades, or better networking, the TV location becomes part of a larger design conversation. That same wall may later need room for low-voltage wiring, concealed power, control hardware, or a future OLED panel that sits much closer to the wall than older sets.
Good TV mounting is practical work. It’s also finish work. Homeowners notice both.
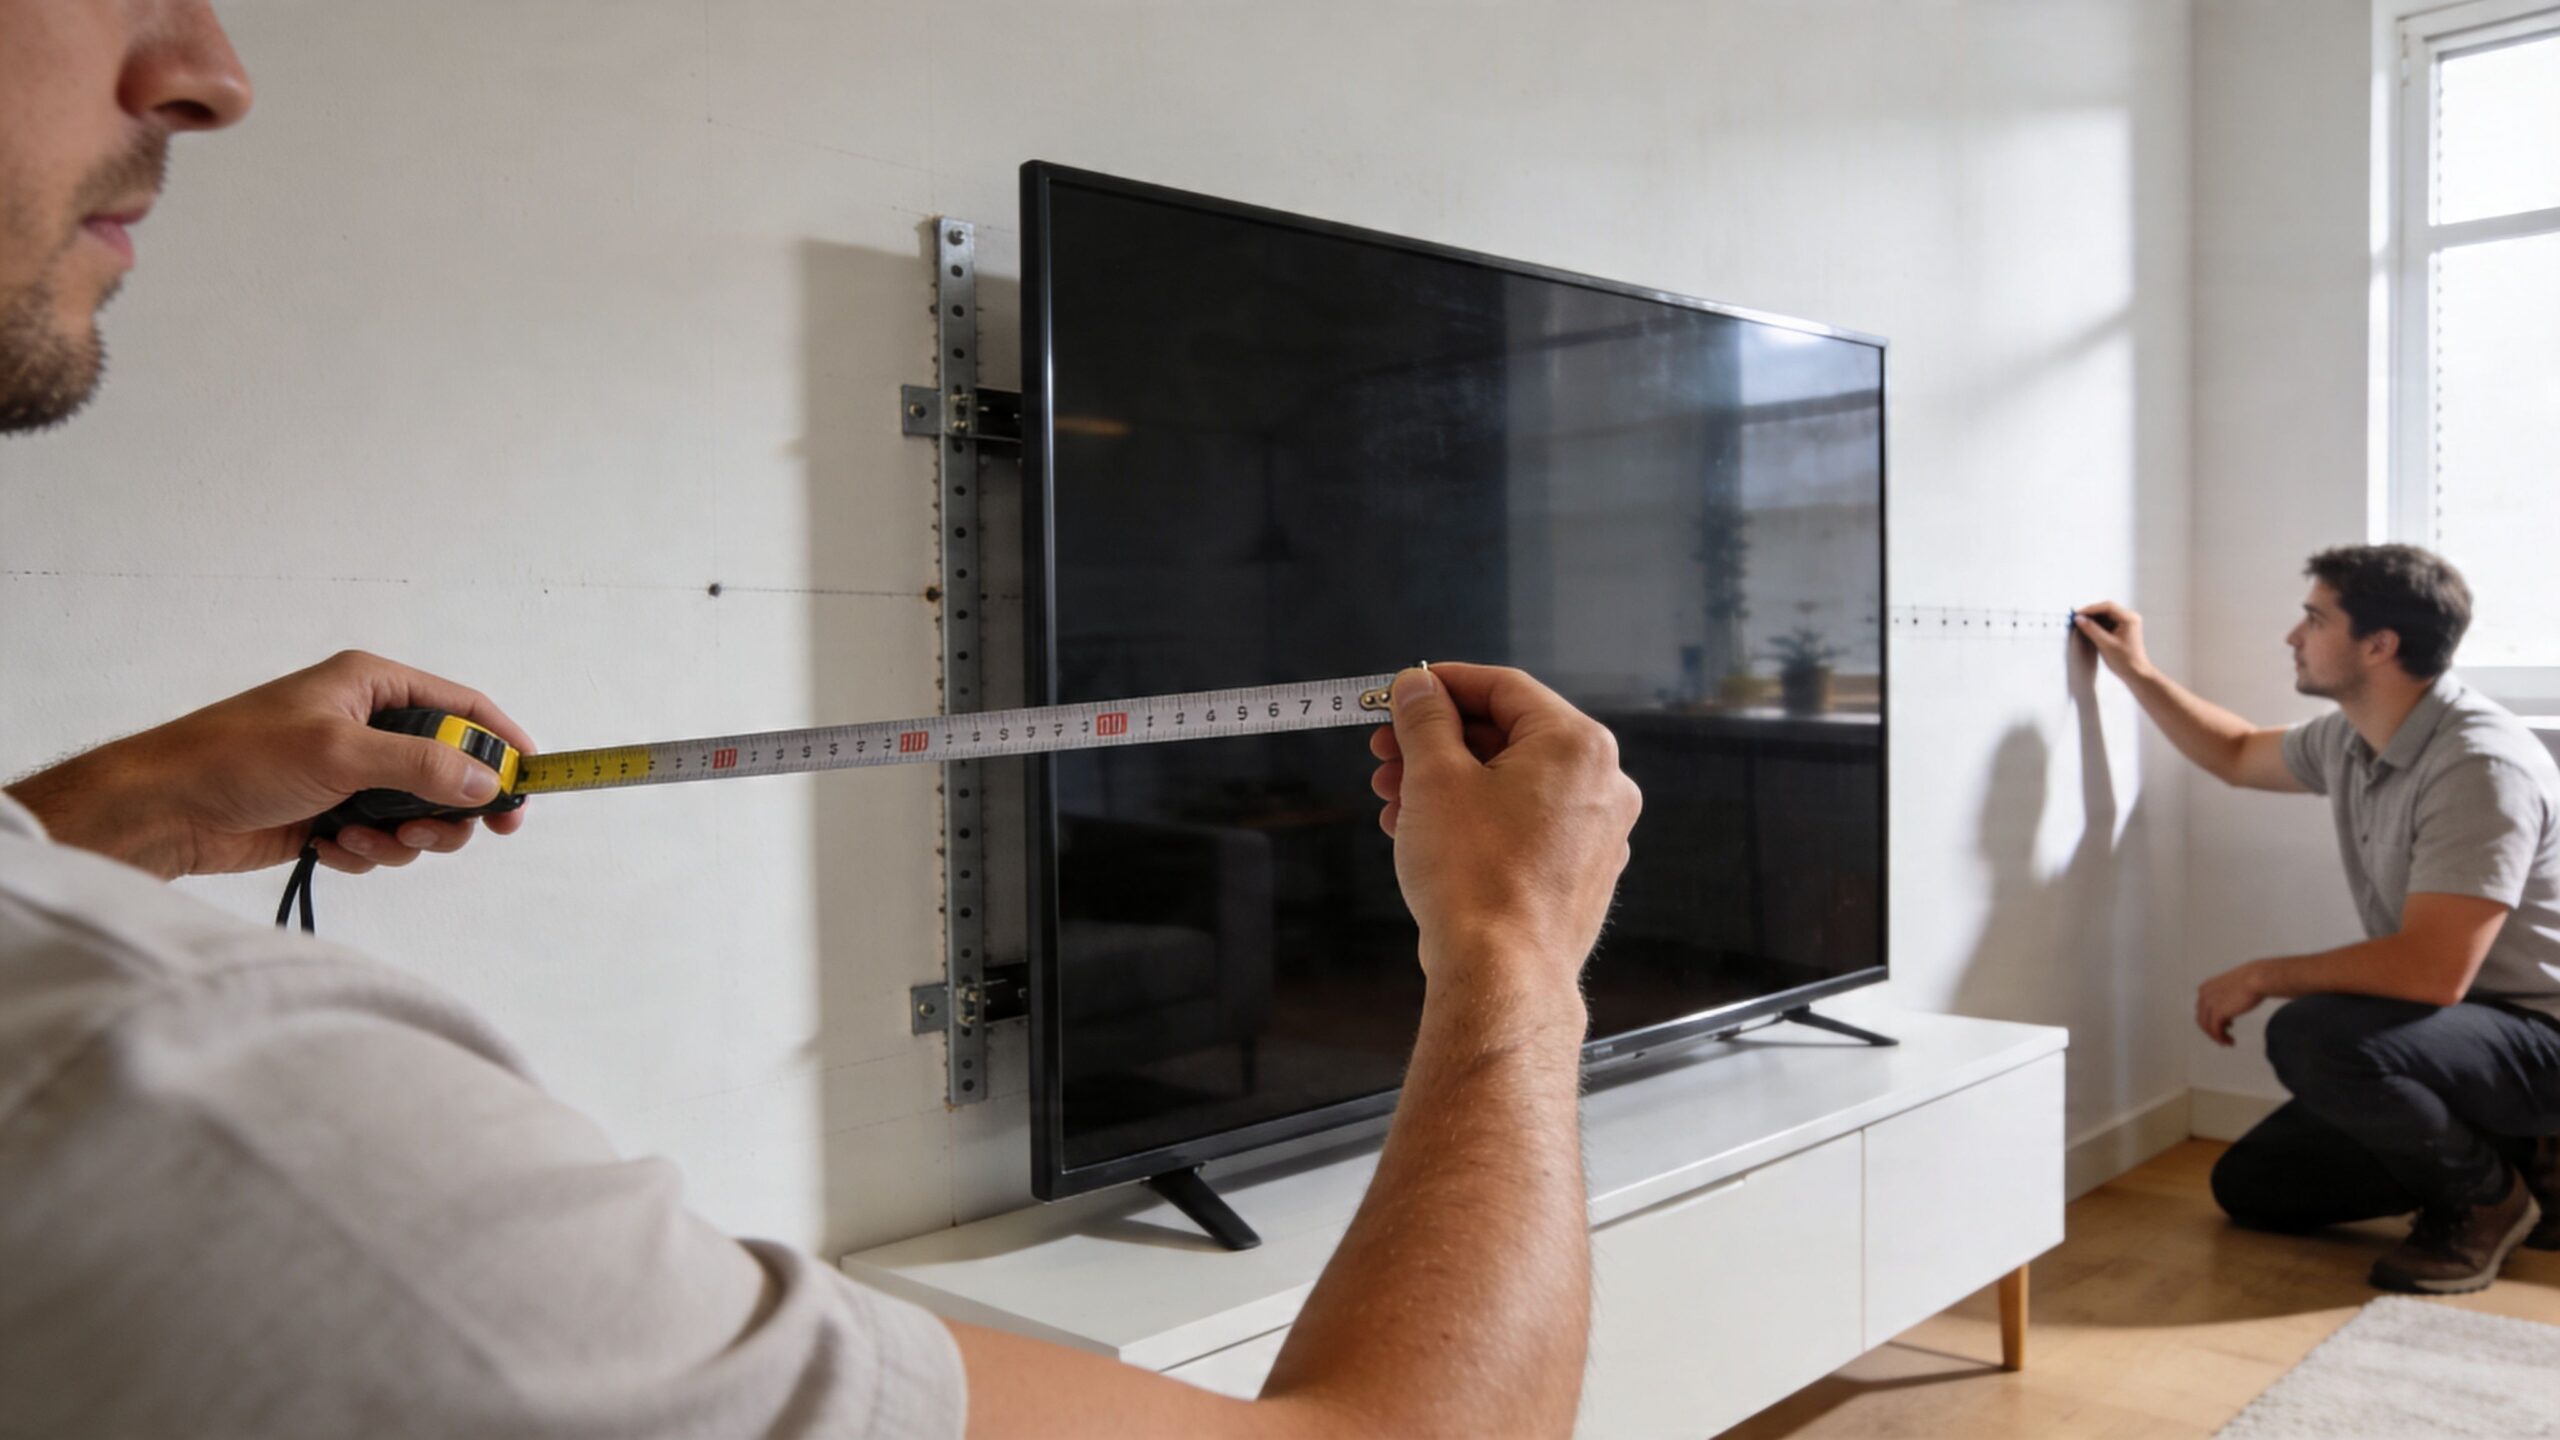
A TV mount only performs as well as the screen and wall behind it. Before you compare mount styles, lock down two facts. Your TV’s mounting specs and your wall’s real structure.
That is the point where clean installs separate from frustrating ones. In the homes we work on across southern Wisconsin and northern Illinois, the screen is often the easy part. The wall is where the job gets decided, especially in older plaster homes that were never built with modern displays, hidden wiring, Sonos soundbars, or future control upgrades from systems like Josh.ai and Lutron in mind.
Screen size helps narrow the field. It does not tell you whether a mount fits.
What matters first is the VESA pattern, which is the spacing between the mounting holes on the back of the TV, plus the set’s actual weight. Common VESA patterns include 100×100, 200×200, and 400×400, measured in millimeters, as explained in RMS Installs' guide to choosing the right TV mount. Two 65-inch TVs can use different patterns, carry weight differently, and need different clearances for plugs, recessed boxes, or low-profile mounts.
Use this checklist before you buy:
That last point matters more in design-driven rooms. A flush look can be excellent, but only if the power location, HDMI path, and service access were planned first. If the TV is part of a larger smart home setup, the mount location also needs to leave room for future additions such as a Sonos Arc, a recessed outlet box, or control wiring that supports scenes and voice control later.
The wall decides the hardware, the labor, and sometimes the final TV location.
Drywall over standard wood studs is the cleanest scenario. Plaster over lath, brick, concrete, stone, chimney walls, and patched remodel work require a different approach. In older Midwestern homes, studs may be off-center, plaster may be uneven, and the wall cavity may not give you the path you expected for power and low-voltage lines. That affects more than structural attachment. It affects whether the finished install looks deliberate or forced.
Generic mounting guides rarely spend enough time on older housing stock. They should. A 1920s or 1950s living room often needs more than a stud finder and a boxed mount from the hardware aisle.
Walk the wall and answer these questions before you order anything:
If you are dealing with hollow walls and lighter accessories, anchor choice matters. For general reference, Neasden Hardware’s guide to the best fixings for plasterboard walls is useful. For a TV installation, structural attachment still comes first.
In newer construction, the wall often accepts the TV where you want it. In older homes, the mount location, backing method, or cable plan usually needs to adapt.
The fix is often one of these:
This is also where smart home planning pays off. If the TV will later tie into Lutron lighting scenes, Sonos audio zones, or Josh.ai voice control, rough-in space and wire paths should be considered before the screen goes up. Reworking a mount after the room is trimmed, painted, and furnished costs more and rarely looks as clean.
If you are still finalizing screen size before you commit to placement, our guide on how to choose the right TV size for your room will help you set the scale before you solve the mounting details.
A homeowner in an older Midwest living room usually wants two things at once. A TV that looks clean on the wall, and a setup that still works when the room grows into Sonos audio, Lutron lighting scenes, or Josh.ai control later.
The mount choice sets that direction early.
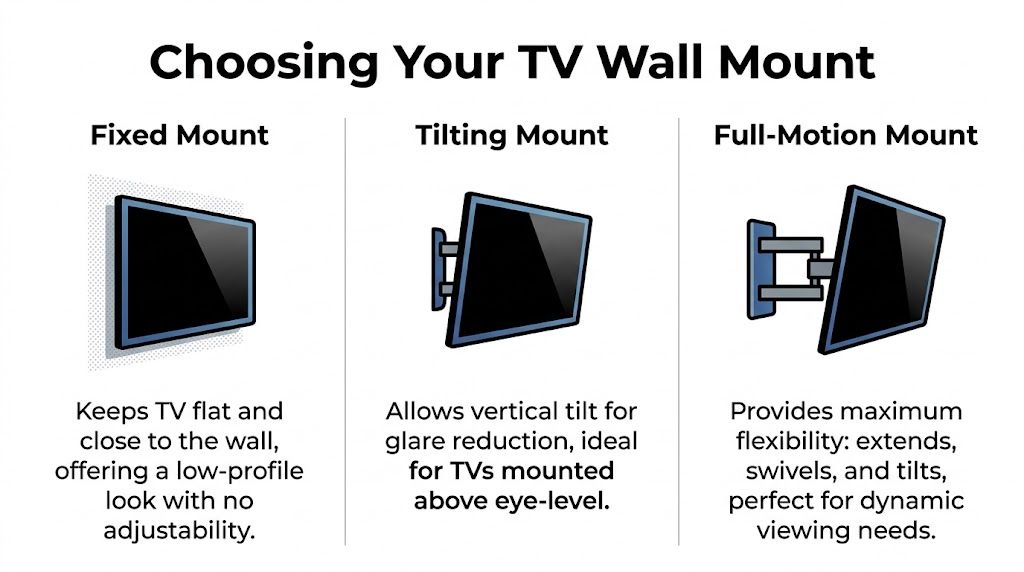
A fixed mount keeps the TV tight to the wall and usually gives the best visual result. A tilting mount adds a little adjustment for height or glare without making the install look bulky. A full-motion mount gives the screen the most flexibility, but it also asks the most from the wall and from the overall design.
That trade-off matters more in older homes. Plaster, inconsistent framing, brick chimneys, and off-center fireplaces can turn a simple mount decision into a structural and aesthetic decision at the same time.
| Mount Type | Profile (Distance from Wall) | Adjustability | Best For | Considerations |
|---|---|---|---|---|
| Fixed | Close to the wall, with some low-profile models nearly flush | None | Dedicated viewing positions, minimalist rooms, theater-style layouts | Harder rear access, no help with glare, placement must be right the first time |
| Tilting | Slightly farther off the wall than fixed | Vertical tilt | TVs mounted a bit high, bright rooms, fireplace-adjacent setups | Doesn’t swivel side to side, still limited for open layouts |
| Full-motion | Extends away from the wall | Swivel, tilt, extension | Corner installs, open-concept spaces, seating from multiple angles | More visible hardware, more complex install, wall structure matters more |
Fixed is the cleanest option. In a room with centered seating, controlled light, and a cabinet or soundbar location already planned, it usually gives the best finish.
This is the mount I prefer when the goal is a built-in look.
It also pairs well with higher-end rooms where the TV should feel intentional, not mechanical. If the wall will carry a slim display, a properly aligned soundbar, and hidden wiring for a larger media setup, fixed keeps the wall calm. Homeowners planning a polished setup often pair that approach with the right home theater accessories for sound, control, and clean integration.
Fixed mounts are less forgiving. If the screen ends up too high, catches daytime glare, or needs to face a second seating area, the clean look stops feeling like an advantage.
Tilting mounts earn their place in a lot of family rooms. They help when the TV has to land slightly above ideal eye level, which happens often over fireplaces, taller casework, or original built-ins in older houses.
They also help reduce reflections.
A good tilt adjustment can clean up a picture that would otherwise look washed out during the day. You keep a relatively tight profile, but you gain enough movement to correct for a wall that is not giving you perfect conditions. For many homeowners, that is the best balance between appearance and function.
Some layouts need the TV to do more. Open-concept rooms, corner installs, kitchens that share sightlines with the family room, and spaces with multiple seating zones usually point to full-motion.
The upside is obvious. You can turn the screen where people sit.
The downside is just as real. A full-motion arm projects the load outward, so the wall carries more stress than it does with a fixed bracket. In an older Midwestern home, that can mean adding backing, changing the mount location, or using a wider plate to catch framing properly. It also means the hardware stays more visible, which can fight against the clean architectural look many homeowners want.
As noted earlier in Mount-It’s guide on choosing a TV wall mount, fixed mounts are the simplest low-profile option, while full-motion models make the most sense for corner placement and viewing from multiple angles. Larger TVs also tend to call for stronger two-arm articulating designs instead of lighter single-arm versions.
A simple framework works well:
The best mount is the one that fits the room, the wall, and the long-term plan for the system. In a basic install, that means better viewing. In a more advanced home, it also means cleaner cable paths, better soundbar alignment, and fewer compromises once control, lighting, and distributed audio enter the project.
A mounted TV used to be the end of the project. Now it’s often the start of one.
In a well-designed home, the TV is tied to lighting, audio, networking, control, and how the room shifts between daytime living and nighttime viewing. The mount affects all of that because it determines where the screen sits, how cables can be hidden, how a soundbar aligns below it, and whether the wall can support the gear that turns a TV area into an actual media system.
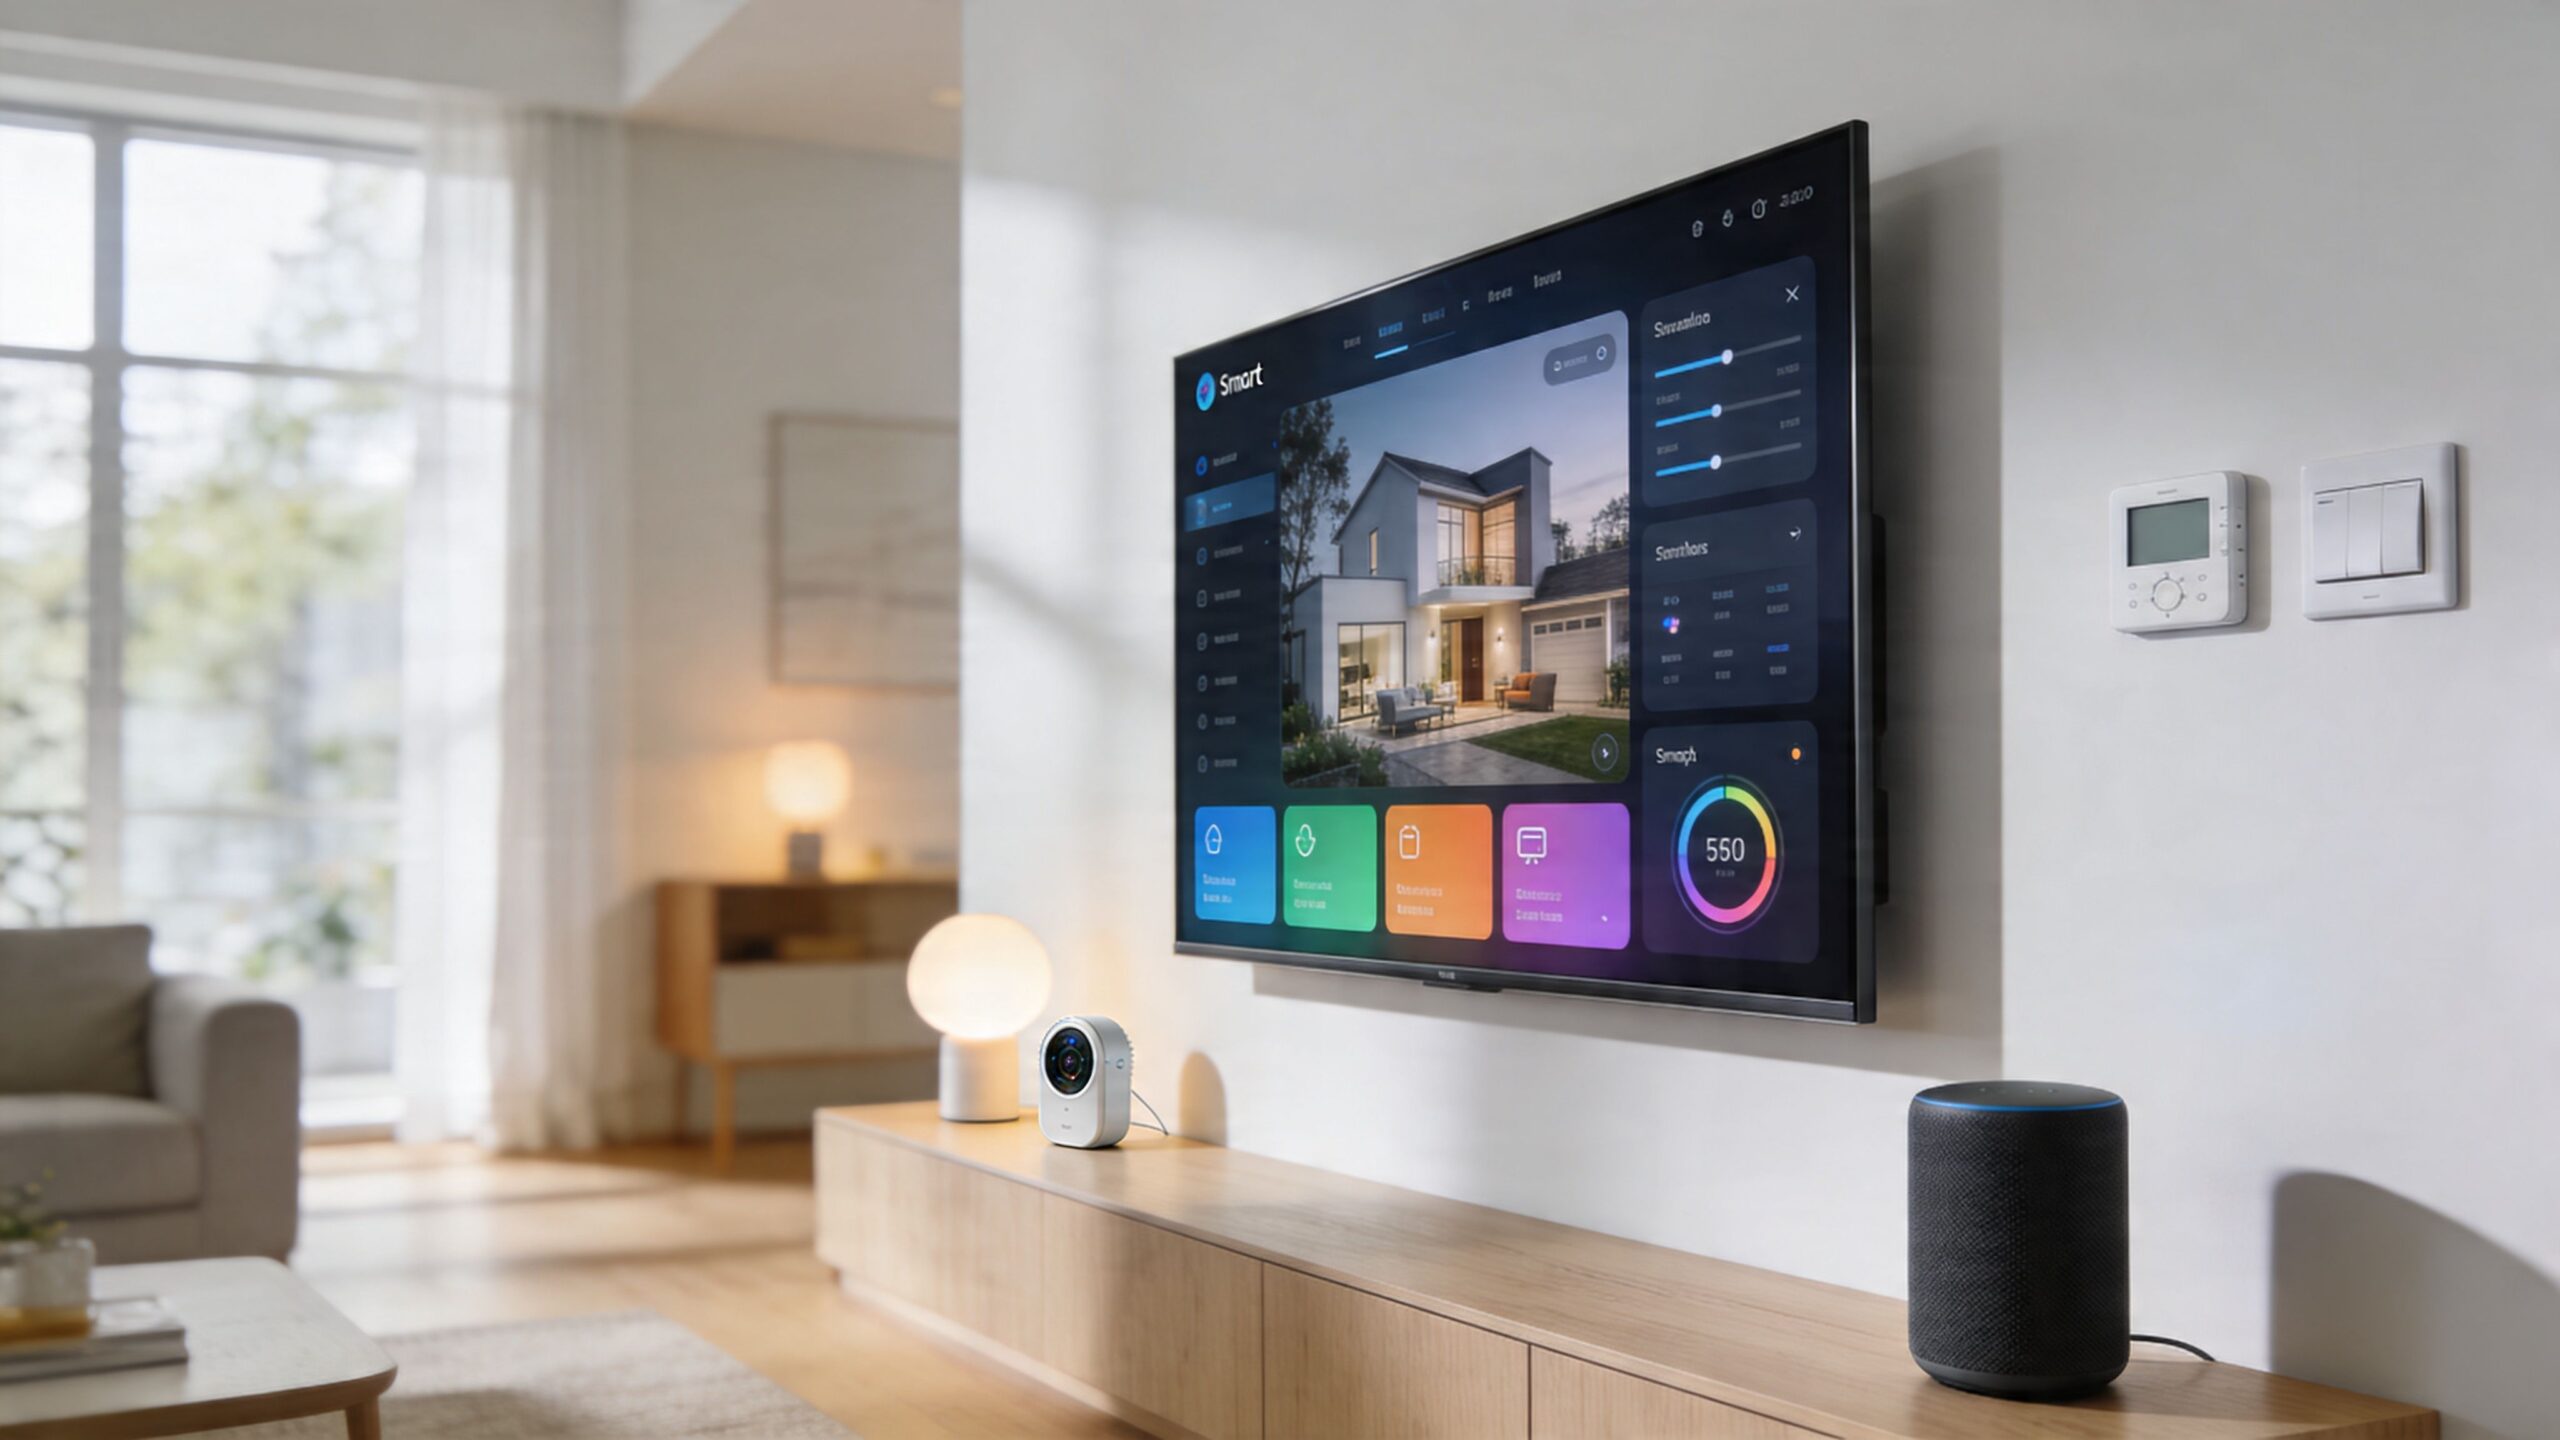
A modern install often includes a Sonos soundbar, hidden streaming hardware, network gear that needs reliable backhaul, and control that reaches beyond a single remote. In higher-end systems, that can expand into Josh.ai voice control, Lutron scenes for lights and shades, and a Kaleidescape player for dedicated cinema viewing.
That means the mount decision can’t be isolated from the wall cavity and cable path. If the TV sits beautifully but there’s no clean route for power, HDMI, network, or low-voltage control, the installation starts looking compromised fast.
One verified point is worth taking seriously here. Future-proofing a TV mount involves considering ultra-thin panels, such as OLEDs under 1 inch thick, and smart home integrations. The right mount must allow for in-wall cable pass-throughs for systems like Josh.ai and Sonos, and specialized low-profile or articulating mounts with integrated leveling are becoming essential, according to Mount-It’s guidance on choosing a TV wall mount for newer displays.
The cleaner the room needs to look, the earlier the mount should be chosen.
A luxury living room doesn’t tolerate visible compromises well. If a Lutron keypad sets a movie scene, shades lower, and the Sonos system wakes up, exposed cords under the TV will feel out of place immediately. The same goes for a display mounted a little too high because no one coordinated the cabinet, soundbar, and outlet locations before install day.
A good integrated setup usually requires these decisions up front:
Many hardware-store installs fall short in this regard. They focus on hanging the TV. They don’t think about what the wall looks like when nothing is playing.
In a finished home, the visual goal is restraint. The TV should sit at the right depth, align with furniture below, leave room for clean speaker placement, and disappear into the architecture as much as possible. That matters in family rooms, bedrooms, and dedicated theaters alike.
For homeowners building out a more immersive setup, this collection of home theater accessories is a useful reference point for the gear that often needs to coexist with the display.
The best smart home installations feel simple from the seat because someone made the complicated decisions before the drywall was patched and the screen went up.
The TV mount is one of those decisions. It seems small until it affects every wire, every line of sight, and every piece of hardware around it.
You feel a bad TV height every night. A clean install fixes that before the first show ever starts.
In real rooms, comfort and appearance have to work together. The screen has to sit well from the main seat, the soundbar needs proper clearance, and the wiring cannot fight the architecture. That matters even more in older Midwestern homes, where plaster walls, uneven framing, and retrofit cable paths often limit what looks easy on paper.
The best reference point is the way the room is used. For everyday viewing, the screen center usually wants to land near seated eye level. If the TV has to go a little higher, such as over a low console with a Sonos Arc or in a bedroom, a tilting mount can correct the viewing angle and reduce neck strain.
The wall should not dictate the install. The seating does.
Homeowners often want the TV visually centered between trim lines, windows, or a fireplace surround. That can work, but only if the screen still feels comfortable after an hour or two on the sofa. In custom installs, I usually balance four things at once: eye line from the primary seat, furniture height, speaker placement, and what the wall looks like when the TV is off.
A few rules hold up in almost every room:
For a more detailed planning method, use this guide on the best height to mount a TV on the wall.
A well-mounted TV with visible cords still reads as unfinished. That is the part many DIY installs miss.
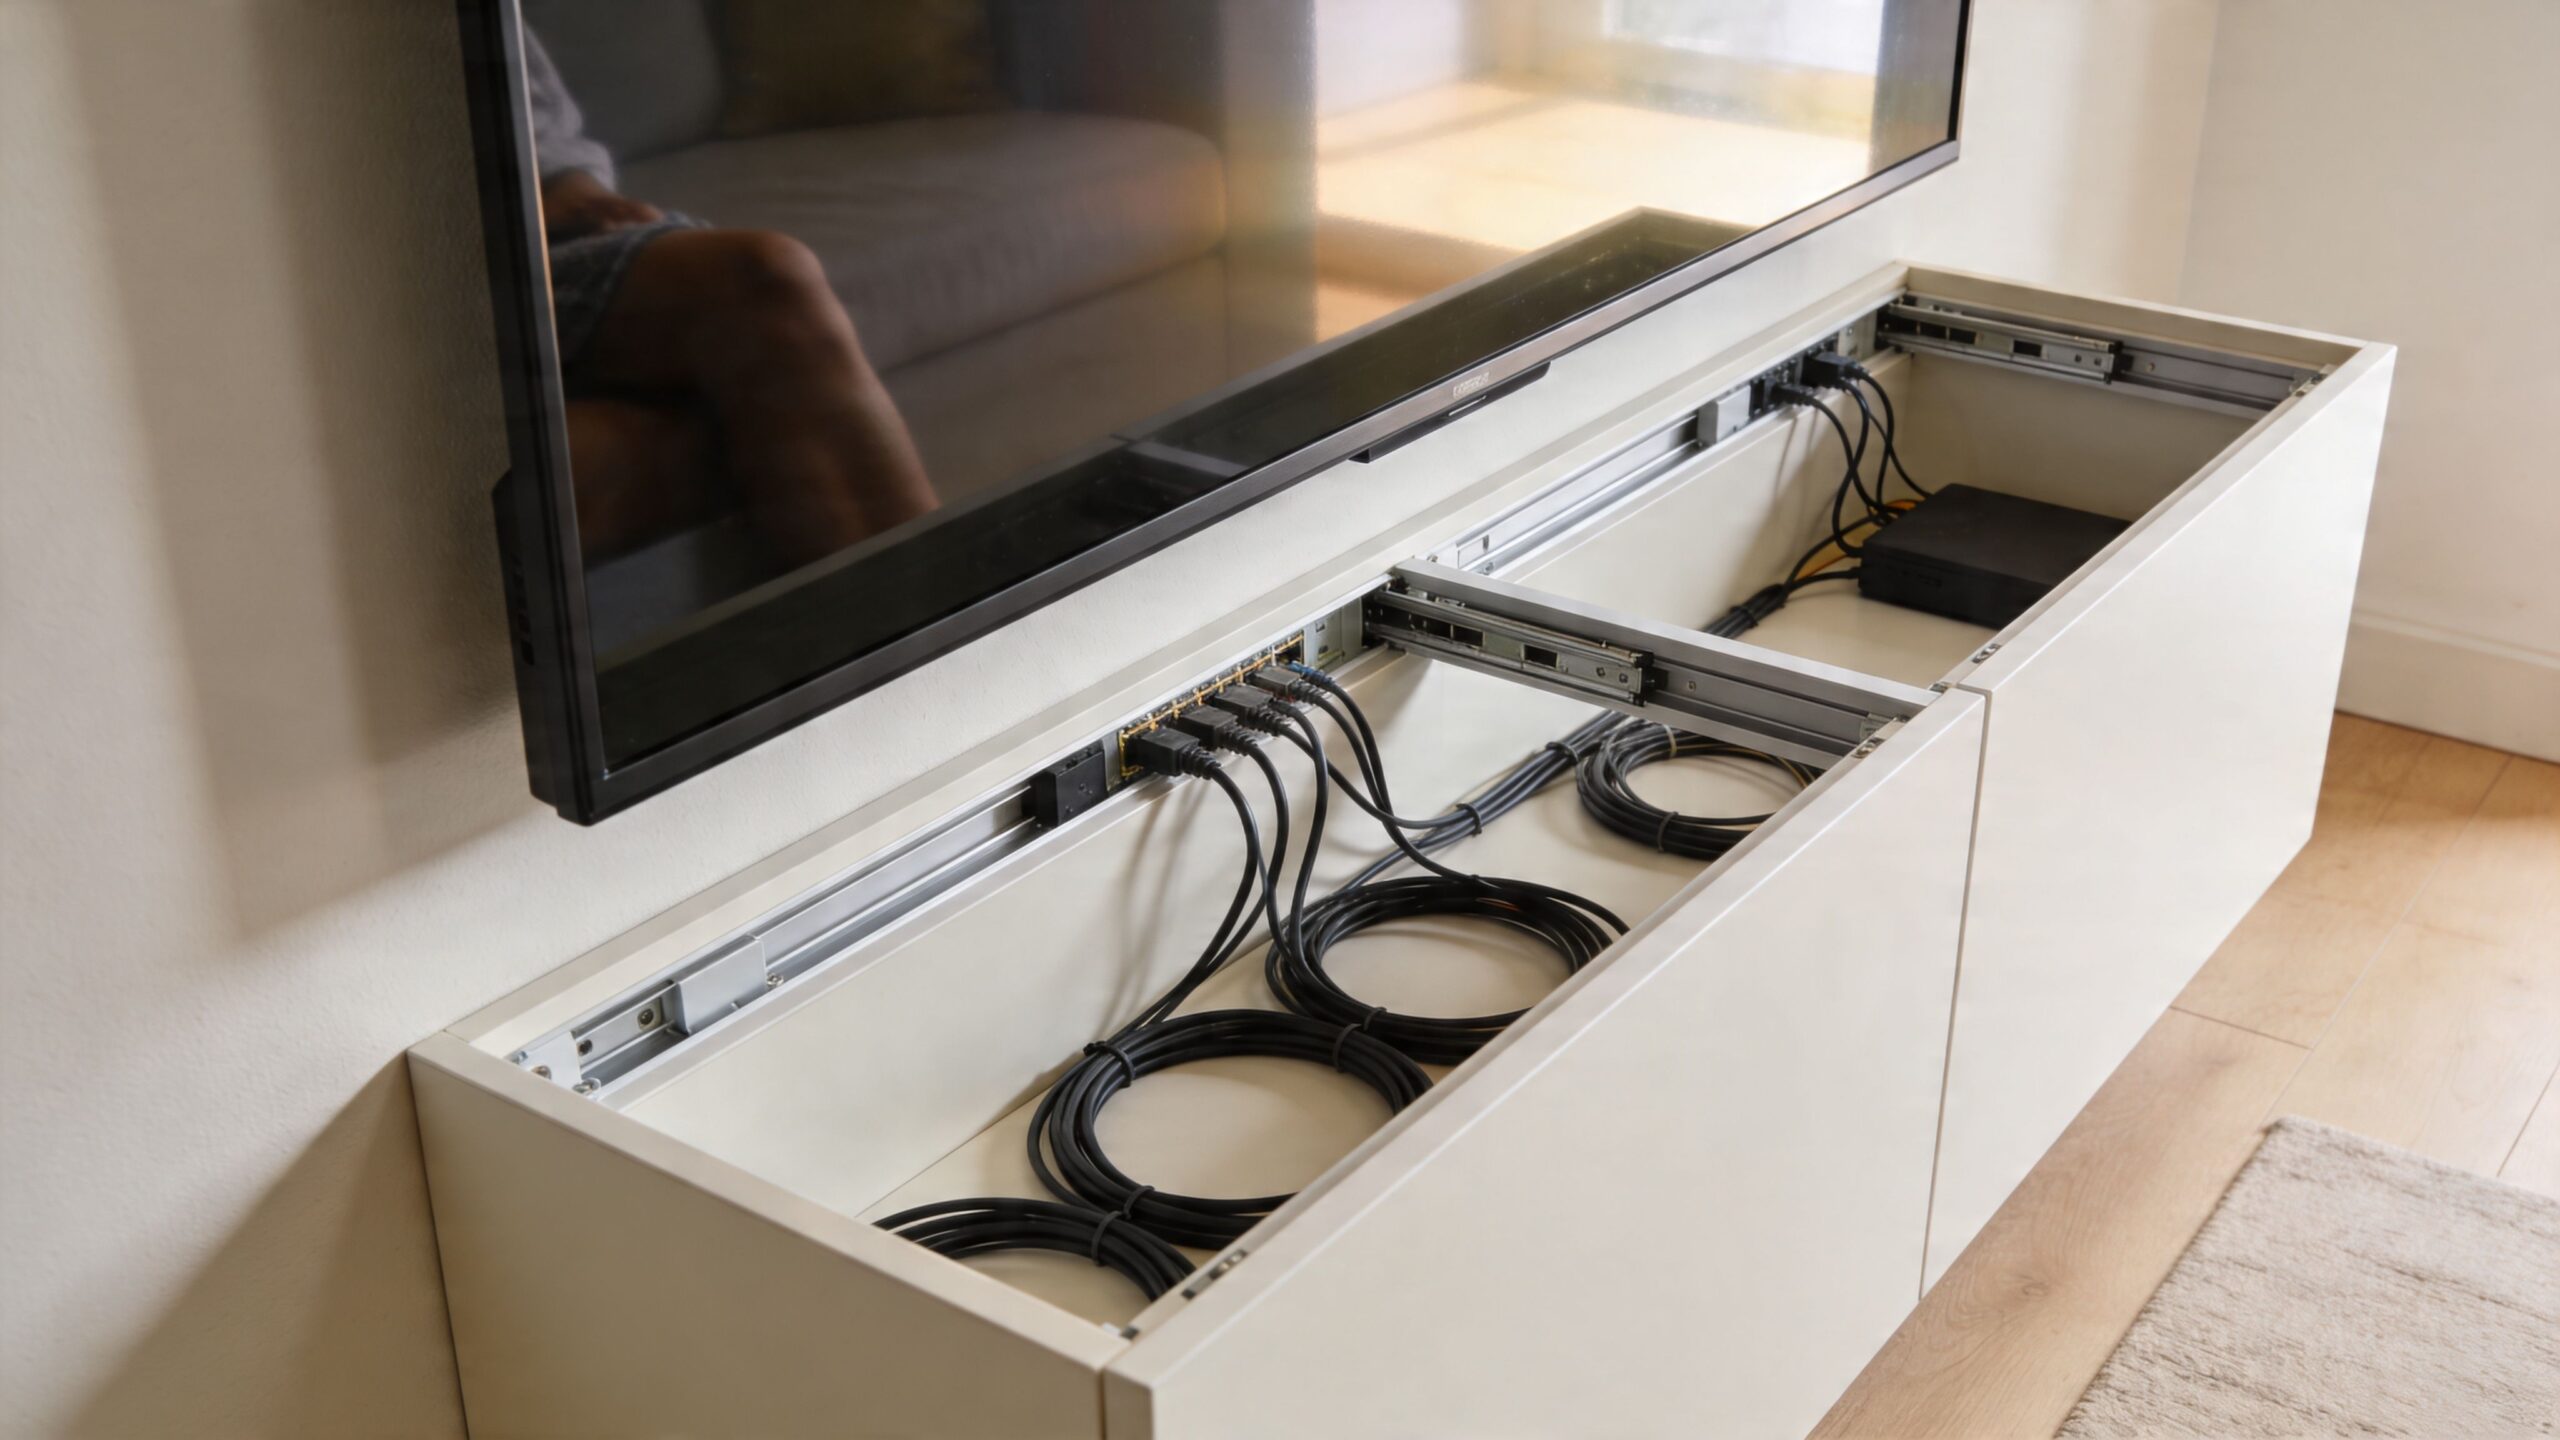
There are usually two workable paths. On-wall raceways are practical in finished rooms where opening the wall is not realistic. If they are sized correctly and painted to match, they can look neat from normal viewing distance. In-wall cable routing gives the cleaner result and supports the floating-screen look many homeowners want in living rooms, bedrooms, and media spaces.
The trade-off is access and construction. In newer drywall, in-wall routing is often straightforward. In older Chicago, Milwaukee, or Indianapolis homes with plaster, fire blocking, or masonry behind furring, cable paths can turn into a much bigger job. That is why planning matters. The right mount height, outlet location, and low-voltage opening should be decided together, not one at a time.
Here’s a useful visual walkthrough on placement and finishing details:
Walls change. Systems change faster.
A TV that starts as a simple streaming setup often becomes part of a larger control system. A Josh.ai voice scene may turn on the display, lower Lutron shades, set lighting, and hand off audio to Sonos. That only works cleanly when the hardware behind the TV remains reachable and the cable path was laid out with future changes in mind.
This is one reason I sometimes recommend a full-motion mount even when the TV will spend most of its life flat to the wall. It gives service access for HDMI changes, network gear swaps, and control updates without forcing a full dismount. In other rooms, a fixed or tilting mount still makes sense, but only if the outlet, recessed box, and connected devices are placed where a technician can reach them later.
Clean cable management is not cosmetic. It affects reliability, serviceability, and how polished the room feels every day.
Some TV installs are straightforward. Many are not.
If the wall has standard framing, the TV is modest in size, and the room doesn’t need anything beyond a simple flush installation, a careful homeowner can often handle it. The line gets crossed when the wall, the mount, or the broader system adds complexity.
A professional install makes the biggest difference in these cases:
One practical detail from the verified data is especially important. It notes a hardware audit should confirm 5/16-inch lag screws for studs and warns against drywall plugs, citing a 50 percent failure rate over 30 pounds in the source tied to the Consumer Reports mounting guidance URL. Whether someone is doing the work or hiring it out, that should reset the conversation away from convenience and toward structure.
The benefit isn’t only safety. It’s judgment.
An experienced installer can look at a wall and spot the likely problems before the first pilot hole. They can tell when a centered TV will feel too high, when a mount plate won’t land where the room design wants it, when a plaster wall needs reinforcement, or when a full-motion arm will create a visual compromise the homeowner hasn’t noticed yet.
They can also coordinate the room as a whole. That matters if the TV is part of a custom home theater, a new home build, a family room audio setup, or a larger property with lighting, networking, and automation all working together. The same team that mounts a display cleanly may also be the team planning Sonos zones, Ubiquiti Wi-Fi coverage, Josh.ai control, Lutron lighting scenes, outdoor lighting and sound, restaurant AV, or even golf simulator integration. In residential work especially, those systems need to feel connected rather than layered on one at a time.
Homeowners often compare the price of a mount to the price of installation and focus on the visible number. The better comparison is installation cost versus the cost of fixing a bad result.
That fix may involve wall repair, a different mount, relocated outlets, patched stone, or a television that never sits quite right because the original placement was chosen too quickly. If you’re weighing that decision, a guide on the average cost of TV mounting can help frame what professional work typically includes.
A good install should deliver four things at once:
Those are the jobs that separate a bracket install from a proper AV installation.
If you want help choosing the right mount, planning a clean install, or building the TV wall into a larger smart home, Home AV Pros can help. The team designs and installs residential AV systems across southern Wisconsin and nearby northern Illinois, including TV mounting, custom home theater, new home builds, whole-home audio, smart lighting and control, networking, outdoor lighting and sound, and more.

Copyright © 2026. Home AV pros. All rights reserved.