You just brought home a new TV. The box is still in the living room, the old media console suddenly looks too small, and the first question hits fast: what tools do i need to mount a tv without messing up the wall, the wiring, or the screen itself?
That question used to be mostly about hanging a bracket. It isn’t anymore. A clean TV install now sits at the center of a room’s design, streaming setup, sound system, and control experience. If you want the screen to look intentional, the cables to disappear, the Sonos soundbar to line up properly, and the whole system to work smoothly with Josh.ai, Lutron, or a stronger Ubiquiti network, the mounting job matters from the first measurement.
A lot of capable homeowners can do this well. A lot also get halfway through and realize they bought the wrong anchors, hit an unexpected wall type, or mounted the TV before deciding where the power and HDMI runs should go. That’s usually where a simple install turns into patchwork.
The typical sequence is familiar. You unbox the TV, set it on the floor with the foam still attached, hold the wall mount plate up for a quick visual check, and start asking practical questions. Is this drywall or plaster? Where are the studs? Will the soundbar sit too high? If the Apple TV, Sonos Arc, or Kaleidescape player is going in a cabinet, where do the cables run?
That’s why a TV mount shouldn’t be treated like a one-tool weekend chore. It’s a small construction task, but it’s also the first move in building a better entertainment wall. The mount location affects glare, viewing comfort, cable routing, equipment placement, and whether the finished room looks clean or improvised.
A smart setup starts before the first pilot hole. The bracket style matters. Fixed mounts keep the profile tight. Tilting mounts help in bedrooms or higher placements. Full-motion mounts solve awkward seating layouts but put more stress on the wall and demand more care in fastening. If you’re still deciding, this guide on how to choose a TV wall mount is a good place to narrow the mount style before you buy tools.
Mounting a TV well means thinking past the bracket. The best installs account for the screen, the speakers, the power, the source devices, and how the room will actually be used.
That bigger view is what separates a wall-mounted TV from an integrated room. In homes that use voice control, automated shades, whole-home audio, or dedicated theater gear, the mount is the backbone. It sets the position for the display, the lighting scenes, the audio alignment, and the cable path that nobody wants to see afterward.
A bad tool kit causes bad decisions. People improvise with the wrong bit, trust the first stud finder beep, or drive lag bolts with too much force and call it done. If you want a secure install, the tool list should be simple and intentional.
A Home Depot mounting guide cites a 2023 Consumer Reports survey of over 5,000 U.S. homeowners showing that 68% of people who attempted DIY TV mounting ran into problems due to inadequate tools, and 42% specifically said they failed to properly locate wall studs using a stud finder. That same verified data notes that in the Madison and Milwaukee market, 78% of homes feature wood-stud framing, skipping a stud finder correlates with 30% higher recall rates for amateur installs, and a quality electronic stud finder costs under $30 while helping prevent the 15-20% of annual U.S. TV fall incidents reported through 2025.
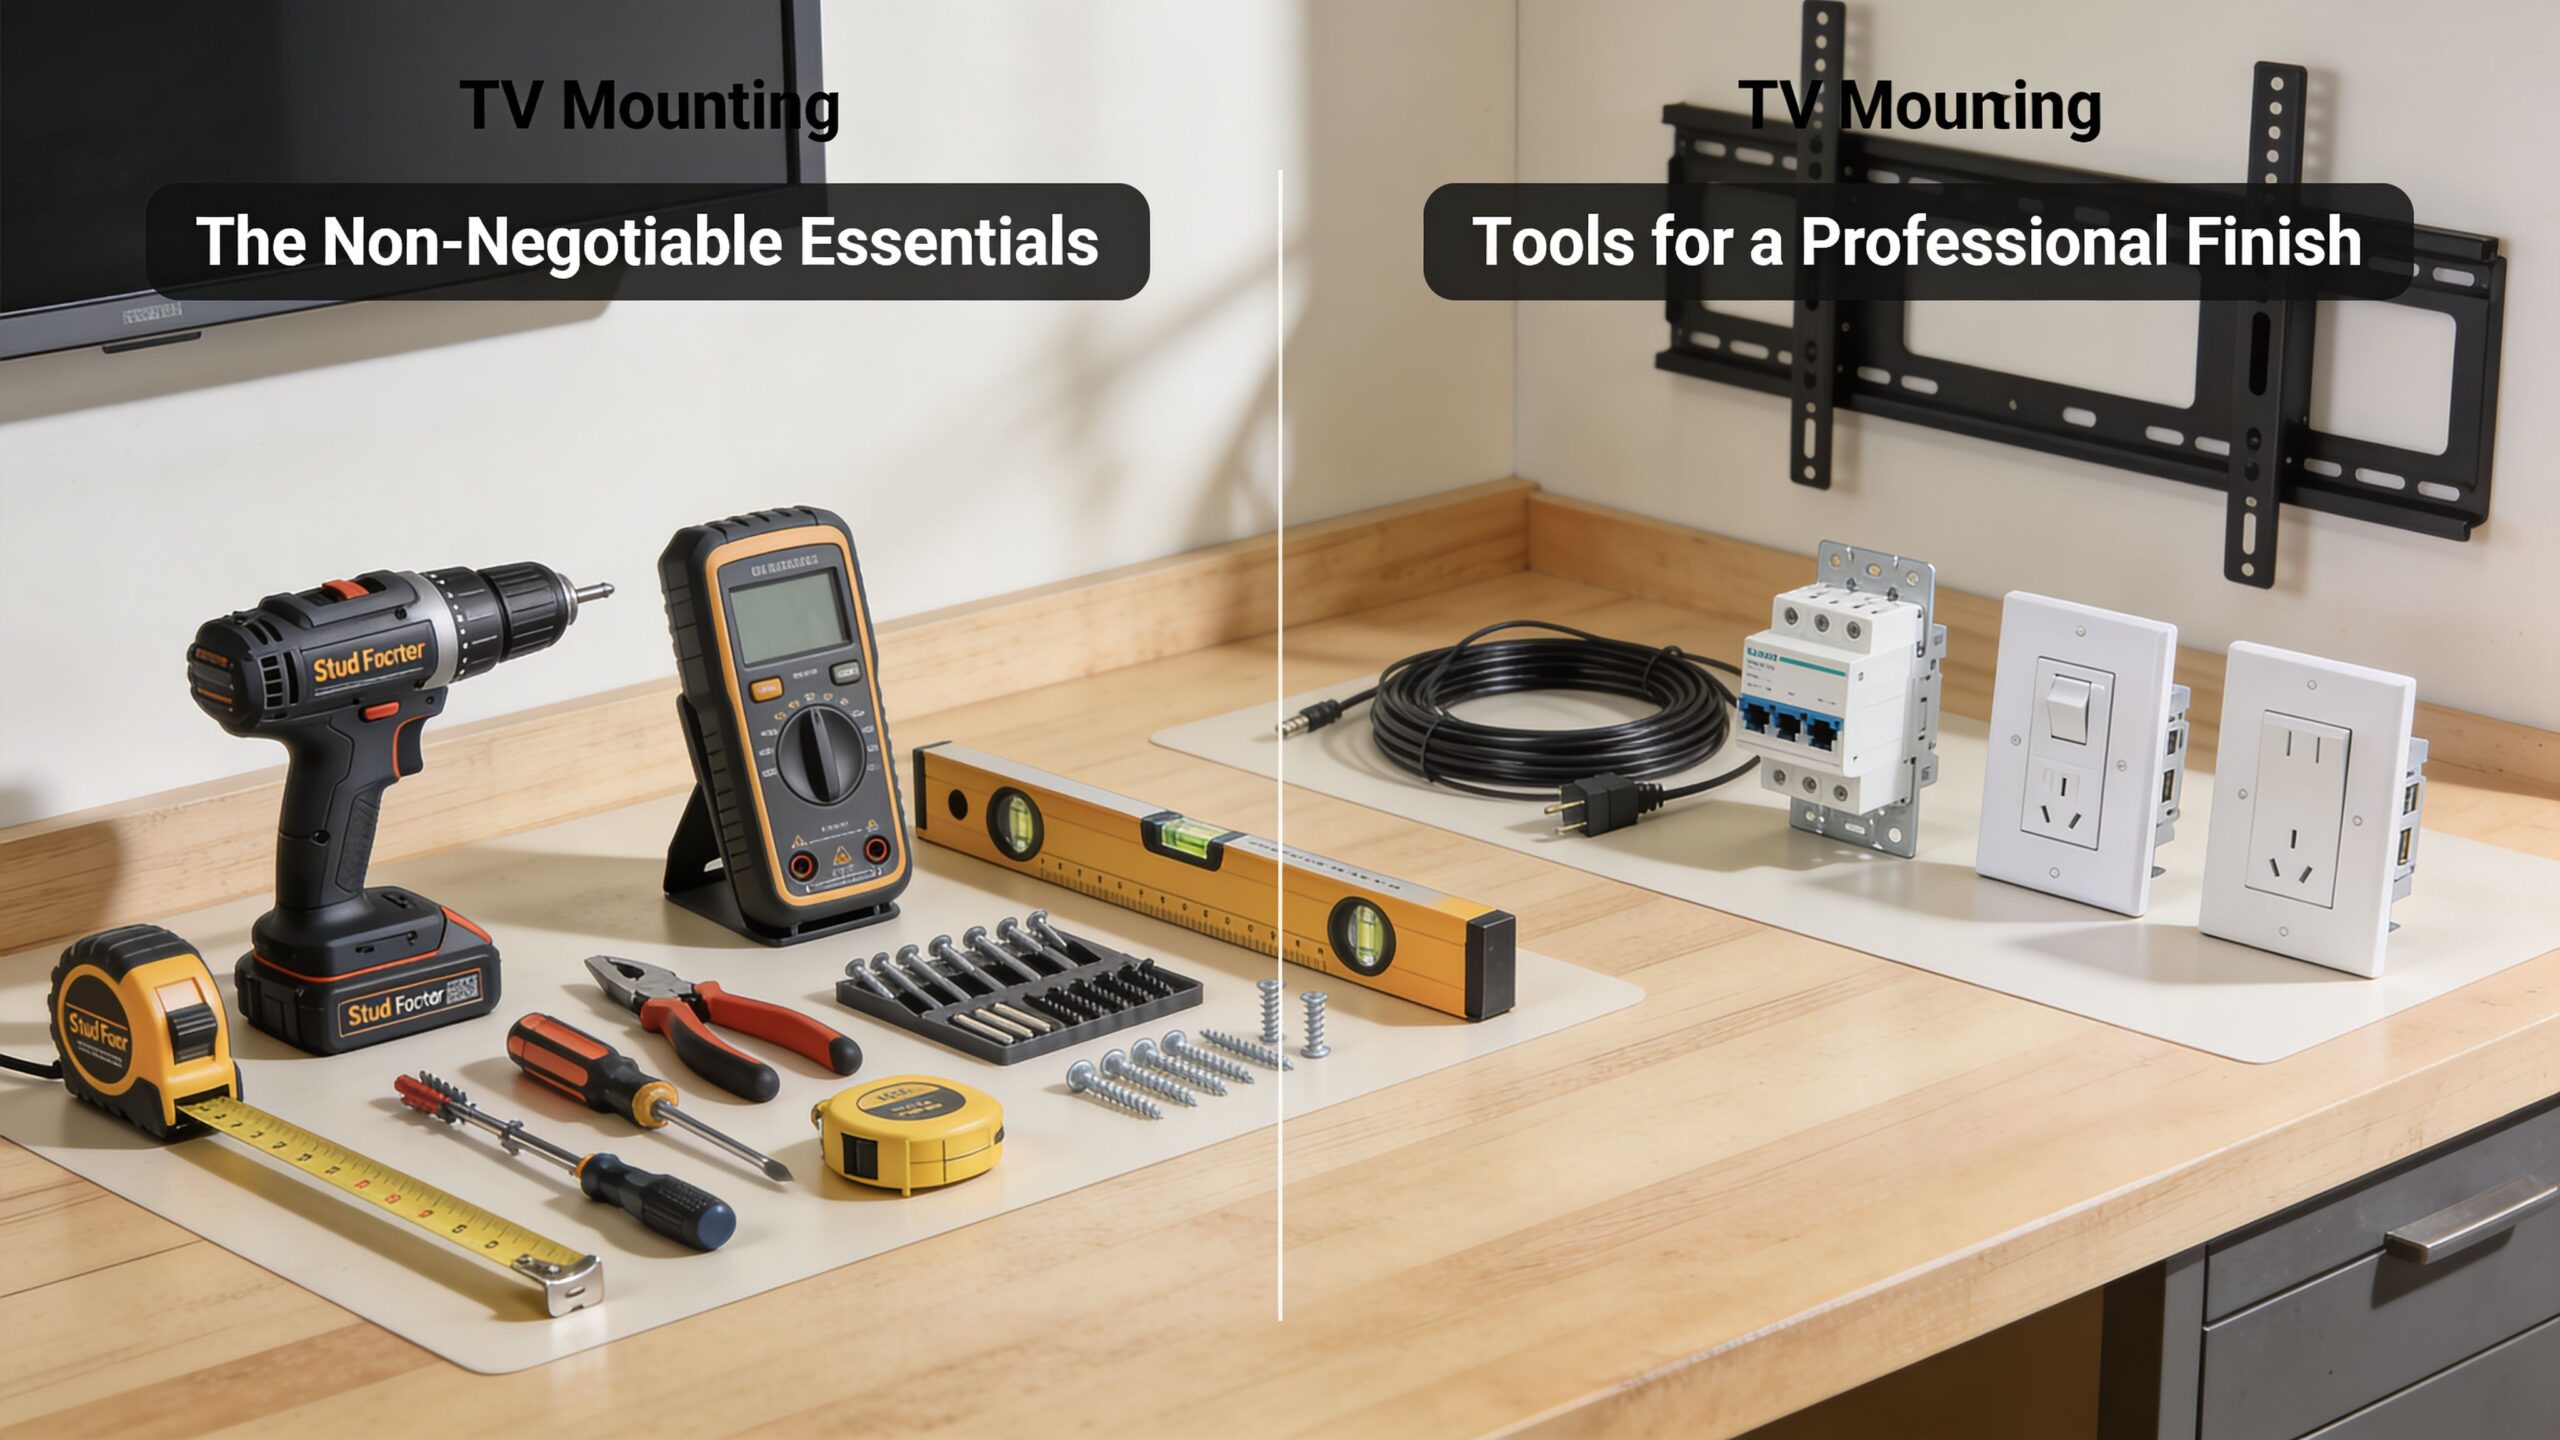
Start with these. If one is missing, stop and get it.
Stud finder. This is the first tool I’d buy and the last one I’d skip. Use a deep-scan electronic stud finder. In real homes, drywall texture, patchwork, and old repairs create false readings. A cheap guess here can ruin the entire install.
Drill or drill/driver. You need controlled drilling for pilot holes. A basic drill works better than brute force. The goal is precision, not speed.
Correct drill bits. Wood bits for studs. Masonry bits for brick or concrete. The wrong bit doesn’t just slow you down. It creates wandering holes, torn surfaces, and weak anchor points.
Level. A standard level works. A longer one is easier on wide wall plates. Many mounts look level against the ceiling line and still read wrong once the TV is hung.
Tape measure. Use it to find centerline, height, bracket spacing, and clearance for a soundbar or cabinet.
Socket wrench set. This matters more than many DIY guides admit. Final tightening on lag bolts should feel controlled. A socket wrench gives you that control better than trying to blast everything home with power.
Pencil and painter’s tape. Tape keeps marks visible and helps protect the wall finish while you lay out the bracket position.
These aren’t always mandatory, but they often separate a decent install from one that looks built into the room.
Practical rule: If the TV is going above a console with a soundbar, measure that whole stack first. Don’t mount the screen and then discover the Sonos Arc blocks the bottom edge or forces the TV too high.
One more thing belongs in the toolkit even though it doesn’t look like a tool. A plan for accessories. If the room will use hidden streaming gear, a gaming console, or a theater rack nearby, think through cable lengths and terminations before the mount goes up. This roundup of essential home theater accessories helps homeowners think beyond the bracket and avoid the usual last-minute purchases.
A few shortcuts create repeat problems:
Those approaches can hold for a while. That isn’t the same as being right.
The most overlooked part of TV mounting happens before anyone opens the hardware bag. You need to know what kind of wall you’re dealing with. Many online guides treat wall type as a detail. It isn’t. It decides the bits, anchors, fasteners, drilling approach, and whether the project should stay DIY at all.
A Mount-It tool guide notes that wall type assessment is rarely addressed upfront, even though homeowners often discover the actual wall composition during the install. In southern Wisconsin and northern Illinois, that matters. Older Madison and Milwaukee homes frequently have plaster walls, and plaster requires a different approach than standard drywall.
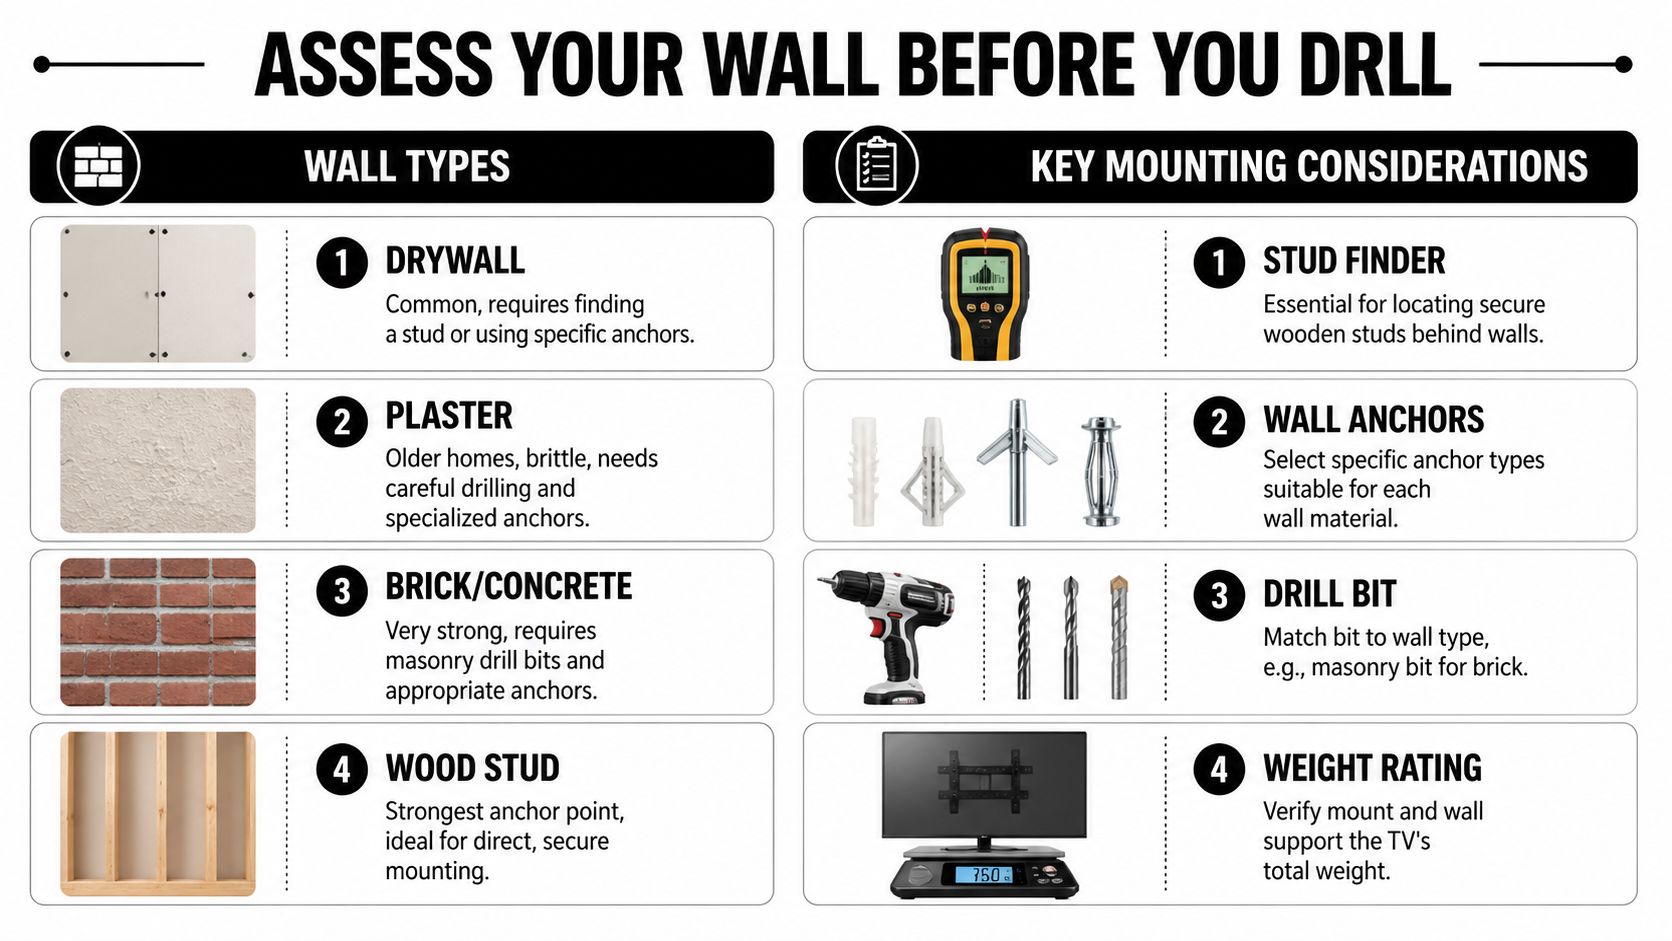
Drywall over wood studs is the easiest and most familiar. It’s usually the best-case scenario for a standard mount because you can fasten directly into framing.
Plaster and lath is where DIY confidence often fades. Plaster can chip or crack when drilled carelessly, and the wall surface may not tell you clearly where solid structure sits behind it.
Brick or concrete can make for a very solid mount, but only if you have the right bit, the right anchors, and enough control to drill cleanly.
Hollow wall sections need special care. If there’s no stud where the mount needs to land, hardware selection changes immediately.
If you want a better read on what’s behind the wall, it helps to understand the basics of what framing in construction means. Homeowners don’t need to become carpenters, but knowing how framing supports the wall makes stud spacing, load paths, and mounting choices much easier to understand.
That matters even more with today’s larger displays. The verified data for this topic notes that modern 55-75 inch TVs often fall into the 40-65 lb range, and a 75-inch Samsung QLED weighs 65.7 lbs. A heavier screen changes how forgiving the wall can be, especially when the mount pulls the load outward.
If you don’t know the wall type, you don’t know the hardware plan. That’s the point where many clean installs turn into patched holes and a trip back to the store.
This is the practical decision tree:
| Wall condition | What usually works |
|---|---|
| Wood studs behind drywall | Lag bolts into studs |
| Brick or concrete | Masonry bits with concrete anchors |
| Hollow wall with no stud at target point | Toggle bolts or specialized anchors |
| Older plaster wall | Slower drilling, careful verification, hardware chosen for the actual backing |
For brick applications, bracket selection matters as much as the bit and anchor choice. This guide to the best TV mount for a brick wall is useful if your wall is solid masonry and you’re trying to avoid the wrong mount style.
The simple version is this. Don’t buy hardware first and identify the wall later. Do it in that order and the wall usually wins.
A clean install starts with layout, not drilling. The first thing I want is the room’s real center and the viewing height that makes sense from the seat people use. If there’s a media cabinet, fireplace, or soundbar involved, those dimensions go into the plan before the bracket ever touches the wall.
A lot of placement mistakes come from treating the wall as the reference point instead of the room. The TV should relate to the seating and the furniture, not just land in the visual middle of a blank surface. That same mindset applies across the house. If you’ve ever looked at kitchen vent placement, the logic behind optimal mounting position for appliances is similar. Height and alignment affect comfort, use, and how the finished space feels.
Professional installers don’t trust one stud reading. Verified trade guidance from MantelMount’s tool kit article describes a multi-tool verification method using both electronic and magnetic stud finders to reduce false positives. That same guidance notes the use of a laser level for horizontal alignment, pre-drilled pilot holes sized for wood or masonry, and an impact driver for bracket attachment with final torquing done by socket wrench to avoid stripped threads. It also states that a certified installer’s final load test helps produce a near-zero failure rate compared with a 15-20% DIY callback rate.
That’s exactly the sequence that works in the field. Scan the wall more than once. Mark the stud edges, not just a guessed center. Put painter’s tape on the wall and write your marks there. Then level the bracket line across the exact height you want.
A few details matter here:
On the job: If the wall gives conflicting stud readings, stop and verify again. The extra ten minutes is cheaper than repairing a missed hole and remounting the plate.
Once the line is set and the stud locations are confirmed, drill pilot holes with the bit that matches the wall material. Clean holes matter. So does drilling straight. If the mount goes into studs, the lag bolts should pull the bracket snug without crushing the drywall around it.
Use the impact driver carefully. It’s fine for getting close. It isn’t the tool I trust for final feel. Finish with the socket wrench so you can feel resistance build and stop before you strip hardware or overcompress the wall surface.
When the bracket is on, attach the TV-side arms or plate to the display using the correct bolts, washers, and any needed spacers. Many installs encounter problems at this stage. A bolt that’s too long can bottom out before clamping. A missing spacer can stress the back of the TV.
Here’s a quick visual if you want to compare your process to a standard install sequence:
You should have a second person for the lift. One person guides the hooks or rails. The other supports the weight and keeps the panel clear of the wall. Once the TV clicks or locks into place, step back and check level again. Brackets can shift slightly during tightening or while the weight settles.
This is the part many DIY jobs skip.
If the install includes a Sonos soundbar, hidden source devices, or a future Josh.ai scene that powers on the room with one command, this is also the time to confirm the signal path and cable order. A wall-mounted TV should end with a working system, not just a secured rectangle.
A TV isn’t finished when it’s hanging straight. It’s finished when the cables disappear, the devices respond properly, and the room feels intentional instead of tech-heavy.
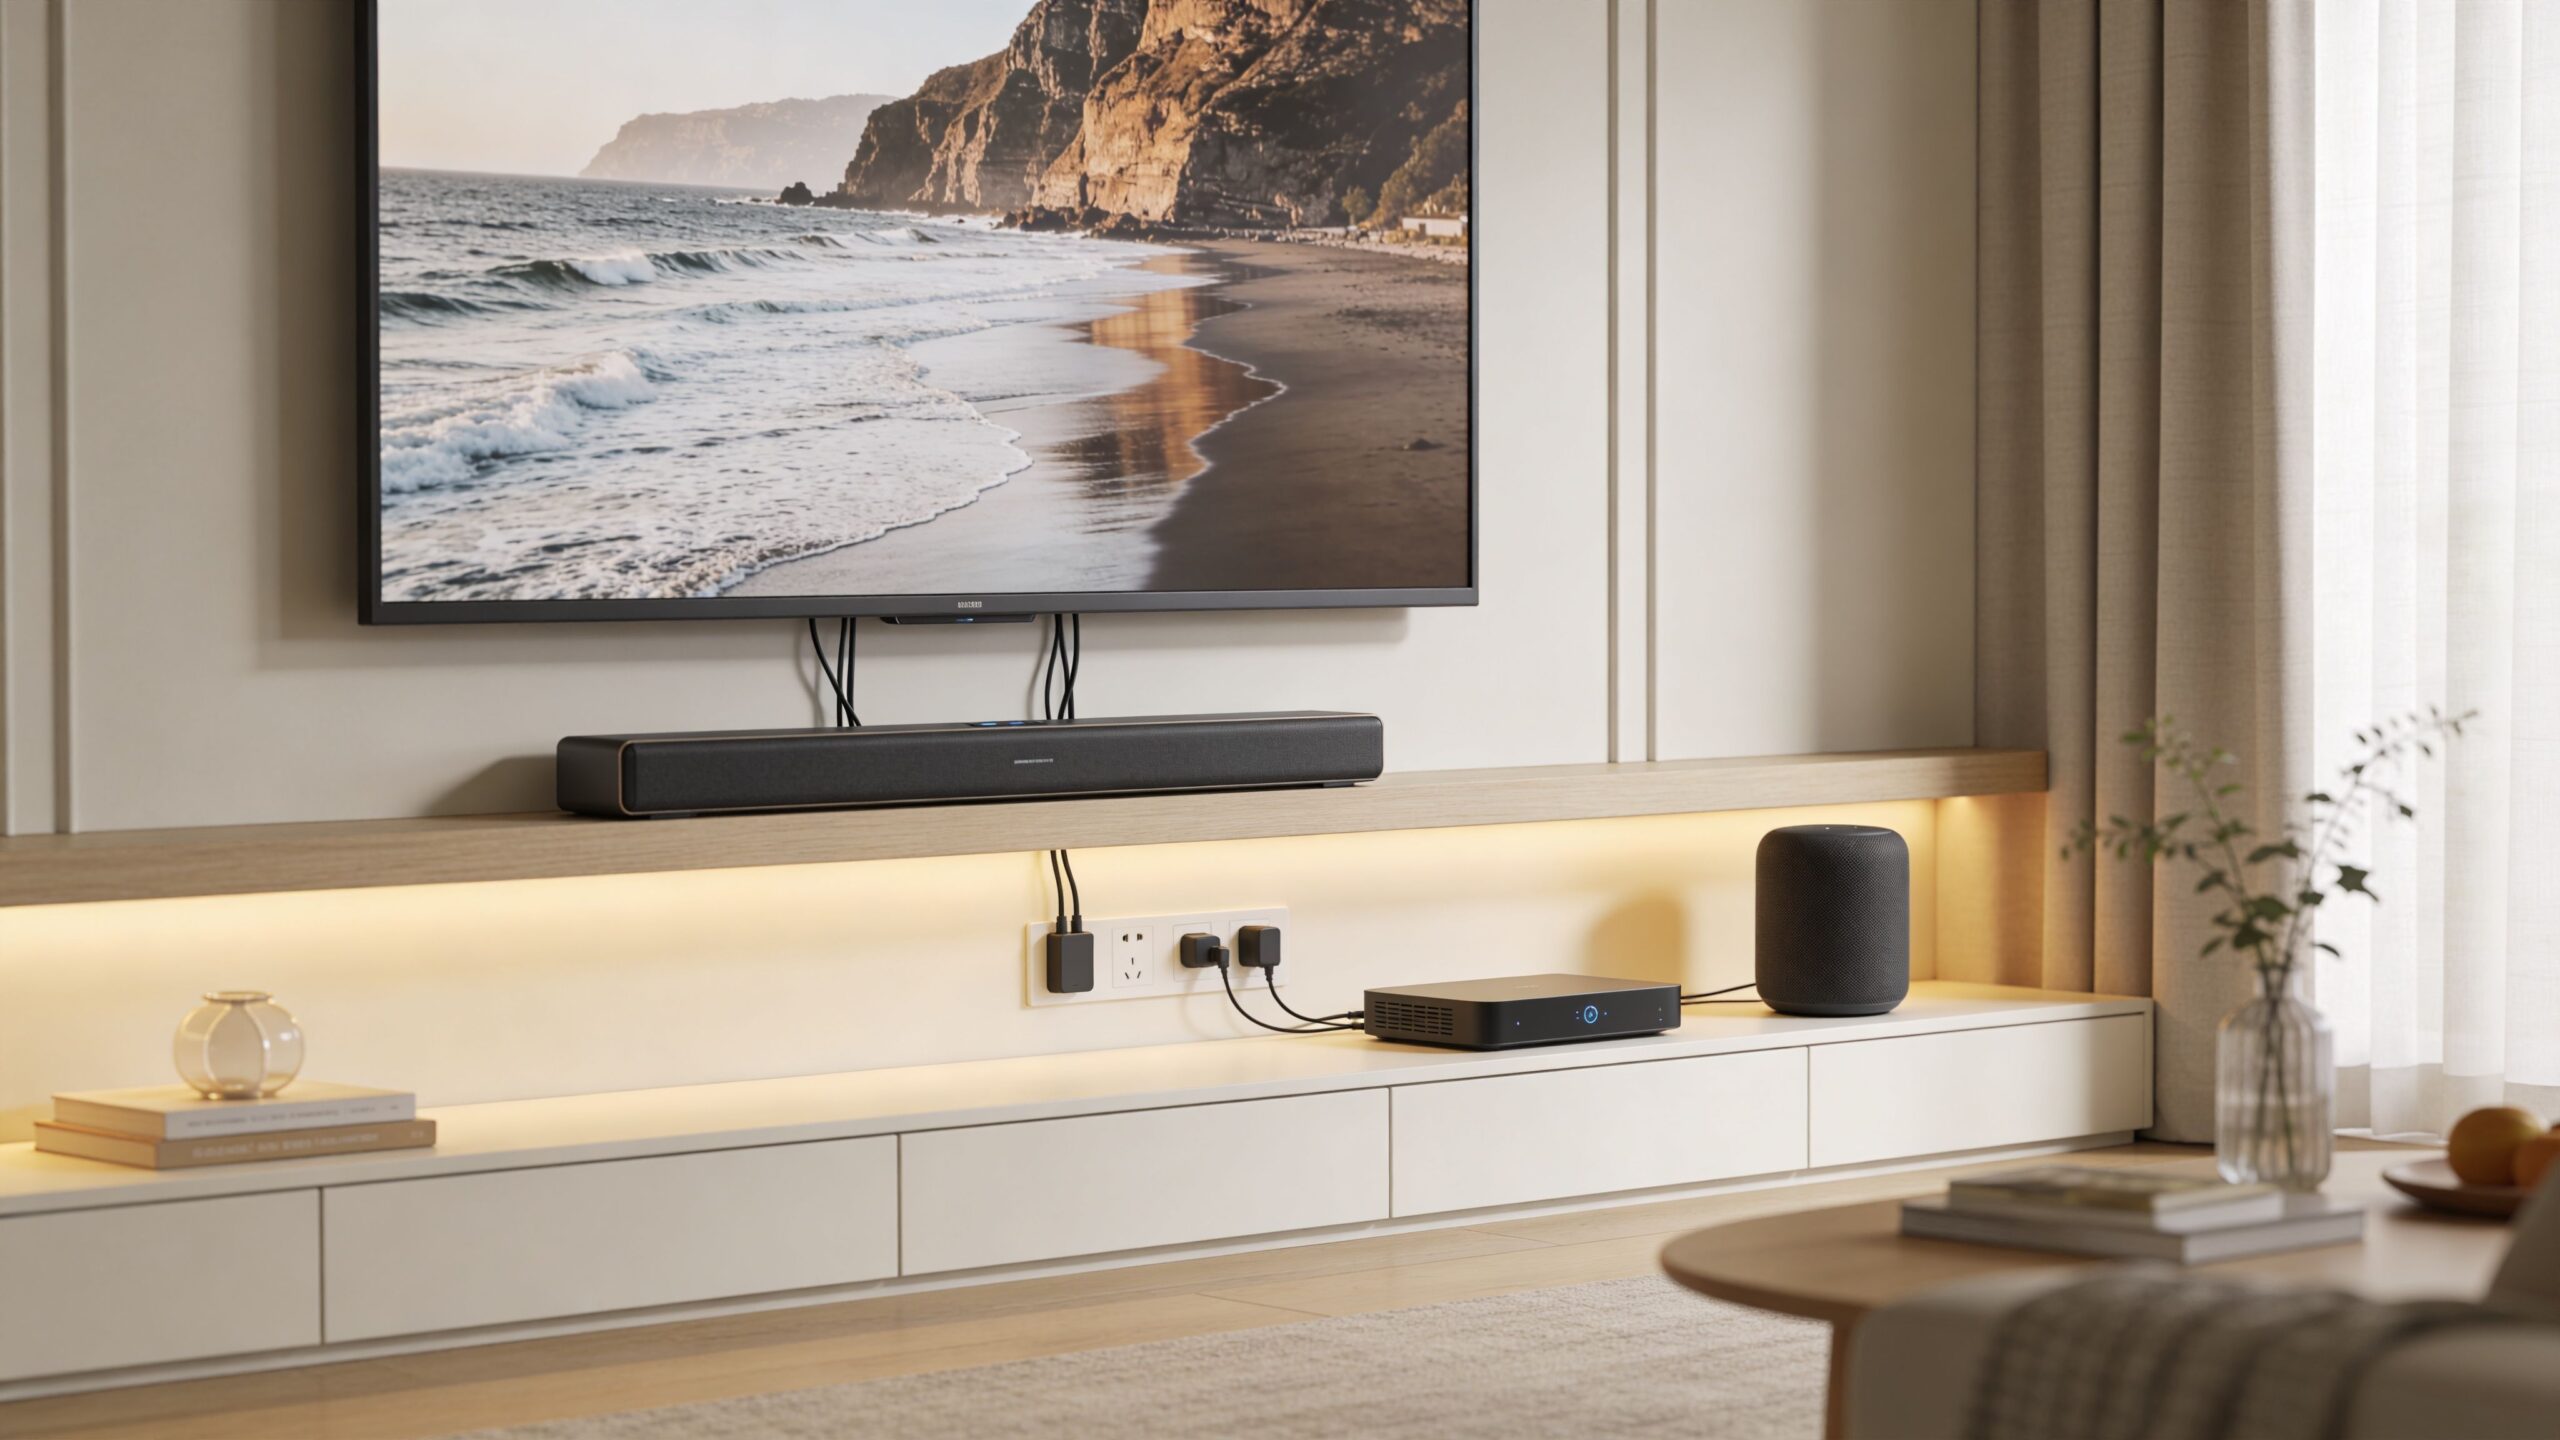
Visible cords pull attention away from the display. They also limit where you can place streaming devices, network gear, and speakers. Some homeowners do fine with a surface raceway painted to match the wall. Others want a more built-in look with in-wall low-voltage runs and a proper power bridge kit. Either can work if it’s planned before the TV goes up.
If you’re comparing options, this guide on how to hide TV wires and cables is a useful next step.
A wall-mounted TV often becomes the control point for a larger setup:
The best TV wall is quiet. No hanging cables, no glowing power strip, no guesswork about which remote to use.
That’s also why mounting matters in projects beyond a single family room. The same planning discipline carries into custom home theaters, new home builds, distributed home audio, and outdoor entertainment areas. Even in restaurant work or larger commercial spaces, the principle holds. Mount location affects wiring, control, serviceability, and how polished the finished environment feels. The difference is that in a home, aesthetics and ease of use usually matter even more.
Some TV installs are straightforward. Others start simple and become risky fast. The smart move isn’t always doing it yourself. Sometimes it’s recognizing when the wall, the mount, or the system around the TV calls for a professional hand.
If the wall is brick, plaster, stone, or metal-stud construction, the tolerance for mistakes gets smaller. If the TV is large, the mount is full-motion, or the room needs hidden wiring and smart control integration, the install stops being a basic hardware job.
| Consideration | DIY Approach | Professional Installation (Home AV Pros) |
|---|---|---|
| Standard drywall over wood studs | Often manageable with the right tools and patience | Faster, cleaner layout and fastening |
| Plaster, brick, concrete, or uncertain wall type | Easy to buy the wrong hardware or bit | Hardware and method matched to wall condition |
| Large TV or articulating mount | Higher risk during lifting and attachment | Safer handling and better structural judgment |
| Cable concealment | Often added after the fact | Planned as part of the install |
| Smart home integration | Usually pieced together device by device | TV, audio, control, lighting, and network planned together |
| Final look | Can be solid but varies with experience | Consistent alignment, cleaner finish, fewer visible compromises |
Call a pro if any of these apply:
A good installer also helps if the TV is only one part of a broader plan. Many homeowners start with a mount and then realize they also want better sound, stronger Wi-Fi, outdoor entertainment, a dedicated theater, or low-voltage planning for a new build. That’s where having one team handle the whole system saves time and prevents rework.
If you want a TV mounted safely, wired cleanly, and integrated into the way your home works, Home AV Pros can help. We design and install home-first AV and automation systems across southern Wisconsin and northern Illinois, including TV mounting, smart home control with Josh.ai and Lutron, Sonos audio, Kaleidescape theater systems, Ubiquiti networking, outdoor lighting and sound, custom home theaters, new home builds, and more.

Copyright © 2026. Home AV pros. All rights reserved.