You're probably looking at a yard that works fine in daylight and disappears at night. The front walk gets by with a porch light. The driveway feels flat. The garden beds vanish. Maybe a few solar stakes are scattered around, but they don't create much mood, and they rarely feel connected to the house.
A well-planned outdoor lighting post changes that. Not by blasting the property with brightness, but by giving the exterior structure, rhythm, and a sense of arrival. The right post lights make a path easier to follow, define edges without glare, and support the rest of the lighting so the whole property feels intentional.
For homeowners building a more connected home, outdoor lighting also shouldn't live on an island. It should work with the same control philosophy as indoor lighting, audio, networking, shades, and security. That's where integrated design starts to matter.
Pull into a well-lit property after sunset and the difference is immediate. The walk reads clearly, the architecture has depth, and the garden feels intentional instead of disappearing into patches of glare and shadow.
That result comes from restraint as much as brightness. A single flood near the garage and another at the back door will light enough to satisfy a checklist, but it rarely creates comfort or character. Good exterior lighting shapes what you notice first, softens transitions between spaces, and leaves some areas quiet so the house still has contrast at night.
An outdoor lighting post often carries that middle layer. It can define a drive edge or entry sequence while smaller accent fixtures bring out planting texture and selective uplights give trees, stone, or columns a measured presence. Done well, the property feels settled and expensive because every beam has a job.

Homeowners often ask for more security lighting. In practice, they usually want three things at once. A clearer approach to the house, better use of the property after dark, and lighting that feels deliberate rather than spotty.
Getting there takes design discipline.
A strong lighting plan supports function and mood at the same time.
Analysts at GM Insights note continued growth in outdoor lighting, including strong demand for LED products. For a homeowner, that matters because LED has matured into the standard for long service life, lower maintenance, tighter optical control, and better dimming performance than many older lamp-based systems. That opens the door to cleaner design, not just lower energy use.
The best results come when exterior lighting is treated as part of the whole home system. At Home AV Pros, we design it that way. Outdoor fixtures should respond with the same ease and consistency as the lighting inside the house, the audio on the patio, the cameras at the gate, and the control system the family already uses every day.
That is where integrated platforms such as Lutron and Josh.ai change the experience. Instead of a timer on its own island or an app no one wants to open, the lighting can follow schedules, tie into arrival scenes, respond to voice control, and adjust for entertaining, late-night returns, or quiet evenings outside. The investment is not just in fixtures. It is in a property that feels better to live with and easier to manage.
A ground-level lighting post sits between a path light and a full-scale area light. It's taller than a small path fixture, lighter visually than many bollards, and softer in purpose than a spotlight.
Its job is usually ambient guidance. Not drama. Not punch. It marks space, gives a property vertical rhythm, and spreads light across a path edge, drive approach, or perimeter zone without making the fixture itself the star.
A lot of homeowners use these terms interchangeably, and that's where projects start to drift.
The right post fixture helps with three things:
Defining edges
Along a driveway, front walk, or garden transition, posts establish where the usable space begins and ends.
Creating ambient structure
They add a low, even layer that connects brighter accents and prevents isolated pools of light.
Supporting architecture without competing with it
A good post light doesn't overpower the façade. It supports the approach to the house.
If a homeowner notices the glare before they notice the landscape, the fixture choice or mounting height was wrong.
That's why posts aren't just taller path lights. Height changes beam behavior, eye-level exposure, and how the light reads from indoors. Used well, they bring calm order to a property. Used poorly, they create a runway effect and visible hot spots.
Material choice decides how your lighting will look in a few seasons, not just on install day. In the Midwest, that matters. Freeze-thaw cycles, moisture, fertilizer exposure, irrigation overspray, and snow management all test outdoor fixtures harder than most product photos suggest.
A lighting post also has to match the home. A sleek modern façade usually wants a different fixture body and finish than a traditional brick home or a naturalistic garden path.
Before style, look at construction quality.
| Material | Pros | Cons | Best For |
|---|---|---|---|
| Aluminum | Lightweight, widely available, works well in many fixture styles | Lower-grade versions can show wear faster in exposed environments | Most residential projects that want a clean look and reasonable cost |
| Brass | Durable, substantial feel, ages attractively | Higher upfront cost, warmer metal tone may not fit every home style | Long-term installations and traditional or upscale homes |
| Copper | Distinctive appearance, develops patina over time | Premium pricing, finish change is not for everyone | Homes where natural aging is part of the design language |
| Composite or engineered materials | Can resist weather well, often lower maintenance visually | May feel less premium in hand and appearance | Utility-focused areas or projects where finish consistency matters most |
Black and dark bronze finishes disappear well into planting beds and are often the safest visual choice. Brass and copper can look beautiful on stone, older brick, and homes with warmer materials, but they should be selected because you want that aged look, not because the fixture looked polished in a showroom.
A simple rule works well here.
Practical rule: Pick the fixture finish that supports the house after dark, not the one that dominates it in daylight.
If your lighting posts sit near coping, retaining walls, pavers, or a pool edge, the surrounding material palette matters. Homeowners comparing stone finishes and edge details may also find this guide for Australian pool projects useful because it shows how coping materials and finishes influence the overall exterior look. The regional construction methods differ, but the design thinking carries over.
What works poorly is mixing too many metal tones, textures, and fixture styles in a small area. A consistent family of posts usually looks more custom, even when the lighting design itself is layered and varied.
A property can have beautiful fixtures, quality materials, and solid hardware choices and still look underwhelming at night. The problem is usually placement. Posts get spaced by tape measure instead of by sightline, circulation path, and how the home is used after dark.
A good plan starts with behavior. Where do people arrive, pause, turn, entertain, and look back toward the house from the patio or pool? Those answers shape the lighting scheme far more than a simple spacing rule.
Posts usually handle ambient guidance. They carry light through outdoor spaces and make paths, entries, and wider transitions feel intentional. Accent fixtures do a different job. They pull attention to trees, architectural details, and texture that deserve focus after sunset.
That distinction matters because an evenly lit yard often reads flat from both outside and inside the home. The stronger result is layered and selective.
Beam spread should follow the feature, not the fixture box. As the team at Gardenreet explains in its beam angle guide, a narrow spread suits a tighter focal point, while a wider spread is better for washing broader surfaces. That is one of the first places DIY plans tend to fall short. Too much beam in the wrong place creates spill, glare, and wasted output.
Rows of identical bright points along a walk can make an expensive property feel generic. I see this often around front paths and poolside routes where every post is given the same spacing, the same lamping, and the same priority.
Better results come from visual balance.
To keep output in scale with the feature, the editors at Lumens suggest about 50 to 150 lumens for small shrubs, 150 to 300 lumens for medium trees or focal features, and 300 to 1000 lumens for large trees or architectural elements. Those ranges are useful because they reinforce restraint. Most residential post layouts benefit more from contrast and hierarchy than from raw brightness.
Good placement is also about lifestyle. A front walk needs safe, quiet guidance. A rear entertaining area often needs softer perimeter light so dining tables, fire features, and architectural accents can take visual priority. Near reflective surfaces such as water, polished stone, or light-colored paving, glare control becomes much more important.
Leave some darkness. It gives the lit areas shape.
For early planning, tools like landscape ai design can help homeowners visualize zones and focal areas before installation begins. For a more practical look at grouping fixtures and organizing a layout around circulation and sightlines, our guide on how to design outdoor lighting for a home is a useful next step.
The biggest upgrade comes when the exterior plan is treated as part of the whole home, not as a separate add-on. Posts near entries, drives, terraces, and garden rooms should support scenes that also include interior lighting, shades, and voice control. In a properly integrated system with Lutron and Josh.ai, a single command can bring the driveway and entry sequence up at arrival, soften the rear garden for entertaining, or shut the entire property down at bedtime without walking from switch to switch. That is the difference between buying fixtures and investing in a lighting system that improves daily use and long-term property value.
A short video can also help you see how layered lighting techniques read in real spaces.
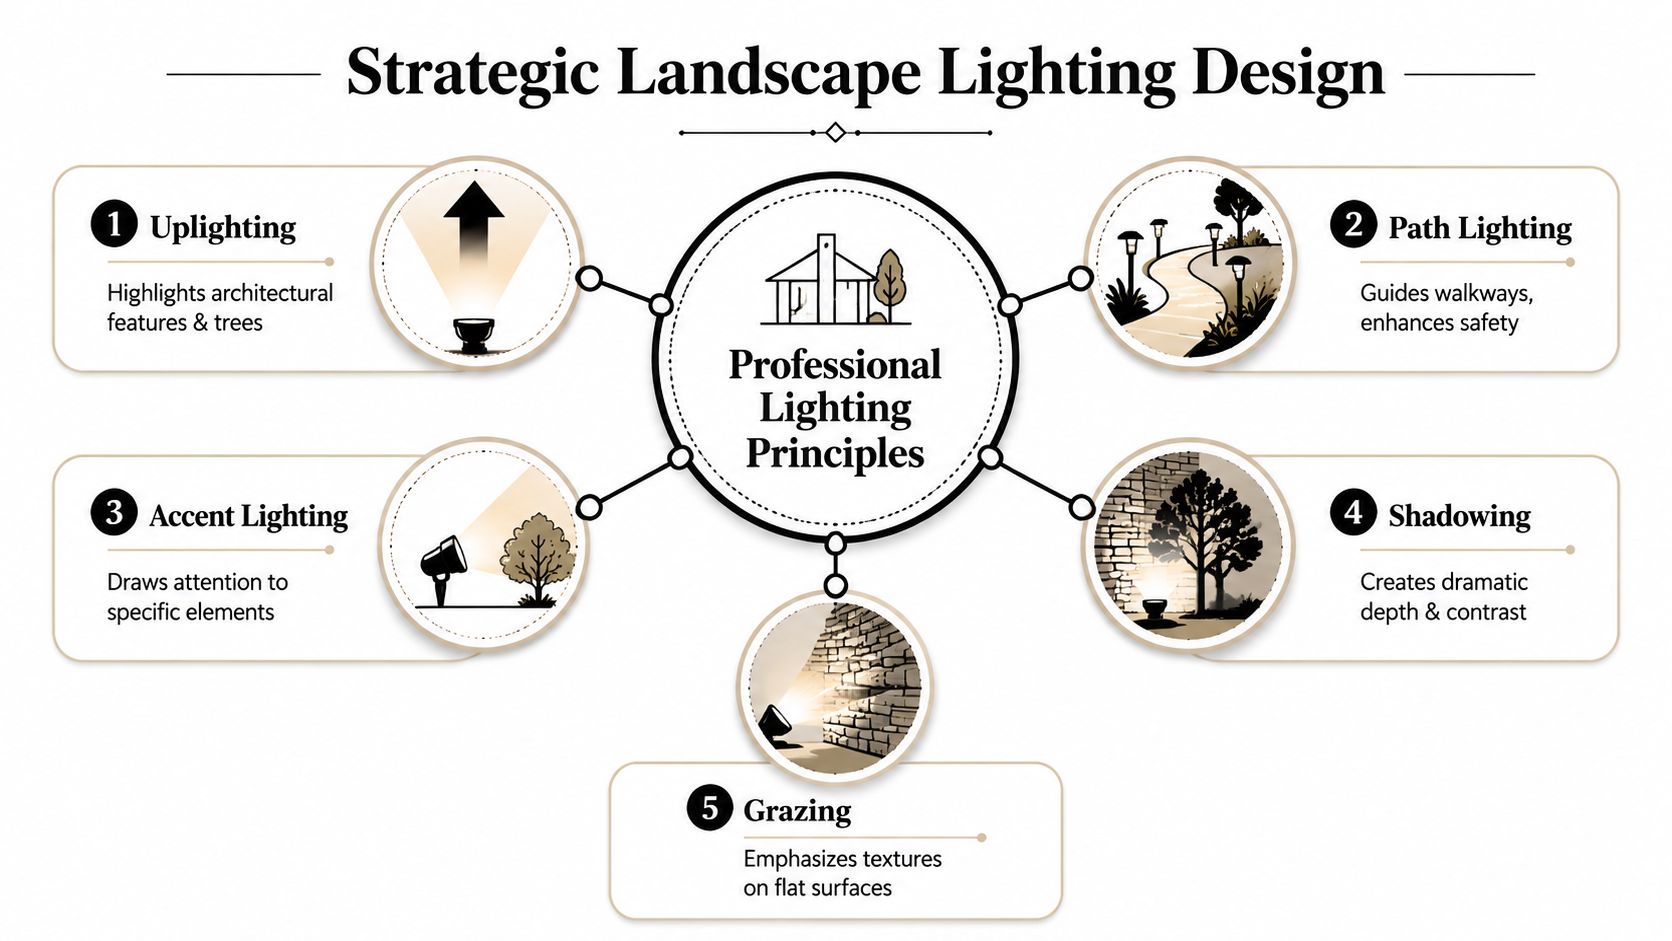
Good results come from judgment, but these principles stay reliable:
A beautiful layout still fails if the electrical side is sloppy. Most service calls in outdoor lighting trace back to bad connections, overloaded transformers, poor wire planning, or fixtures that were never mounted securely enough for real weather.
For residential projects, low-voltage systems usually make the most sense. They're flexible, easier to expand, and better suited to the subtle lighting most homes need outdoors.
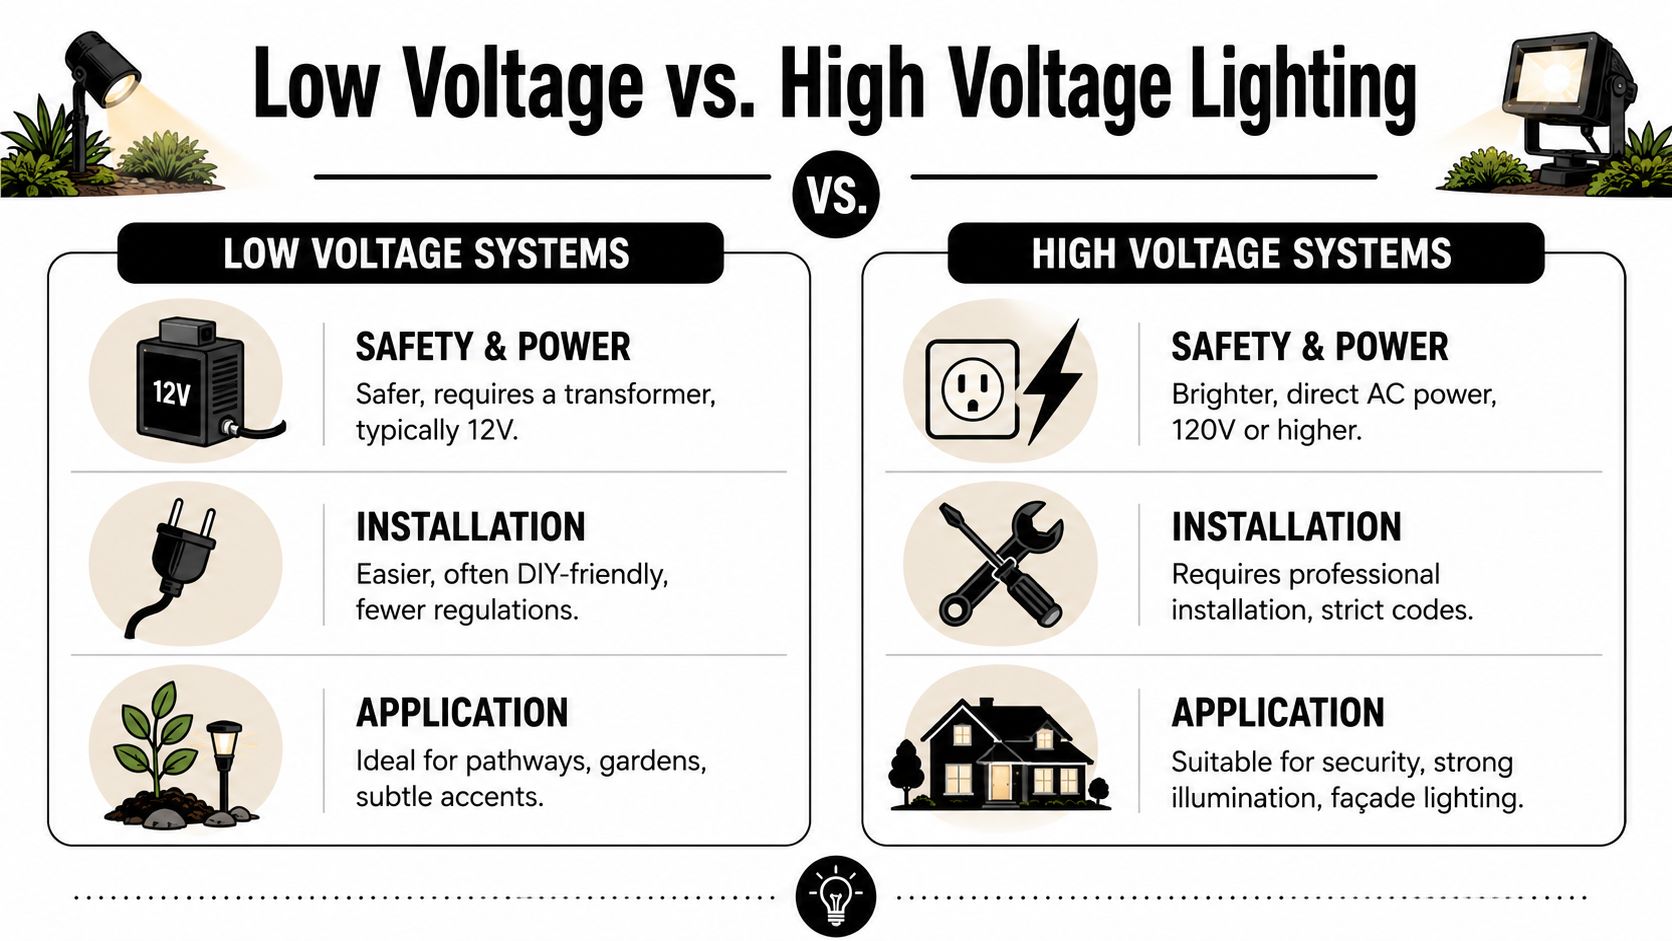
Line voltage has its place, but that place usually isn't a refined residential path-and-garden scheme. An outdoor lighting post intended for ambient exterior use is often better served by low voltage because it supports safer distribution and simpler zoning.
What matters more than the label is execution.
The core sizing rule is straightforward. A common guideline is to keep the connected load at least 20% below the transformer's maximum wattage and to calculate capacity by multiplying total fixture wattage by 1.25, according to this low-voltage landscape lighting guide. The same guidance notes that secondary circuits should not exceed 300 watts to reduce voltage drop and thermal stress.
A system can look fine during a daytime walkthrough and still be built poorly. These are the issues that show up later.
Some posts can live happily on a stake in stable planting beds. Others need a more substantial mounting method, especially near hardscape edges, drive approaches, or areas that see snow clearing.
A proper install usually means more planning than most DIY kits anticipate.
Load calculation before purchase
Not after the lights are already on site.
Cable routing with service access in mind
You want future fixture replacement or additions to be straightforward.
Connection methods built for weather
Outdoor reliability starts at the splice.
Night aiming and adjustment
Final positioning should happen in darkness, not just from a paper plan.
If you want a better sense of the electrical side, our article on how to wire low voltage lighting walks through the decisions that affect performance long term.
Most outdoor lighting problems aren't fixture problems. They're infrastructure problems.
The biggest missed opportunity in lighting is treating it like a standalone utility. On at dusk. Off at bedtime. That's functional, but it leaves a lot on the table.
A modern outdoor system should behave like the rest of the home. It should respond to routines, scenes, presence, and events. That's where platforms like Lutron and Josh.ai change the conversation from switching to orchestration.
Smart lighting control isn't about adding novelty. It solves real usage problems.
High-end outdoor design also benefits from layered control because, as this landscape lighting techniques guide notes, professionals rarely rely on a single beam angle. They layer narrow beams for focal points, medium beams for accents, and wide beams for surfaces. Once your system has those layers, smart control lets you use them differently depending on the occasion.
Homeowners see the gap between a lighting product and a lighting system. A post light tied into Lutron can participate in a whole-property scene. Josh.ai can trigger it by voice. Sonos can join the same entertainment preset. Oelo permanent lighting can handle seasonal transitions without turning the house into a patchwork of separate apps and timers.
That integrated approach also matters in new home builds. If the lighting, networking, audio, surveillance, and control backbone are coordinated early, the outdoor system feels intentional from day one.
For homeowners considering that larger ecosystem, our page on smart home automation lighting control shows how lighting scenes fit into broader home control without adding friction.
An outdoor lighting post looks simple until you have to make the whole system work. The fixture has to suit the architecture, the beam has to suit the space, the transformer has to carry the load, the connections have to survive weather, and the controls have to make sense for daily life.
DIY systems usually break down in one of three places. The design is too bright and too uniform. The wiring wasn't planned for voltage drop or future additions. Or the control experience ends up fragmented, with separate apps, timers, and workarounds.
A professional installer brings coordination. That means selecting the right fixture family, mounting it correctly for the site, loading circuits conservatively, aiming lights at night, and tying the exterior into the rest of the home. It also means understanding how outdoor audio, Wi-Fi coverage, cameras, and control platforms affect the experience once the sun goes down.
If you're comparing options, it helps to start with a team that already works across low-voltage disciplines. Our page on finding low-voltage wiring contractors near me gives a practical starting point for evaluating that side of the project.
The goal isn't more gadgets. It's a home that feels finished.
If you want your outdoor lighting to feel integrated with the rest of the house, Home AV Pros designs and installs residential systems that connect outdoor lighting with smart control, whole-home audio, networking, security, and new-build low-voltage infrastructure across southern Wisconsin and nearby northern Illinois.

Copyright © 2026. Home AV pros. All rights reserved.