You're probably looking at a basement, garage, or bonus room right now and wondering whether it can become a golf simulator without turning into a clunky tech project that never feels finished. That's the right question to ask first.
A successful home golf simulator installation isn't just about buying a launch monitor, hanging a screen, and hoping the software does the rest. The room has to work. The projection geometry has to work. The lighting, wiring, heat, acoustics, and network all have to support the experience. If you want the simulator to feel like part of a polished home instead of a temporary setup, the automation layer matters too.
In the Madison to Milwaukee area, many simulator projects end up in existing spaces rather than purpose-built additions. That creates real trade-offs. Basements give you better light control and easier sound isolation. Garages can offer width, but often need more attention to temperature, dust, and finish quality. Bonus rooms can look the most integrated, but ceiling shape and structural obstructions can become the limiting factor.
The dream usually starts with the idea of “I've got a room that should fit.” The professional approach starts by proving it on paper.
A foundational rule for a home golf simulator installation is a room that's at least 12 feet wide, 16 feet deep, and 9 feet high, because that gives you a workable baseline for a safe full swing, accurate ball tracking, and projection geometry, as noted in Assembled Golf's simulator planning guide. Some setups can work in tighter rooms, but the safest path is to evaluate the actual usable envelope, not just the drywall-to-drywall dimensions.
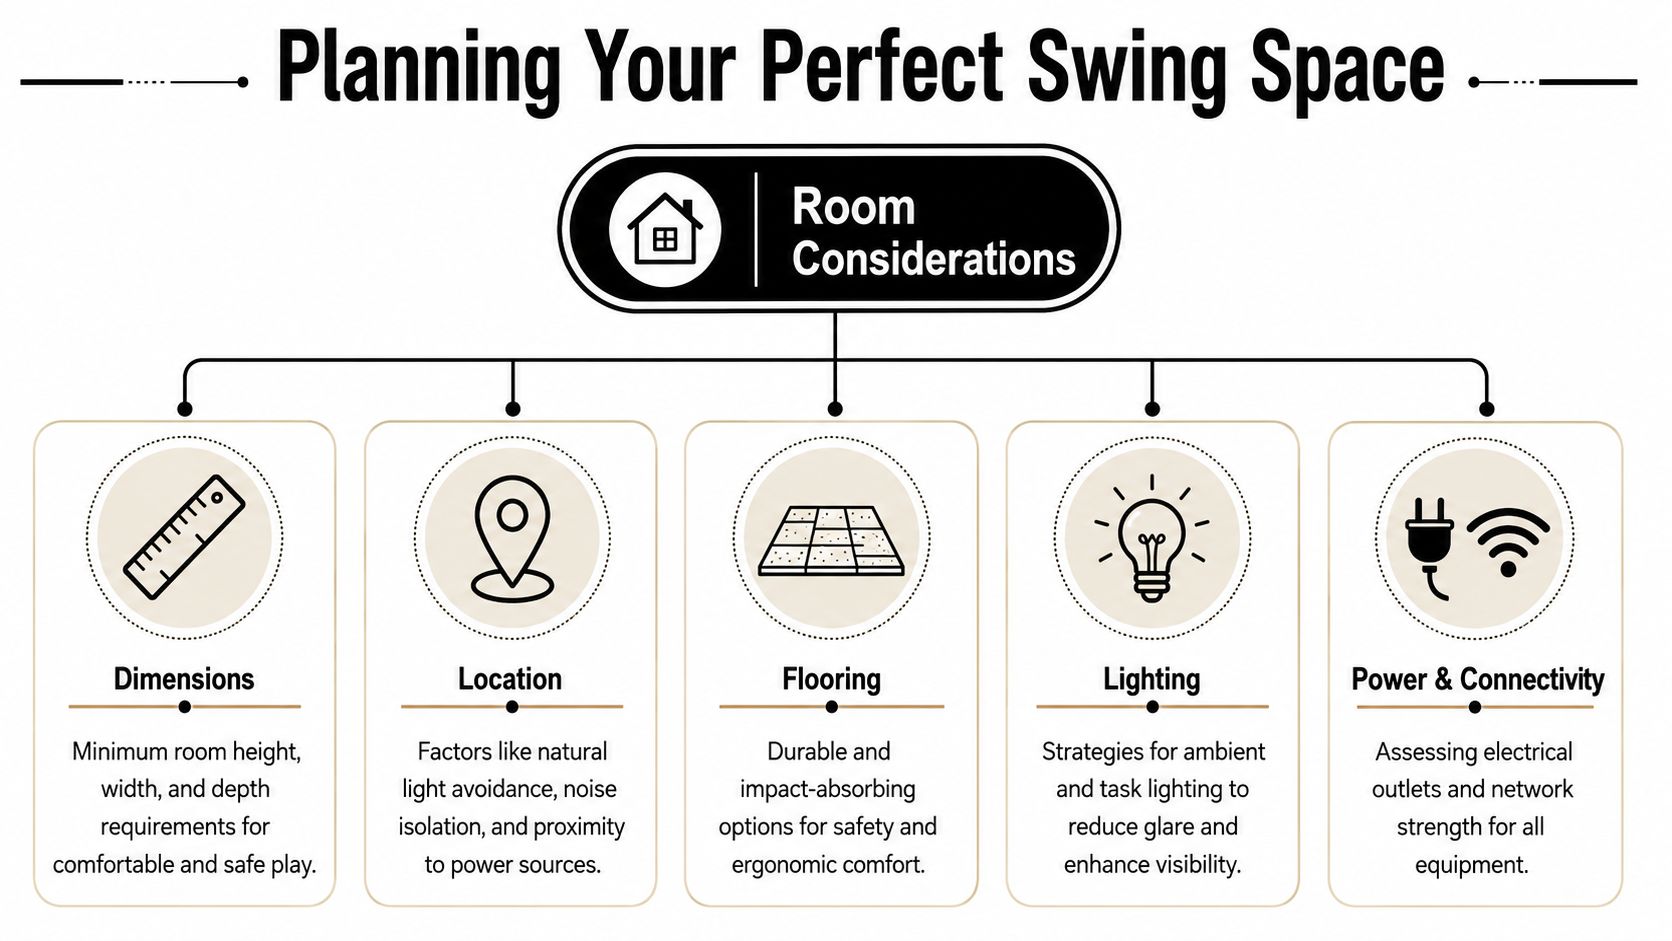
Ceiling height is where many projects fail early. A room can technically meet the height target and still feel wrong if a soffit, duct, beam, garage door track, or light fixture drops into the swing path. Width matters for centered stance and comfort. Depth matters for the golfer, the screen, the projector, and the walking space behind the player.
Before you compare launch monitors or projector models, sketch the room. Mark every obstruction. Include doors, windows, stairs, support posts, and anything mounted to the ceiling.
A clean planning process usually looks like this:
Practical rule: If the room only works when you ignore a beam, a low can light, or the arc of the club, it doesn't work.
Basements are often the strongest option because they usually offer controlled light and easier cable concealment. Garages are tempting because they feel spacious, but the finish level has to rise substantially if you want a refined result. Bonus rooms can become beautiful simulator spaces, especially when they're tied into whole-home AV, but sloped ceilings and knee walls can complicate both screen placement and projector alignment.
If you're weighing options, it helps to compare your room against dedicated golf simulator space requirements before any equipment order goes in.
A room that merely “fits a swing” isn't the same as a room that's enjoyable. Homeowners usually want space to step in and out, set down clubs, and avoid the cramped feeling that kills the premium experience. If left- and right-handed players will share the room, layout tolerance matters even more.
This is also where aesthetics start. High-end simulator rooms don't happen by accident. They look clean because the room was selected with screen wall symmetry, hidden wiring paths, lighting control, and equipment placement in mind from day one.
A simulator room can clear the club and still fail in daily use. The problems usually show up after install day. The screen rebounds too hard, the projector washout is worse than expected, the room gets stuffy after twenty minutes, or the finish materials start showing ball marks in all the wrong places.
That is why room prep deserves the same attention as the launch monitor and projector. In the Madison and Milwaukee area, we see this most often in finished basements and bonus rooms where the homeowner wants the simulator to feel fully integrated with the rest of the house, not like a practice cage dropped into an empty room.
The screen wall needs space to flex, and the surrounding surfaces need to handle misses. Hard trim, sharp corners, uncovered soffits, and glossy paint all create problems. Balls ricochet unpredictably, and even light mishits can scar a room quickly. A better approach uses padded wall treatments, dark low-sheen finishes near the screen, and details that hide wear instead of highlighting it.
Floor prep matters just as much. A premium mat on an uneven slab still feels wrong underfoot, and that inconsistency shows up in stance, strike quality, and comfort over longer sessions. If the floor is out of level, correct it before the hitting surface goes down. That is a small detail that separates a simulator you tolerate from one you use several times a week.
A lot of lower-level simulator projects are also part of a broader entertainment build. If the room may share design cues with a theater or media space, it helps to study how builders approach creating a high-end home cinema, especially the finish decisions around lighting, sound control, and concealed infrastructure.
Projectors perform best when the room lighting is intentional. That means less direct spill on the screen, fewer reflective surfaces in the hitting zone, and fixtures placed where they do not interfere with the swing or the image. Recessed cans directly above the player are a common mistake. So are bright wall sconces near the screen wall. Both make the room harder to use and harder to calibrate.
Sound deserves the same planning. Club strike, ball impact, and enclosure noise can make a finished room sound sharp and busy if every surface is hard. Acoustic panels, padded wall sections, carpet outside the hitting zone, and insulated partitions all help. In a smart home project, this matters even more because simulator rooms are often next to a theater, family room, office, or guest space.
Short version. If the room sounds harsh when you clap, it will sound worse once balls start flying.
Heat buildup gets ignored in DIY installs. It should not. Projectors, gaming PCs, network gear, amplifiers, and people all add heat, and enclosed bays can trap it fast. Basements have their own version of the same problem because they may feel cool at first but still suffer from stale air and poor circulation during longer sessions.
We plan simulator rooms the same way we plan other high-performance AV spaces. Get supply and return air right. Leave access for the projector, the PC, and any mounted sensors. Keep a path for future service so a lamp change, hardware upgrade, or cable replacement does not turn into drywall work.
That service mindset is one of the biggest differences between a room that looks finished and one that stays easy to own.
Projector location, screen wall construction, outlet placement, and low-voltage routes should be settled before the finish carpentry is complete. Drywalling first and figuring out mounts later usually leads to visible wire raceways, awkward projector placement, or access panels in the wrong spot. In higher-end homes, those compromises stand out.
The cleanest rooms hide power, network, HDMI or fiber runs, control wiring, and any future expansion path inside the structure from day one. That is especially important if the simulator will tie into centralized AV, whole-home automation, or a dedicated rack elsewhere in the house. Homeowners often start with simulator use only, then add distributed audio, motorized shades, scene lighting, and surveillance coverage later. The room should be ready for that.
For examples of layouts that balance performance with a polished finish, these golf simulator room design ideas show the kind of planning that keeps sightlines, safety, and aesthetics aligned.
The equipment list looks simple until the parts have to work together in a finished room. A launch monitor may need a different hitting position than the projector prefers. The screen material that looks great on a spec sheet may behave poorly once audio, lighting, and image brightness are part of the same design. In the Madison and Milwaukee projects we see at Home AV Pros, the cleanest results come from choosing the system as a package, not as six separate purchases.
A typical build revolves around the launch monitor, simulator PC, projector or display, impact screen, enclosure or built-in screen wall, and hitting surface. Start with the pieces that impose the biggest constraints, then match the rest to them. That order prevents expensive rework.
Launch monitor selection affects room layout, ceiling strategy, and how visible the technology will be once the room is finished. Camera-based systems usually fit dedicated residential rooms more cleanly because they can mount overhead or sit close to the player without requiring a long read zone behind the ball. Radar-based units can perform very well, but they ask for more depth and stricter alignment.
That difference matters in high-end homes where the simulator also has to look intentional. If the room is narrow, overhead camera systems often give you more freedom with walkways and furniture placement. If the room is deep and the client wants a specific data set or brand ecosystem, radar may still be the right call.
Homeowners comparing package types and sensor categories can start with this guide to the best golf simulator for home, which breaks the options down by room fit and use case rather than marketing claims.
For a true simulator room, projection usually wins. It fills the impact screen, keeps ball flight visually connected to the image, and lets the room serve as a golf space first instead of a practice bay with a TV on the wall.
A large flat panel still has a place. It works well in compact training setups where the goal is swing data, club gapping, or occasional use. It also avoids projector mounting constraints. The trade-off is experience. The room feels more like a tech station than a finished simulator environment.
Projector selection needs to be tied to the exact screen size, throw ratio, ceiling height, and mounting method. Lens offset and service access matter as much as raw brightness. If you are sorting out finished-ceiling constraints before committing to a mount location, this Vancouver projector ceiling guide is a useful reference from the installation side.
Impact screen choice changes more than the picture. It affects noise, ball rebound, perceived image sharpness, and how the front wall looks when the system is off. A premium room usually benefits from a built-in screen wall with trimmed edges, concealed fasteners, and finishes that match the rest of the home. A modular enclosure can still be the right answer in a garage or multi-use space where flexibility matters more than architectural detail.
The trade-off is straightforward:
| Option | Works well when | Watch for |
|---|---|---|
| Modular enclosure | The room is shared, transitional, or likely to change later | More visible framing, exposed hardware, less integrated lighting and trim |
| Built-in screen wall | The room is dedicated and finish quality matters | More coordination with framing, acoustics, projector alignment, and service access |
The mat and stance area shape how the room feels every time someone uses it. Cheap turf can create joint fatigue, inconsistent club interaction, and a visible mismatch against an otherwise polished build. In dedicated installations, the better approach is a stance platform or inset hitting strip that sits flush, looks intentional, and can be replaced without tearing apart the floor assembly.
The right equipment stack fits the room, supports the software you plan to run, and stays serviceable after the finish work is complete. That is what separates a simulator that looks impressive on day one from one that still feels right after a full season of use.
A golf simulator can be a cool room. It becomes a polished living experience when it's integrated into the rest of the house.
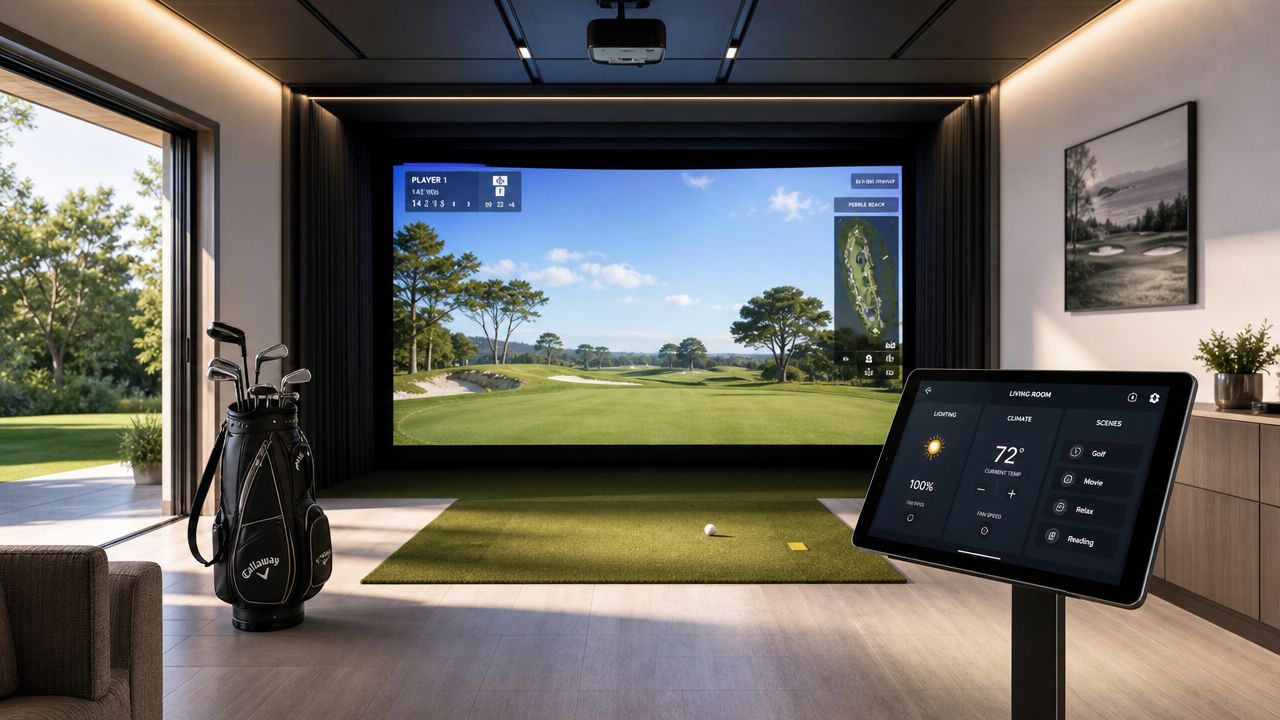
In higher-end homes, people don't want a stack of remotes, a visible tangle of gear, and a startup routine that feels like operating a conference room. They want one tap, one voice command, or one scene that makes the room respond correctly. That's where automation platforms and good AV design change the value of the simulator.
The easiest way to tell whether a simulator was integrated well is the startup experience. If someone has to manually power the projector, change an input, launch software, dim lights one zone at a time, and adjust audio separately, the room won't get used as often as it should.
A better approach is a scene-based workflow:
That's where platforms like Josh.ai and Lutron fit naturally. Josh.ai gives you intuitive voice control without making the room feel gimmicky. Lutron handles the lighting layers that matter in simulator spaces, especially where you need usable brightness without screen glare or camera interference.
For homeowners thinking beyond a single room, these kinds of smart home services matter because the simulator shouldn't feel isolated from the rest of the property.
A simulator room often becomes one of the most flexible rooms in the house. With the right design, it can shift from practice bay to movie night without compromise. Sonos makes distributed audio easy to live with, especially if you want the room tied into whole-home music. Kaleidescape makes more sense when the room is also expected to perform like a true cinema environment, with cleaner source handling and a premium movie experience.
Home AV Pros handles golf simulator integration along with custom home theater, new home builds, home audio solutions, outdoor lighting and sound, and selected commercial projects such as restaurants, but the design priorities here are firmly residential: simplicity, concealment, room feel, and daily usability.
Here's a useful visual on connected-room thinking in action:
Simulator rooms increasingly rely on software updates, online features, control apps, streaming content, and in some cases added cameras or monitoring devices inside the room. A weak network can make a premium install feel cheap.
That's why strong structured networking matters. Ubiquiti is a common fit in homes where the owner wants dependable Wi-Fi, hardwired AV gear, camera coverage, and cleaner network management under one ecosystem. In practical terms, that means fewer dropouts during updates, smoother control response, and better support for a room with multiple connected devices.
A well-designed simulator room shouldn't feel disconnected from the rest of the property. Exterior arrival lighting, pathway scenes, and backyard entertaining zones can all be tied into the same control logic. Oelo lighting is especially useful when homeowners want permanent outdoor lighting that blends into broader automation scenes rather than acting like a separate gadget.
A premium simulator room doesn't start when the software launches. It starts when the house responds correctly the moment you decide to use it.
Most homeowners notice the screen, projector, and launch monitor first. Installers notice the infrastructure. That's because hidden mistakes are what cause visible frustration later.
A polished simulator room needs power where the equipment lives, low-voltage pathways that don't leave cables exposed, and a network plan that supports control, updates, streaming, and reliability. If those pieces are improvised, the room usually ends up with surface raceways, extension cords where they shouldn't be, and service headaches that could have been avoided.
The ideal time to run power and signal wiring is before the room is fully finished. That allows clean ceiling locations for the projector, proper placement for any control hardware, and neat service loops where equipment may need future adjustment.
For networking, hardwired connections are usually the better choice for stationary gear. Wi-Fi is fine for some devices, but the projector source, control backbone, and any always-on AV components benefit from stable wired connectivity. That's even more important in a smart home where the room may also tie into lighting control, whole-home audio, surveillance, and centralized management.
Flooring work is another point where DIY confidence can outrun results. If your project includes subfloor correction, finish flooring changes, or transitions that affect the hitting area, the logic is similar to what tradespeople describe when discussing hiring floor experts. The visible surface is only as good as the prep and technique underneath it.
Some homeowners can absolutely handle parts of a simulator build. Others should stop at room planning and bring in specialists for the technical finish work. The key is being honest about where the risk lives.
| Task | DIY Considerations | Professional Advantage |
|---|---|---|
| Room measurement and layout | Possible if you're disciplined about scaled drawings and obstruction mapping | Better at spotting swing, projector, and finish conflicts early |
| Screen and enclosure assembly | Manageable for straightforward kits | Cleaner fit, better alignment, fewer safety compromises |
| Projector mounting | Requires solid structural anchoring and exact placement | More precise placement, cleaner cable concealment, less image drift |
| Power planning | Easy to underestimate outlet locations and load coordination | Cleaner electrical plan and better coordination with the room design |
| Network integration | Basic setups are possible, but reliability can suffer | Better performance for control, updates, and connected-room features |
| Automation programming | Often fragmented across apps and remotes | Unified control for lighting, audio, video, and startup scenes |
| Final finish quality | Depends heavily on patience and trim/detail skill | Better visual consistency with the rest of the home |
If the room is dedicated, newly built, or expected to match the finish quality of the rest of the house, professional integration usually pays off in cleaner execution. That's especially true in the Madison to Milwaukee corridor, where many projects involve existing basements, garages, and bonus rooms that need both AV planning and finish coordination.
A professional integrator also helps when the room is part of a broader home project. New home builds, remodels, theater spaces, distributed audio, outdoor lighting, and security systems all intersect with low-voltage planning. A simulator room shouldn't be designed in isolation if the rest of the home is being wired or upgraded at the same time.
Installation isn't complete when the hardware is mounted. It's complete when the image lands correctly, the launch monitor reads consistently, the control flow feels predictable, and the room stays that way after repeated use.
The most reliable workflow is to install in sequence: frame first, screen second, mat third, then projector, launch monitor, and software. After setup, use projector alignment tools and validate the launch monitor with 10 to 15 test shots against known carry distances before regular play, as outlined in Treasure Valley Solutions' installation and calibration guide.
Each step affects the next one. If the screen tension changes after the projector is aligned, the image fit may drift. If the mat moves after the launch monitor is positioned, tracking can become inconsistent. Installers work in sequence because stable geometry produces stable calibration.

A dependable finishing process usually includes:
Don't chase software fixes for a hardware alignment problem. Get the physical geometry right first.
Once the system powers on cleanly, test it with intent. Hit a controlled series of shots you understand well. You're not trying to impress anyone. You're checking whether carry readings, start direction, and general behavior feel believable and repeatable.
A good testing session looks for patterns:
Most simulator rooms don't need constant attention, but they do benefit from routine checks. Screens loosen. Mats wear. Mounts can shift slightly over time. Projector filters and lenses need periodic care based on the hardware you choose.
A practical maintenance rhythm includes:
The final polish is what separates a collection of components from a room you trust every time you walk into it.
A well-executed Home AV Pros simulator project starts with the room, then carries through wiring, calibration, lighting, networking, and control so the space feels integrated with the rest of the home. If you're planning a home golf simulator installation in southern Wisconsin or nearby northern Illinois, the most useful first step is a real room evaluation. That makes it easier to decide what fits, what should be built in, and how to make the room perform like a finished part of the house instead of a standalone gadget zone.

Copyright © 2026. Home AV pros. All rights reserved.